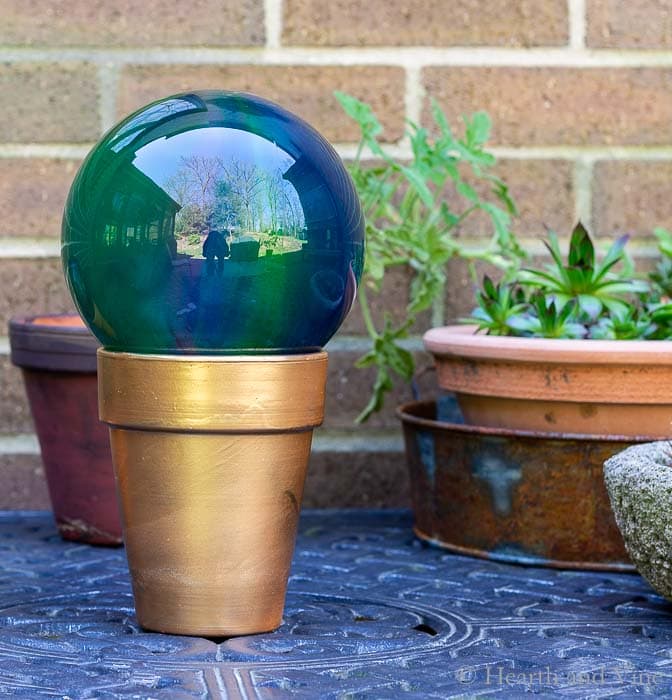
These gazing balls, perfect for gift giving, are super easy to create and can be used in the garden or as a tabletop decoration.
Today I'm going to show you how to make a simple gazing ball with Mod Podge, neon food coloring, a clear plastic light fixture, and a dollar store vase.
Gazing balls were all the rage when I first started gardening, and when I started blogging I noticed a ton of DIY gazing balls. You may have seen them too. You know the ones made from bowling balls or light fixtures with marbles or gems glued all over. They are all so beautiful.
Be the first to receive new posts and get access to our Subscribers Only Page.
This post contains some affiliate links (that means if you make a purchase after clicking a link, there’s no additional cost to you, but I will earn a very small commission. ) i.e. as an Amazon Associate, I earn from qualifying purchases. Click here to read my full disclosure policy.
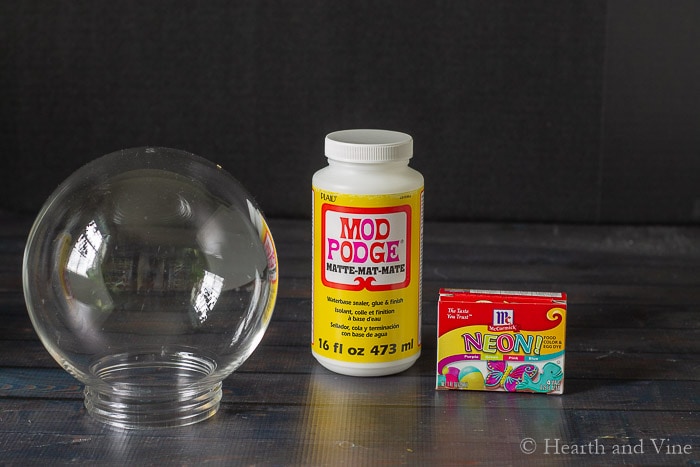
Supplies
Globe fixture
Mod podge
Neon Food Coloring
Clay pot
Gold Spray Paint (optional)
Update: I've had the two gazing balls on my uncovered porch for a few months and they still looked great. However, when I placed them in the garden the smaller glass vase did start to melt a little and parts of it were white. The larger plastic version seems okay but maybe a little faded. I suggest that you place it in a shady part of your garden.
A reader offers the following:
"They work great with acrylic paint and PVA glue. I've had mine in full sun for over a year and they still look as good as new. Put them on top of 50p solar lights and they still light up regardless of the paint covering them." ~ Andrea
More reader suggestions are in the comments section at the end of this post.
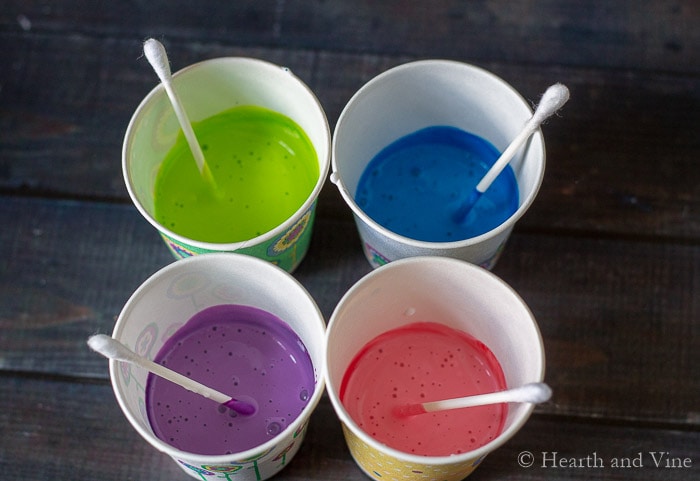
Start by mixing some of the Mod Podge and food coloring together in small cups. I stayed with the four colors that came in the box. However, they also have ratios for mixing even more colors from the original four. Use several drops of food coloring to get the color you like.
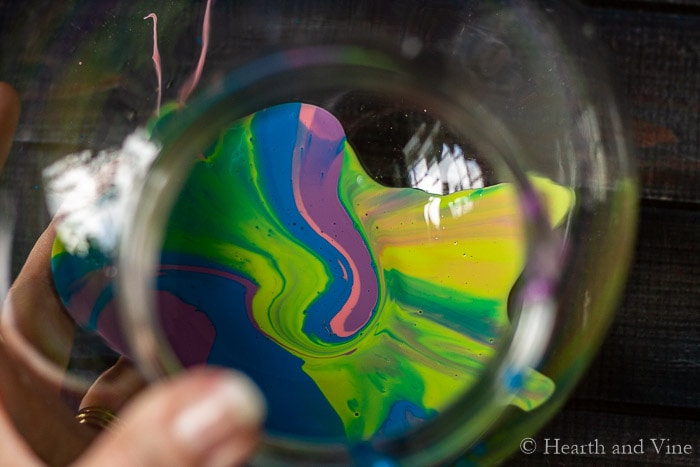
Pour a little of each into the bottom of the ball and swirl them around.
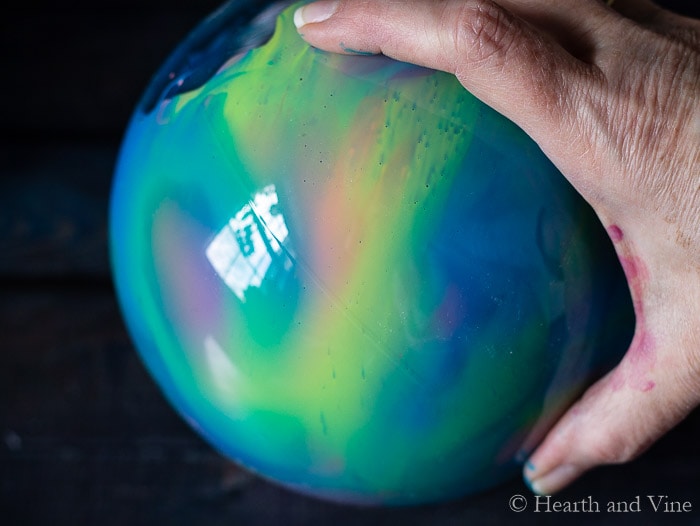
Continue rolling the ball around, allowing the entire ball to be coated with the mixture. Add more of the colored glue mixture if needed.
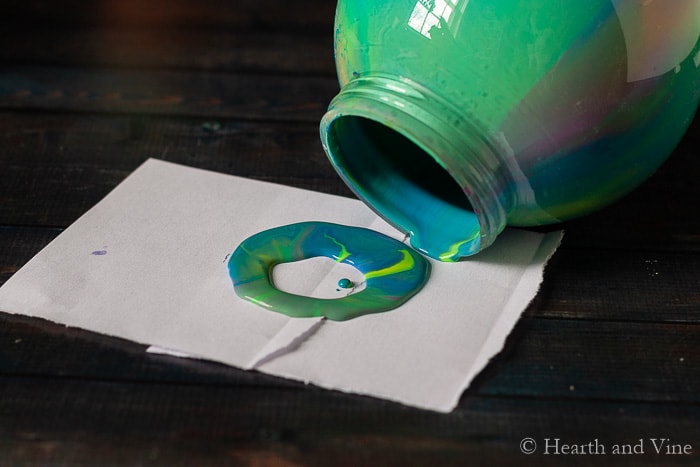
Once it is coated place it on some paper and allow excess paint to drip out onto the paper.
Here's what they look like while the Mod Podge is still wet. They look so pretty that I'm thinking about trying this with a white base next time. Maybe some white craft paint, or leftover house paint.
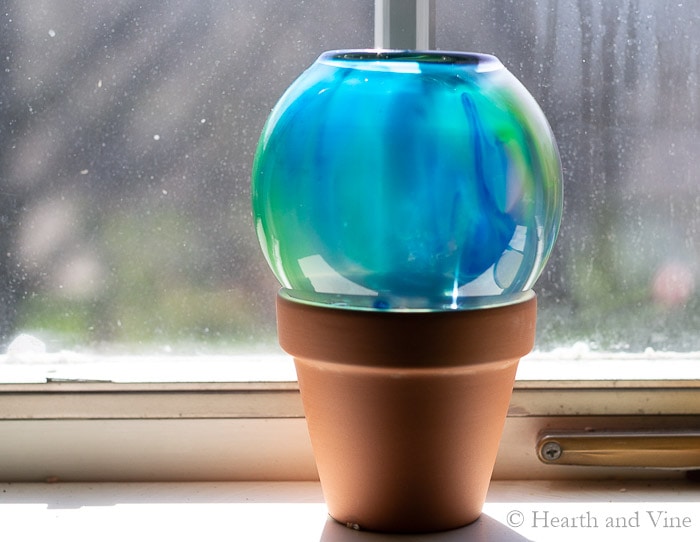
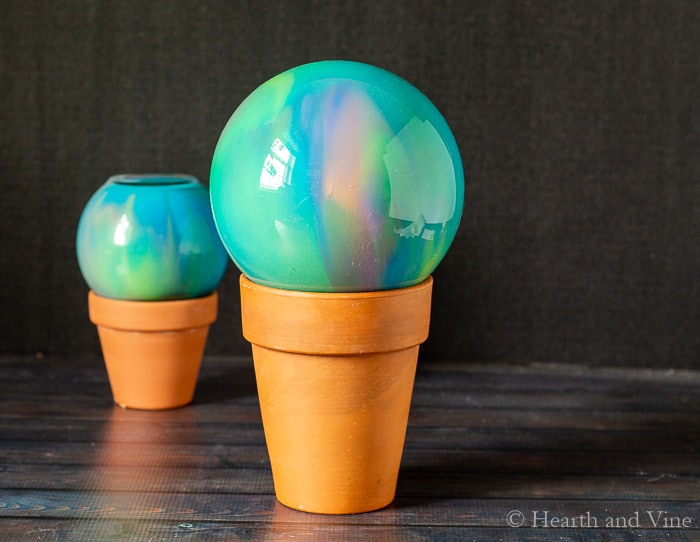
Here's what it looked like the next day. This particular one is a little glass vase from the dollar store. It's cute but has a flat top which is why I decided to buy the vinyl light fixture online for a true ball-like effect.
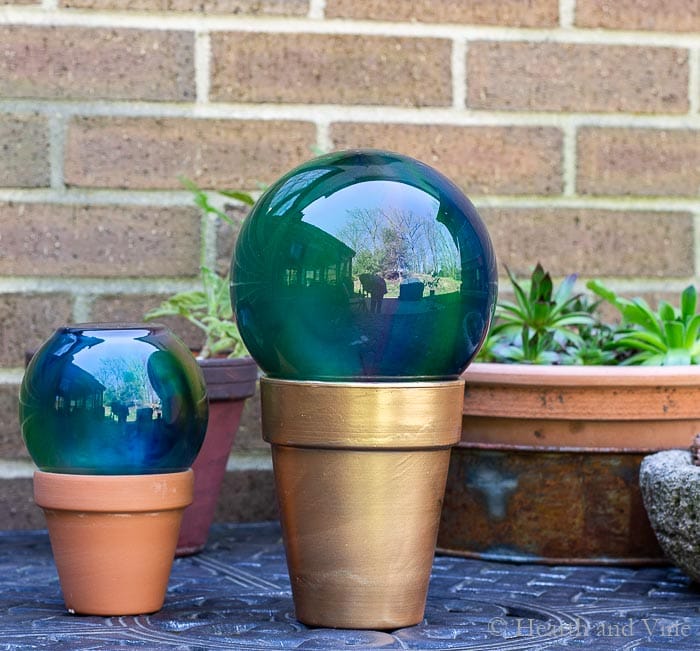
They fit nicely on clay pots. My daughter suggested that I spray paint one of them gold. Good idea, huh?
Now I need to find the perfect spot in the garden, or maybe I'll just keep them out as a cool tabletop decoration.

More Garden Art Ideas

Gazing Balls
Equipment
- paper cups
- Q-tips to stir glaze
Materials
- Globe fixture
- Mod podge
- Neon Food Coloring
- Clay pot
- Gold Spray Paint optional
Instructions
- Fill some small cups with Mod Podge and add a few drops of food coloring to each one. Mix well.
- Pour a little of each cup into the globe and swirl it around.
- Continue rolling the ball around, allowing the entire ball to be coated with the mixture.
- Add more of the colored glue mixture if needed.
- Once it is coated place it on some paper and allow excess paint to drip out onto the paper.
- Let it dry for several hours or overnight.
- Place the globe on a clay pot.
- Consider spray painting the pot gold first.
Notes
wanda
has anyone tried the globe with a milk glass yet?
Kathleen
I tried to make one of the gazing balls. I could only find the neon food coloring in gels. When I finished coloring the inside of the globe, I let it dry for several days then glued the ball on a terra cotta planter and set it in my garden, which is on the sunny side of my house. The next day the modge podge and food coloring had all melted into the planter. I read the suggestions about using the acrylic paint instead of food coloring. I'm going to try that and see if it holds up any better.
Patti Estep
Kathleen, yes that is a problem. I've kept mine on the porch but I'm glad you're trying with some of the reader's suggestions. It really hard to keep any kind of paint from fading in the bright sun.
Erica Smith
Hey Patti I did this one year with food coloring & mod podge on a mason jar. After a few meltings I tried the acrylic paint and it stays put! The food coloring will stay if you seal it inside with a poly acrylic spray so then it can't melt. I actually sprayed a light layer 1st, used the glue with PVA & food coloring, let it dry then sprayed a good coating of clear poly or clear spray paint. Hope this helps others! Oooh & I also recycle clear round glass light fixtures the same way! Just make sure you secure them to your holder so the wind doesn't knock them out! They're beautiful with fairy lights inside at night!
Blessings, Erica
Patti Estep
Erica, those are great tips. Thanks for sharing!
Jenn
Maybe one of the clear coat spray paint brands with UV protection and non-yellowing features? I personally prefer the Rust-Oleum Brand over Krylon due mainly to do with mixability, the nozzle that is used, etc. They do come in a matte coat, satin coat and a gloss coat.
Just a quick thought?
Jana
She also said you might want to put it in a shady place. I miss stuff or don't read everything before I respond to a post so if you read it again you'll see it. Have fun! 👍
Judy Durkalski
Where did you get the clear globes?
Patti Estep
Judy, I bought the little one at the dollar store and the larger one from Amazon. There is a link in the post to the larger one under the supply list.
Sara
What is the glue to paint ratio?
Patti Estep
Sara, you just need enough drops of food coloring to color the glue. It's really up to you. If you are using paint I'd guess a 2 to 1 ratio of glue to paint would be good. Maybe even less but I haven't tried it.
Vivi
I check Goodwill, yard sales and state sales for the essential materials(globs, bowling balls, clay pots, etc that’s the cheapest way).
Patti Estep
Thanks Vivi. That's a good suggestion.
Natalie
Hey I love thses!!! I'm wondering if glow paint would work like someone mentioned... Anyone try anything new? Patti have you tried this with outdoor mod podge? Just feel like I've seen that at Michael's. Thanks for another great project!!
Patti Estep
Natalie, I have not tried it, but I think it's definitely worth a try. Let me know how it turns out.
Randy
Patti the comment your reader Andrea made regarding acrylic paint & ova glue. Do you know what that ova stands for? Just curious! Thank you!
Patti Estep
Randy I think they meant PVA glue.
B.J
Yes. Hello auto-correct.
linda
I made one like yours years ago just using acrylic paints. I had made Christmas balls and thought it would look good as a larger one for the yard. I LOVE your idea so now I MUST copy it and make another ball.
Patti Estep
Linda, they were fun, cheap and easy to make. Unfortunately, they do tend to fade in the sun. I also tried using alcohol inks and I'm watching to see how they fare in the sun.
Caprize Segall
Try coating the outside with a OUTDOOR clear spray. Varathane now sells a outdoor in a spray can. Worth a shot. I make birdhouses...anything I spray with outdoor anything always holds up to the sun. They are making huge strides in non yellowing sealers 🙂
Patti Estep
Good to know. Thanks for sharing Caprize!
Dawn Kessenich
I wonder about if there’s a mirror spray paint ( like silver).That can be used? Is there mirror silver spray or paint??? I would love that for reflection around the garden. 😀
Patti Estep
Dawn, They do make mirrored spray paint. That's a good idea. I don't know how well it would hold up to the elements but I think it would be worth a try.
Teresa
Krylon makes one.
Patti Estep
Thanks Teresa!
Bre
oh I love this idea.. I am looking it up now!
Pixie
I love your gazing balls, what a great idea!!!! I an going to try and make one to put on my table for under my big oak tree in the back yard😊. I was thinking, why couldn't you use a glow stick to light them up with? No heat to meat the food coloring and it might give a nice glow ☺. Thanks for a great idea 🤗
Patti Estep
I'm so glad you like it Pixie and I think the glue stick is worth a try. I did mention that the sun seemed to fade and almost melt the little glass one. However, I had them on a shady porch for most of the summer and they were fine. I hope to try it again with craft paints to see if that's a more sustainable medium.
Donna Townley
What portions do you use
Patti Estep
Donna, if you mean the amount of the the Mod Podge, you actually need very little. The color portions is really up to you. I just used a little bit of each color and started swirling.
Jill Phillips
I was very excited about making my gazing ball, but unfortunately, it did not work out for me.
When trying to purchase the neon coloring, it seems that they only sell 'gel' coloring these days, so the associate assured me that I should dilute first to make sure that it mixed with the modgepodge correctly, this mixture ended up way too runny and after putting into the fish bowl, it more or less came out over the next couple hours. Second attempt seemed to work better, the consistency was certainly better and thicker, however, after four days of having upside down on my kitchen countertop, it seemed not to want to dry out? I kept changing the paper underneath for new, and while I did this, I turned the fish bowl up the correct way, but it seemed that when I did this, the modgepodge seemed to want to run back into the bowl, so for some reason, definitely not wanting to dry, and if the reason behind this was because there was too much modgepodge in the fish bowl in the first place, then I would have thought when it was turned upside down for four days, that this would have come out enough that we would end up drying out? Eventually I decided to put out on my front porch on top of a garden pot. I thought that maybe the upside down pot with its holes in was what was needed, the air could then circulate into the fish bowl and it would dry out this way. After a couple days, it seemed that the fish bowl did clear, but that was only because the modgepodge almost melted in its entirety and all came out? The weather outside was a little warmer than my kitchen, which might have been a factor, but if ultimately it was going to go into the garden anyway, this would have happened at some point anyway. Any pointers on what I might have done wrong would be greatly appreciated. I have so longed for a gazing ball and making one yourself is way more exciting than to go and buy like most people. Thank you.
Patti Estep
Sorry you are having so much trouble Jill. I've had my gazing balls on the patio table and they are doing fine. I'll move them to the garden to see if that makes any difference. In the meantime, one thought I had was to use regular paints. They even sell patio paint in the craft store that is supposed to be good for outside. I have seen people make vases using paint with this swirling method. Maybe it would work better for you. They are probably used indoors, but think of all the painted rocks you see. They are made for the outdoors.
Andrea
They work great with acrylic paint and pva glue. I've had mine in full sun for over a year and they still look as good as new. Put them on top of 50p solar lights and they still light up regardless of the paint covering them
Patti Estep
That's great to hear Andrea. Thanks for sharing!
liz rowe
would i follow the same instructions but using acrylic paint and can i still use modge podge
Patti Estep
Liz, I haven't tried it but you should be able to use acrylic paint with mod podge.
Sandy
Love This! It's just what I have been looking for. How has the modge podge held up to the summer heat outside?
Patti Estep
Sandy, so far they have held up well. However, I've had them on our patio which does get sun but not as much as the garden. I'll try moving them to see how they do.
Michelle Marine
I'm just going to admit that I have never heard of gazing balls, Patti! 😀 What a cute project though! I think I may have to do this with my kiddos this summer. Looks like a fun way to keep them entertained and productive for a while!
Stefanie W.
Add some glow powder or non color glow paint. I'm gonna try to make them glow
Patti Estep
Great idea Stephanie!
Diana
I love them! I wanna make a bunch!! I think our humidity would keep the glue gooey, so I'm thinking about closing it up. Maybe glue on a re-purposed plastic lid with silicone or waterproof glue. Would this cause any issues I'm not considering?
Patti Estep
I'm so glad you like it Diana. You should probably make a test sample first before investing in several. You could try shopping at your local thrift store to see if you can find any fixtures to play with. You could also check online with the manufacturer (Mod Podge) to see if they have any suggestions. Let me know how it goes.
Julie Briones
So lovely! What a perfectly easy and beautiful DIY, Patti! You could actually put a smaller vase in the one, and it would make a lovely 'gazing ball planter'!
Patti Estep
Thanks Julie. That's an interesting idea!
Jami
What a clever idea, Patti - you could also repurpose light fixtures from thrift stores, though they'd mostly be glass. Love this!
Irishrose
To distract from the flat area I would mount a small bird, bunny or other animal, either painted plastic or ceramic. I think that could look adorable! Thanks for the gazing ball ideas. Can't wait to try this out....
Patti Estep
That is a genius idea! I have the perfect little bird for this. Thanks for sharing.
Diane Williams
What a beautiful result! Perfect garden art project. That gold pot! Great ideas for pretty affordable garden art. Bet it will look lovely on a patio or tucked into foilage.
Patti Estep
Thanks Diane. I love your foliage idea, and I'm definitely going to try that soon.
Shelly
Patti, these turned out so nice. I love the swirling effect. So pretty and easy to do too. For lights maybe a small string of led battery powered lights that don't get hot?
Patti Estep
Thanks Shelly. Lights that don't get hot may work. I'd keep an eye on them though. 🙂
Valerie Abrams Forman
Shelly,how about Fairy lights? you can get waterproof at Walmart! $3.89 I have them everywhere in my garden 6-8 hours and you set them and they go on and off by themselves . You would just place your gazing ball over them. They are in a small case that you set with your batteries in it.
Linda Egan
I wonder what they would look like with a string of lights in them or possibly some kind of candle light.......
Patti Estep
That's a fun idea Linda. I'd worry about the heat but maybe one of those electric tea light candles would work. It would be pretty at night.