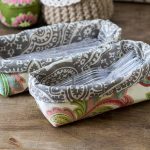
Fabric Caddy/Bin Tutorial
Learn how to make a pretty fabric caddy using fabric of your choice. These little bins can be used for so many things!
Yield: 1 Fabric Caddy
Cost: $10
Equipment
- Iron
Materials
- 1/2 yd - each two coordinating fabrics
- 1/2 yd of mid-weight fusible interfacing
- Coordinating thread
Instructions
- Cut one 11 inch by 13 inch rectangle from each fabric and one from the fusible interfacing.
- Iron the interfacing onto the outside fabric.
- With right sides together, fold the fabric in half and sew the sides.
- Open and place one of the side seams against the bottom line to create a point.
- Mark a dot from the tip of the corner to 1/2 the total width desired.
- Draw a line at the dot with a ruler to make sure the distance equals your desired width.
- Sew along the line and then cut off the corner.
- Turn right side out.
- Complete the same steps for the outside fabric.
- Set the outside fabric with the interfacing inside the lining fabric bin.
- Make sure the right sides are facing, the wrong side of the liner is on the outside, and the interfacing is on the inside.
- Match side seams and edges and pin together.
- Leaving a 2-3 inch opening, sew the top edges together.
- Turn the fabrics right side out and pin the opening closed.
- Top stitch along the edge.
- Fold over edge about one inch and your fabric caddy is complete.
Tried this project?Tag @hearthnvine on Instagram