DIY Dried Orange Garland for Your Holiday Decor
This tutorial will show you how to make a dried orange garland. Made with bay leaves, and cinnamon sticks that make a beautiful statement in your fall, Christmas, and winter decor.
Yield: 1
Cost: $25
Equipment
- Drill (optional)
- Large needle (embroidery or yarn)
Materials
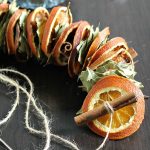
- Dried Oranges see below how for to dry your own
- Whole Bay Leaves
- Cinnamon Sticks 2.75 Cut, 1 lb
- Twine
Instructions
- Dry oranges. Start by slicing oranges about 1/4 inch thick, blotting excess moisture with paper towels, and place them straight on the oven rack or baking rack.
- Bake at 200 degrees (F) for about 4 hours, turning every hour or so. I made them in two batches in the evening and after 4 hours turned off the oven and let them sit there overnight.
- Gather your bay leaves in a bowl. Weed through them to find the best whole large leaves.
- Drill a small hole in the middle of the cinnamon sticks. You can also just wind the cinnamon sticks around the twine as you go.
- Next, string them all together using a large embroidery needle, a paper clip, or even a piece of wire.
- Create any pattern you want. This one starts with a cinnamon stick, then an orange slice. Followed by 8 bay leaves, another orange slice, 8 more bay leaves, a final orange slice
- Repeat until you reach your desired length.
Notes
I used a sharp knife but you could also use a mandoline slicer.
If you don't like the idea of placing oranges directly on your oven rack you could use a baking sheet lined with parchment paper or a wire rack. You could also buy dried orange slices to save time.
Pack the garland in an airtight container and it will keep this garland for years. The oranges may darken some after a while but it still looks pretty.
Tried this project?Tag @hearthnvine on Instagram