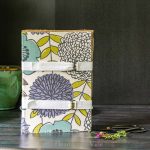
Flower Press DIY For Travel
Collect beautiful plant specimens wherever you go with this DIY flower press.
Yield: 1 Flower Press
Cost: $25
Equipment
Materials
- 2 Basswood pieces for the cover - approx. 8 x 12 inches
- 8 sheets of corrugated cardboard
- 14 or more sheets of newsprint or blotter paper
- fabric to cover the outside approx. 12 inches x 24 inches
- 2 - 24 inch lengths of cotton twill tape
- 2 - 1 inch D rings
- 2 - 3.5 inch lengths of 3/4 inch velcro
Instructions
- Place fabric on the cover, centering the pattern where you like best.
- Cut and tear the excess off leaving an inch or so.
- Glue the fabric to the wood.
- Place some Mod Podge on the wood first.
- Apply an additional layer of glue on top.
- Place the cardboard sheets with two pieces of newsprint in between each layer, between the wooden cover pieces.
- Wrap the fabric around the entire piece.
- Glue the back the same way you glued the front.
- Attach the D rings to the straps with glue.
- Position the straps around the book.
- Add the velcro strips.
- Glue the straps to the spine using fabric glue.
Notes
You can also use plywood for your pieces of wood to create the cover.
The easiest flowers to press are naturally flat blooms such as single-petal roses, daisies, violets, Queen Anne’s lace, or pansies. Ferns and herbs are also a great choice.
Large flowers and bulky flowers such as carnations take forever to press and often don't look good pressed.
Tried this project?Tag @hearthnvine on Instagram