Beeswax Food Wraps DIY
This beeswax wrap DIY tutorial is easy to create and perfect for keeping food fresh and will help reduce your plastic use.
Yield: 3
Cost: $10
Equipment
- Paintbrush
- Old pot
- Empty plastic container or metal can
- Plastic spoon or knife, wooden skewer for stirring
- pinking shears
- Iron
- pencil
Materials
- 1/2 cup beeswax pellets
- 3 tablespoons ground pine resin
- 1 tablespoon jojoba oil
- Cotton fabric thin
- Parchment paper
Instructions
- Measure two inches from the rim of each bowl and mark for cutting.
- Cut out the fabric with pinking shear to avoid fraying edges.
- Measure beeswax, resin, and jojoba oil into a small plastic container or clean can.
- Melt the mix in an old pot or double boiler with simmering water on the stove.
- Place your fabric on some parchment paper on a covered work area.
- Brush the wax mixture all over the fabric.
- Cover the fabric with another piece of parchment and use an iron to evenly melt and disburse the wax all over and through to the other side.
- Remove the parchment and lift up the fabric. It will begin to dry immediately.
- Hang with close pins or lay on a drying rack.
- Repeat with the other pieces of fabric.
Notes
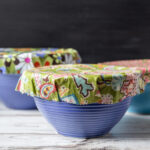
The beeswax wraps do not stick to the bowls well. Instead, the fabric sticks to itself. You need to pinch it together or fold over and press it to the sides to cover the bowls.
Do not use the wraps on anything hot or wash with hot water. The heat will melt the wax. Instead, hand wash with mild dish soap in cool water and hang to dry.
Tried this project?Tag @hearthnvine on Instagram