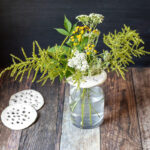
How to Make Clay Flower Frogs
This air dry clay flower frog tutorial will show you how easy it is to make your own flower frog that looks great on its own and makes it easy for you to create a gorgeous arrangement.
Yield: 1
Cost: $5-$10
Equipment
- Craft knife
- Roller
- Assorted pen caps
- Straw
Materials
- Air dry clay
- Vase
- Herbs optional
Instructions
- Roll out the air dry clay with a roller or the side of a bottle to about 1/4 inch thick.
- Draw a circle slightly larger than the vase you want to use.
- Remove the circle disc and start creating holes in a pattern you like with the pen caps and straw.
- Smooth out all edges with your fingers.
- Press some herbs into the clay for additional decoration if desired.
- Allow the clay to dry overnight.
- To use: Set the clay flower frog on top of your vase that's filled with water.
- Then start placing flower stems into the holes until you have a look that you like.
Notes
- You can make the holes all the same size. Just be sure to make some or all of them big enough to hold larger thick stems.
- You don't have to fill every hole in your arrangement.
- You can often fit more than one flower stem or greenery in each hole.
- Starting in the middle with taller flowers and heavier stems might make the arranging a little easier to create, but it's not absolutely necessary.
Tried this project?Tag @hearthnvine on Instagram