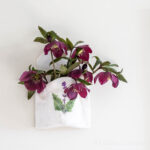
How to Make Wall Pockets with Clay
Here's a fun way to create a wall pocket to use as a vase or to hold any items and hang it on the wall for a beautiful decor piece that is also functional.
Yield: 1 wall pocket
Cost: $15
Equipment
- 1 Roller
- 1 clay cutting tool
- round bowl
Materials
- 1-2 pounds air dry clay
- 16 oz plastic water bottle
- piece sandpaper
- flowers and leaves (optional)
- craft paint (optional)
- polyurethane spray to protect the pocket (optional)
Instructions
- Round out the clay about 1/4 inch thick.
- Use a round bowl or plate to round off the top and the bottom of the clay.
- Cut the bottom 4-5 inches of a plastic 16 oz. water bottle and set it in the middle of the clay.
- Fold up the bottom of the clay to cover the water bottle.
- Press in the sides of the clay.
- Cut and straighten both sides.
- Use some water and your fingers to smooth out any imperfections or marks.
- Press in and then remove some flowers and/or leaves on the top for extra decoration.
- Use a small round cap to create a hole at the top for hanging.
- Allow the clay wall pocket to dry overnight or longer. This may take a couple of days.
- Gently sand any rough edges or spots with a piece of sandpaper.
- Use some watered down craft paint to color in the pressed flower marks.
- Continue to allow the clay pocket to dry thoroughly.
- Once dry protect the clay with a few coats of polyurethane spray if desired.
- Add a little water to the plastic water bottle and hang on the wall.
- Place your favorite cut flowers in the pocket and enjoy.
Notes
You need to let this project completely dry before hanging it. It may take a couple of days before the bottom part and back part where the plastic bottle is dry.
If you notice cracking use some more air dry clay and water to patch and smooth out with your fingers.
You don't need to only use the wall pocket for flowers. You can use it to hold anything. For example, a bunch of pens and pencils placed conveniently near a work area.
Tried this project?Tag @hearthnvine on Instagram