Flame Painted Copper Bracelet Tutorial
Learn how to make a flame painted copper bracelet in no time for a colorful, interesting look.
Yield: 1
Equipment
- Kitchen Torch
- Bowl of water
Materials
- Copper bracelet
- Fine Sandpaper
- Spray Polyurethane
Instructions
- Remove any grease or dirt from the copper cuff.
- Lightly sand the cuff with fine grit sandpaper going in the same direction.
- Fill the kitchen torch with butane.
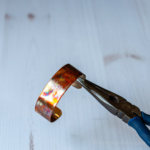
- Hold one end of the cuff with the pliers and use your other hand to run the flame over the copper.
- Continue moving the torch around the entire bracelet watching as the colors change.
- If the copper gets too light that probably means it got too hot so let it cool and try again.
- You can set the cuff in the water to cool off, then dry and continue applying the torch until you get the desired effect you like.
- Once the copper cuff bracelet cools, you can spray it with polyurethane as a protective sealer to keep it from tarnishing.
Notes
Some people use varnish or UV resin to seal their piece.
Tried this project?Tag @hearthnvine on Instagram