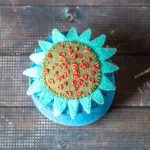
Pincushion DIY - Easy Pretty Felt Flower Tutorial
Learn how to make a fun little pincushion with this simple tutorial. It's a great use for scrap fabric and felt and will look adorable in your craft or sewing room.
Yield: 1 Pin Cushion
Cost: $10
Equipment
- Embroidery needle
- Scissors
- Pencil or sewing marker
Materials
- Felt in 3 different colors
- Embroidery thread
- Batting
Instructions
- Pin the smaller circle to the center of the larger circle.
- Draw equal points around with a pencil to make petals.
- Cut away the excess felt. Set aside.
- Attach the bottom round to the large rectangle using 3 embroidery thread and a blanket stitch.
- Continue around with a blanket stitch and up the side.
- Overlap the edges of the side seam if necessary.
- Add the top circle of felt, leaving a small opening (couple of inches) for the stuffing.
- Once stuffed, you can finish the basic pincushion.
- Next, set the flower pieces you made earlier on top and, using a French knot stitch, sew the flower to the pincushion, adding random knots all over.
- Add your pins and needles.
Notes
If you want, you can use crushed walnut shells, rice, wool roving, or scrap fabric as the pincushion stuffing.
Tried this project?Tag @hearthnvine on Instagram