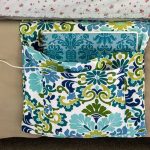
DIY Bed Pocket Caddy
Make a DIY bed pocket caddy perfect for a college student to use in their dorm room. With little space, this is helpful for extra storage.
Yield: 1 Caddy
Cost: $10
Equipment
- Sewing Machine
- Scissors
- Measuring tape
Materials
- 3/4 yard of the main fabric
- 1/2 yard of lining fabric
- coordinating thread
Instructions
- Cut out your fabric pieces into two 26 in. by 14 in., and one 14 in. by 10 in. of both fabrics, for the large pocket.
- Cut another piece 9 in. by 8 in. for the smaller pocket.
- Start by making the small pocket.
- Place right sides together and sew a seam all the way around leaving 2-3 inches open for turning.
- Turn right-side out and press.
- Top stitch the top of the pocket.
- Pin the small pocket to the printed piece of the large pocket and stitch along the sides and bottom.
- Run an additional line of stitching about one-third of the way in from the edge, from the top of the pocket to the bottom, to create another pocket.
- Sew the large lining pocket piece to the large printed pocket with right sides together at the top.
- Flip over and press.
- Top stitch the top of the pocket.
- Pin the last long print piece to the one with the pocket, with right sides together.
- Sew along the entire outer edge, leaving about a 3-4 inch opening for turning.
- Turn right side out and press.
- Top stitch the edges on the sides above the pocket and the top.
Tried this project?Tag @hearthnvine on Instagram