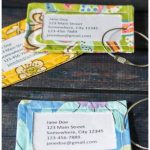
DIY Luggage Tags Made From Your Favorite Fabrics
Learn how to make pretty DIY luggage tags using your favorite fabrics. They also make a thoughtful gift idea.
Yield: 1 Luggage Tag
Cost: $5-$10
Equipment
- Sewing Machine
- Utility Knife
- Small Hole Punch
Materials
- Fabric scraps
- Thermoweb iron-on vinyl
- Wire Keychains
- Heavy clear plastic
Instructions
- Cut out the fabric 9 inches by 3 inches.
- Cut out a piece of vinyl the same size as your fabric.
- Adhere it to the right side of the fabric following the package directions.
- Turn over the top and bottom edge and topstitch in place.
- Fold in half with right sides together.
- Stitch up the sides and cut corners.
- Turn the tag right side out.
- Place some of the paper backing between the luggage tag fabric and the iron.
- Sew in about 1/4 inch from the edges.
- Place a piece of cardboard to protect the bottom fabric.
- Score and cut out an opening with a utility knife.
- Tame any rough edges with fray check.
- Create a hole with a small hole punch and slide on a metal keychain.
Tried this project?Tag @hearthnvine on Instagram
