DIY Beautiful Tin Can Pendant Light
Use basic tin cans and a light kit to make a rustic hanging pendant light for anywhere in the house.
Yield: 1
Cost: $20
Equipment
- hammer
- Nail
- Paper
- Scissors
Materials
- Tin Cans 32 oz
- Craft Paint
- Pendant Light Kit
- Light bulbs
Instructions
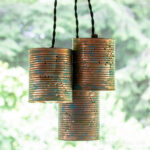
- Paint your cans whatever you like. I started them with copper paint, then added shades of green and aqua and sprinkled a little table salt on top.
- Place a quart baggie inside the can, fill it with water, and freeze. This will make it easier to punch holes.
- Place the frozen can on a towel to keep it steady. Tape on the template and punch holes with a hammer and nail. Or just punch holes freehand.
- To attach the cans to the pendant kit you first need to separate the three different sockets. Do this by unscrewing the white plastic connector shown above. There will be one white and one black wire for each of the three sockets.
- Remove the black connector near the socket on each light. Loosen the screw on the side and then unscrew the connector from the socket.
- Slide this connector completely off, and set it aside.
- Thread the wires up through the can pulling them through until the socket reaches the top of the can.
- Thread the socket connector back on with the threaded side down, and screw it back into the socket and tighten the side screw.
- Repeat for all three cans and re-connect the wires to the white connector making sure all white wires are placed together on the white wire side and all black wires on the black side.
- Screw in small decorative 40 w bulbs into the sockets.
- Hang near an outlet or use an extension cord and enjoy.
Notes
To keep the drill bit from moving use a little bit of masking tape in the area. I used a 3/8 inch bit that is sold for use on metal.
I found that I could make varying hole sizes depending on how many times, or how deep, I hit the nail with the hammer.
This light kit had each socket wire a different length. I assume it comes this way so you can hang them in a row from the ceiling. I wanted mine to be clustered together, so I cut some of the wires so that they are just a little different.
Tried this project?Tag @hearthnvine on Instagram