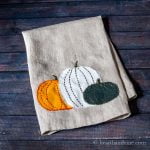
Pumpkin Tea Towel - Easy Applique Project for Your Fall Decor
Make an adorable pumpkin tea towel with this simple tutorial. It uses basic hand sewing applique techniques that even a beginner sewer can do!
Yield: 1 Tea Towel
Cost: $5
Equipment
- Embroidery needle
Materials
- Tea towel or large napkin
- Embroidery hoop
- Embroidery floss
- Scrap fabric
Instructions
- Print out the pumpkin template.
- Cut out the pumpkin pieces and trace them onto your scrap fabric.
- Place it on the bottom of your tea towel.
- Glue the fabric shapes onto the tea towel with fabric glue or stitch witchery.
- Add the embroidery hoop around the area to keep the background fabric nice and taut.
- Choose embroidery floss for each pumpkin in either a coordinating or contrasting color.
- Tie a knot in one end then thread the other through the eye of the needle.
- Come up through the back of the linen and pull the thread through until the knot catches.
- Put the needle back down through the fabric above the first spot.
- Move to the left or right of your fabric.
- Bring the needle back up through, keeping the stitches close together to outline the pumpkin.
- Repeat for each stem.
- Use a pencil to lightly draw the vertical lines.
- Stitch from the bottom just like before.
Tried this project?Tag @hearthnvine on Instagram