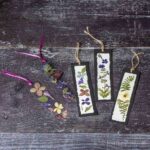
Pressed Flower Bookmark Craft Project
This easy tutorial will show you how to make these beautiful pressed flower bookmarks with paper and/or laminating sheets.
Equipment
- Paper Cutter optional
- Hole Punch
Materials
- Assorted Pressed Flowers & Leaves
- Heavy White Watercolor Paper
- Black Cardstock
- Laminating Sheets
- Mod Podge or White Glue
- Scissors
- Paintbrush
- Thin Ribbon or Twine
Instructions
Paper Bookmarks
- Fold the white watercolor paper and use a paintbrush to brush water along the crease. Then tear along the wet crease to create a torn edge.
- Repeat with all four edges of the paper.
- Glue the white paper to a black cardstock backing.
- Play around with the pressed flowers and leaves into a layout you like.
- Take a photo for reference.
- Carefully use the paintbrush and Mod Podge to glue the flowers into place.
- After the flowers have had a chance to dry a little, punch a small hole into the top of the black backing paper.
- Cut a piece of thin ribbon or twine about 5 inches long.
- Fold the ribbon in half, then feed the ends from the back to the front.
- Then slip the ends through the loop and pull tight, creating a tie.
Laminated Bookmark
- Cut a piece of the laminating sheets larger than you want the bookmark to be.
- Peel off the protective backing and place the flowers in the middle in a column on the sticky side.
- Carefully place another piece of the laminating sheet on top of the flowers, sticky side down, covering the flowers.
- Trim the laminating sheets to the size you like, leaving some room for a hole at the top.
- Punch a hole at the top and add a ribbon through the hole as shown above.
Tried this project?Tag @hearthnvine on Instagram