• Skip to primary navigation
  • Skip to main content
  • Skip to primary sidebar
  • Home
  • DIY Projects
    • Homemade Bath and Body
    • Sewing - Fabric Crafts
    • Flower Crafts/Decor
    • Thrift Store/Vintage
  • Gardening
    • Flower Gardens
    • Container Gardening
    • Houseplants
    • Indoor Gardening
    • Landscaping
    • DIY Garden Art
  • Decorate
    • Spring Decor
    • Summer Decor
    • Fall Decor
    • Winter Decor
    • Home Decor Projects
  • Recipes
    • Breakfast Recipes
    • Lunch Recipes
    • Dinner Recipes
    • Dessert
    • Salad Recipes
    • Soups and Stews
    • Side Dish Recipes
    • Appetizers and Snacks
    • Healthy Recipes
  • Holidays
    • Valentine's Day
    • Easter
    • Mother's Day
    • Halloween
    • Thanksgiving
    • Christmas
Hearth and Vine
menu icon
go to homepage
  • About
  • DIY
    • ...Flower/Gardening Crafts
    • ... Bath and Body
    • ...Sewing/Fabric Crafts
    • ...Thrift Store/Upcycle
  • Gardening
    • ...Flower Gardens
    • ...Container Gardening
    • ...Indoor Gardening
    • ...DIY Garden Art
  • Decorate
    • ...Home Decor Projects
    • ...Spring Decor
    • ...Summer Decor
    • ...Fall Decor
    • ...Winter Decor
    • ...Room Makeovers
  • Recipes
    • ...Appetizers and Snacks
    • ...Dinner Recipes
    • ...Side Dish Recipes
    • ...Salad Recipes
    • ...Dessert
    • ...Drinks
  • Holidays
    • ...Valentine's Day
    • ...Easter
    • ...Mother's Day
    • ...Halloween
    • ...Thanksgiving
    • ...Christmas
  • Subscribe
  • Instagram
    • Facebook
    • Instagram
    • Pinterest
    • Twitter
  • subscribe
    search icon
    Homepage link
    • About
    • DIY
      • ...Flower/Gardening Crafts
      • ... Bath and Body
      • ...Sewing/Fabric Crafts
      • ...Thrift Store/Upcycle
    • Gardening
      • ...Flower Gardens
      • ...Container Gardening
      • ...Indoor Gardening
      • ...DIY Garden Art
    • Decorate
      • ...Home Decor Projects
      • ...Spring Decor
      • ...Summer Decor
      • ...Fall Decor
      • ...Winter Decor
      • ...Room Makeovers
    • Recipes
      • ...Appetizers and Snacks
      • ...Dinner Recipes
      • ...Side Dish Recipes
      • ...Salad Recipes
      • ...Dessert
      • ...Drinks
    • Holidays
      • ...Valentine's Day
      • ...Easter
      • ...Mother's Day
      • ...Halloween
      • ...Thanksgiving
      • ...Christmas
    • Subscribe
    • Instagram
    • Facebook
    • Instagram
    • Pinterest
    • Twitter
  • ×
    Home » Decorate

    How to Easily Refinish a Wood Tabletop

    by Patti Estep · Sep 11, 2016

    Jump to How-to Card

    Learn how easy it is to refinish a wood tabletop, with just a few materials, transforming it from drab to fab in no time.

    refinished-oak-table-top

    contains some affiliate links for your convenience.  Click here to read my full disclosure policy.

    We've had this oak table and chair set many years. It's extremely sturdy, and still very functional, but there are two problems. One is that I no longer love the golden oak look, and two, the top of the table is in rough shape. So I thought, how hard would it be to refinish a wood tabletop? It turns out, not hard at all.

    How To Refinish a Wood Tabletop

    I had my husband help me move the top to the garage and placed it on an old metal table. Then I picked up some stain with polyurethane already in the mix and basically just followed the directions.

    refinishing-wood-tabletop-materials

    Materials

    Minwax Polyshades Satin in Bombay Mahogany - 1/2 pint
    Palm Sander 
    220 sandpaper
    Extra Fine Steel Wool
    Tack Cloth
    Bristle Paint Brush

    table-top-damaged-worn-finish

    Here's a close up of how bad the tabletop looked before. Lots of scratches, and many areas where the finish had worn off.

    refinish-table-top-after-hand-sander

    Using a palm sander, sand with the grain from one side to the other. If you don't have a palm sander you can use sandpaper over a piece of wood and manually sand the top. I sanded the edge and the wood underneath piece by hand.

    Newsletter Signup
    Join Our Newsletter List!

    Be the first to receive new posts and get access to our Subscribers Only Page.

    refinish-tabletop-tack-cloth

    Wipe off the dust with any soft cloth, then go over it with a tack cloth which will pick up any remaining particles.

    refinish-table-top-first-coat-of-stain

    Stir your can of satin. Then using a bristle brush, I recommend one that is not expensive as you may want to throw it out when you are done, start at one end and brush the stain on with long strokes, in the same direction as the grain. Make sure you do not leave a wet edge, which means keep going until you get to the edge of a section, for a seamless look. If you start to notice brush marks go over the area lightly back and forth with your brush to smooth it out.

    refinish-table-top-after-one-coat

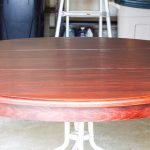
    This picture has one coat of stain. Since you will probably need 2-3 coats, you will have plenty of time to perfect your technique.

    According to the folks at Minwax, you need to allow the stain to dry for at least 6 hours before applying a second coat. Once dry, lightly sand by hand with the steel wool. Use the tack cloth again to thoroughly remove any dust, then apply another thin coat of stain.

    refinish-table-top-three-coats

    I ended up applying three coats and waiting over night in between coats, as this was done in my garage during the humid summer weather.

    refinished-tabletop-after-3-coats

    You can still see some of the dents and marks, but I kind of like the way that looks.

    refinished-oak-tabletop

    We are certainly pleased with the way it turned out, and though it did take me three days, this was a pretty easy project. I may just have to stain the base, or maybe just the chairs in the future.

    For now I think just having the top refinished has given this old set a new life. 

    Learn how easy it is to refinish a wood tabletop with just a few materials, transforming it from drab to fab in no time.
    refinish-table-top-three-coats
    Print

    How to Easily Refinish a Wood Tabletop

    See how easy it is to refinish an old wood tabletop. It takes time to let each coat dry, but it is a simple process and turns out beautifully!
    Prep Time1 hour hr
    Active Time2 hours hrs
    Additional Time3 days d
    Total Time3 days d 3 hours hrs
    Course: DIY Projects
    Cost: $40

    Equipment

    • Palm Sander

    Materials

    • Minwax Polyshades Satin in Bombay Mahogany - 1/2 pint
    • 220 sandpaper
    • Extra Fine Steel Wool
    • Tack Cloth
    • Bristle Paint Brush

    Instructions

    • Using a palm sander, sand with the grain from one side to the other.
    • Sand the edge and the wood underneath with sandpaper.
    • Wipe off the dust with any soft cloth, then go over it with a tack cloth.
    • Stir your can of stain.
    • Using a bristle brush, start at one end and brush the stain on with long strokes, in the same direction as the grain.
    • Make sure you do not leave a wet edge, which means keep going until you get to the edge of a section. 
    • Apply 2-3 coats.
    • Allow the stain to dry for at least 6 hours before applying a second coat.
    • Once dry, lightly sand by hand with the steel wool.
    • Use the tack cloth to thoroughly remove any dust, then apply another thin coat of stain.
    Tried this project?Tag @hearthnvine on Instagram
    « Spinach and Ricotta Pita Bread Pizza
    Using Plants & Flowers to Add that Special Touch »

    About Patti Estep

    Patti is the creator of Hearth and Vine, a home and garden blog filled with projects to inspire your creative side. She loves crafting, gardening, decorating and entertaining at her home in Pennsylvania. When she is not working on a project at home or searching for treasures at nurseries and thrift stores with her girlfriends, you’ll probably find her with family and friends, at a restaurant, or home party enjoying new and different food adventures.

    Reader Interactions

    Comments

    1. Maria Brittis

      September 11, 2016 at 4:25 pm

      Absolutley beautiful and professional job! Its just better than new
      Maria

      Reply
    2. Jeanne

      September 11, 2016 at 10:36 am

      What a beautiful job - love the step-by-step instructions. Thanks for sharing. http://doodlet.me/

      Reply
      • Patti Estep

        September 11, 2016 at 10:42 am

        Hi Jeanne,

        Thanks. I wish I would have had the nerve to do this sooner.
        Have a great week and thanks for stopping by,
        Patti

        Reply
    3. Emalea

      September 11, 2016 at 7:41 am

      I love how easy the Minwax Polyshades work. I recently purchased a small buffet at a garage sale cheap to use in our guest bedroom. The top was destroyed and I used Polyshades gloss and turned it into a beautiful piece for blanket storage. The finish is very sturdy and prevents nasty water marks from glasses too.

      The table looks great. I'm sorry I sold mine at a garage sale.

      Reply
      • Patti Estep

        September 11, 2016 at 7:51 am

        Hi Emalea,

        Thank you for letting me know I can count on it to last. Love your buffet turned bathroom story. Now you have me thinking about garage sales and flea markets.
        Thanks for stopping by,
        Patti

        Reply

    Leave a Reply Cancel reply

    Your email address will not be published. Required fields are marked *

    Recipe Rating


    Primary Sidebar

    Patti Estep Profile Picture

    Hi!

    I'm Patti

    Join me to create lots of fun DIY projects, including crafts, gardening, home decor, and tasty recipes

    More about me

    Popular Posts

    • Baked zucchini bite on a slated tray with a bowl of horseradish sauce.
      Make Tasty Zucchini Bites in Under an Hour
    • Three tin cans in descending sizes hanging from twine.
      DIY Wind Chimes with Tin Cans
    • Blue jean crossover bag
      DIY Crossbody Bag from Jeans
    • Ham barbecue sandwich on plate
      Chipped Ham Barbecue Sandwiches - A Pittsburgh Favorite
    • Echievera planter
      What to do With a Stretched Succulent
    • Make a Mason Jar Oil Candle Lamp with botanicals and essential oils. ~ gardenmatter.com
      DIY Oil Candle - Gifts for the Holidays

    Footer

    ^ back to top

    About
    Contact
    Privacy Policy
    Disclosure Policy
    Terms of Service

    Sign Up Here!
    for our
    newsletter &
    special offers

    Follow Me

    facebook
    Pinterest
    instagram

    As an Amazon Associate, I earn from qualifying purchases. i.e. as an Amazon Associate, I earn from qualifying purchases.

    Copyright © 2025 Hearth and Vine

    Rate This Recipe

    Your vote:


    A rating is required
    A name is required
    An email is required