• Skip to primary navigation
  • Skip to main content
  • Skip to primary sidebar
  • Home
  • DIY Projects
    • Homemade Bath and Body
    • Sewing - Fabric Crafts
    • Flower Crafts/Decor
    • Thrift Store/Vintage
  • Gardening
    • Flower Gardens
    • Container Gardening
    • Houseplants
    • Indoor Gardening
    • Landscaping
    • DIY Garden Art
  • Decorate
    • Spring Decor
    • Summer Decor
    • Fall Decor
    • Winter Decor
    • Home Decor Projects
  • Recipes
    • Breakfast Recipes
    • Lunch Recipes
    • Dinner Recipes
    • Dessert
    • Salad Recipes
    • Soups and Stews
    • Side Dish Recipes
    • Appetizers and Snacks
    • Healthy Recipes
  • Holidays
    • Valentine's Day
    • Easter
    • Mother's Day
    • Halloween
    • Thanksgiving
    • Christmas
Hearth and Vine
menu icon
go to homepage
  • About
  • DIY
    • ...Flower/Gardening Crafts
    • ... Bath and Body
    • ...Sewing/Fabric Crafts
    • ...Thrift Store/Upcycle
  • Gardening
    • ...Flower Gardens
    • ...Container Gardening
    • ...Indoor Gardening
    • ...DIY Garden Art
  • Decorate
    • ...Home Decor Projects
    • ...Spring Decor
    • ...Summer Decor
    • ...Fall Decor
    • ...Winter Decor
    • ...Room Makeovers
  • Recipes
    • ...Appetizers and Snacks
    • ...Dinner Recipes
    • ...Side Dish Recipes
    • ...Salad Recipes
    • ...Dessert
    • ...Drinks
  • Holidays
    • ...Valentine's Day
    • ...Easter
    • ...Mother's Day
    • ...Halloween
    • ...Thanksgiving
    • ...Christmas
  • Subscribe
  • Instagram
    • Facebook
    • Instagram
    • Pinterest
    • Twitter
  • subscribe
    search icon
    Homepage link
    • About
    • DIY
      • ...Flower/Gardening Crafts
      • ... Bath and Body
      • ...Sewing/Fabric Crafts
      • ...Thrift Store/Upcycle
    • Gardening
      • ...Flower Gardens
      • ...Container Gardening
      • ...Indoor Gardening
      • ...DIY Garden Art
    • Decorate
      • ...Home Decor Projects
      • ...Spring Decor
      • ...Summer Decor
      • ...Fall Decor
      • ...Winter Decor
      • ...Room Makeovers
    • Recipes
      • ...Appetizers and Snacks
      • ...Dinner Recipes
      • ...Side Dish Recipes
      • ...Salad Recipes
      • ...Dessert
      • ...Drinks
    • Holidays
      • ...Valentine's Day
      • ...Easter
      • ...Mother's Day
      • ...Halloween
      • ...Thanksgiving
      • ...Christmas
    • Subscribe
    • Instagram
    • Facebook
    • Instagram
    • Pinterest
    • Twitter
  • ×
    Home » DIY Projects

    Decoupaged Tin Can Storage Tutorial

    by Patti Estep · Jul 3, 2024

    Jump to How-to Card
    Three decoupaged tin cans on a bathroom counter with knobs for storage.

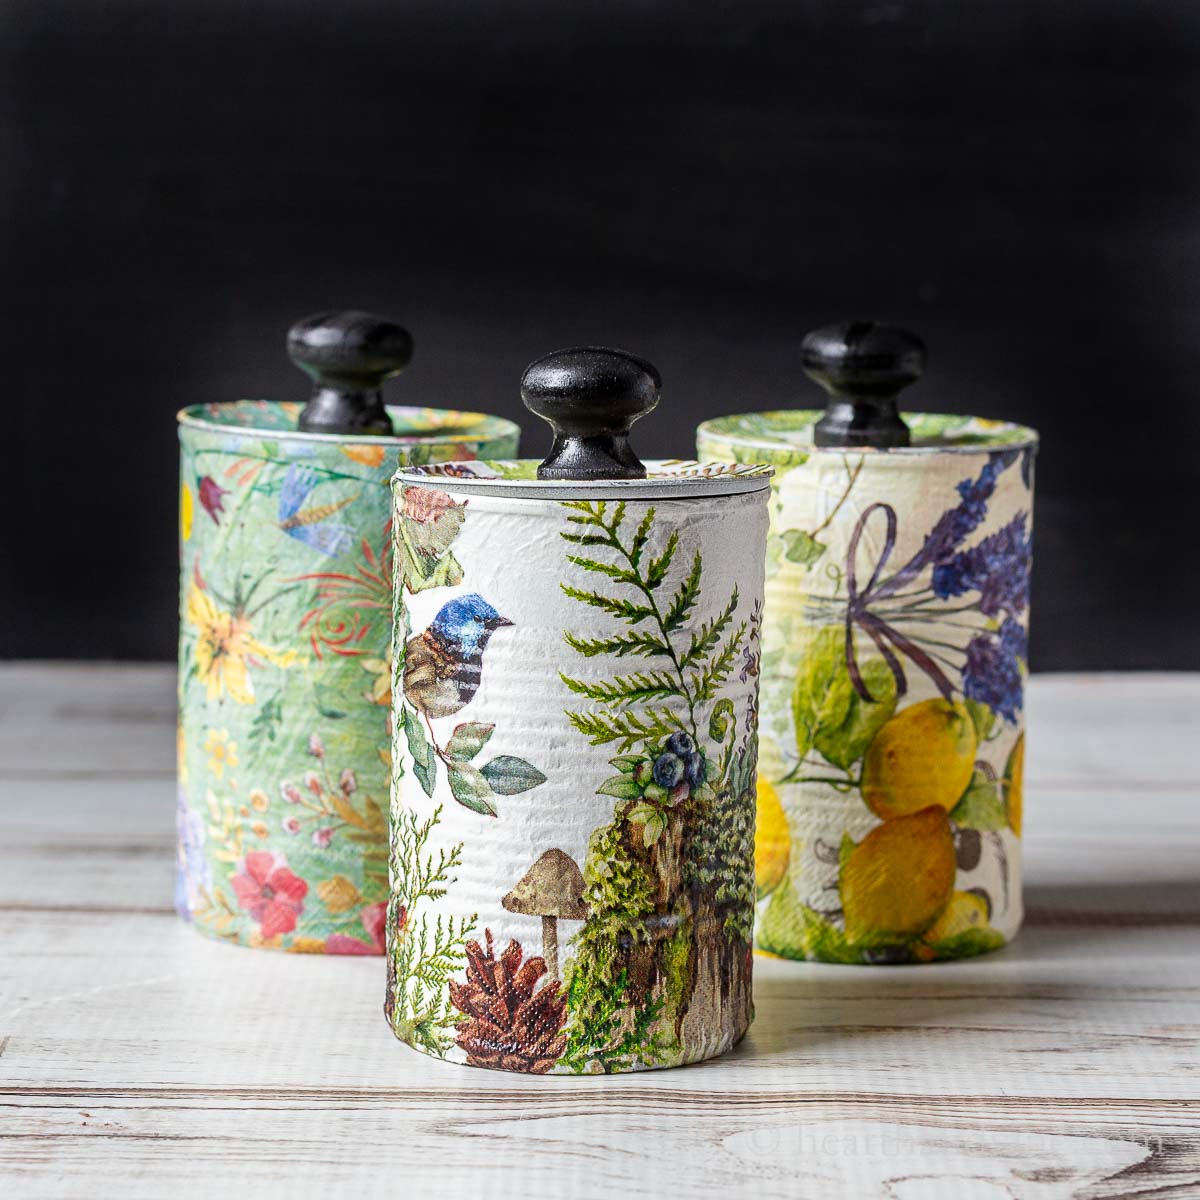
    You'll love this fun decoupaged tin can storage project. It's a great way to recycle and upcycle cans into beautiful useful storage containers.

    Three decoupaged tin cans with drawer pull tops.

    Decoupage is such a fun craft. According to Wikipedia "Decoupage  is the art of decorating an object by gluing colored paper cutouts onto it in combination with special paint effects and decorative elements." 

    There are so many beautiful paper napkins on the market that can turn cans from the recycling bin into gorgeous storage containers for minimal time and money and that's what I'm sharing here today.

    This post contains some affiliate links (that means if you make a purchase after clicking a link, there's no additional cost to you, but I will earn a very small commission.) i.e. as an Amazon Associate, I earn from qualifying purchases.  Click here to read my full disclosure policy.

    Supplies for decoupaged tin cans including three cans of beans, mod podge, black and white spray paint and smooth edge can opener, patterned napkins and wooden knobs.

    What You'll Need

    • Smooth Edge Can Opener
    • Glue gun and glue sticks
    • Scissors
    • Sponge brush
    • Nail File
    • Empty Tin Cans 16 oz
    • White Spray Paint
    • Mod Podge
    • Patterned Paper Napkins
    • Drawer knobs
    Three cans and lids spray painted white.

    How to Upcycle Tin Cans into Storage Bins

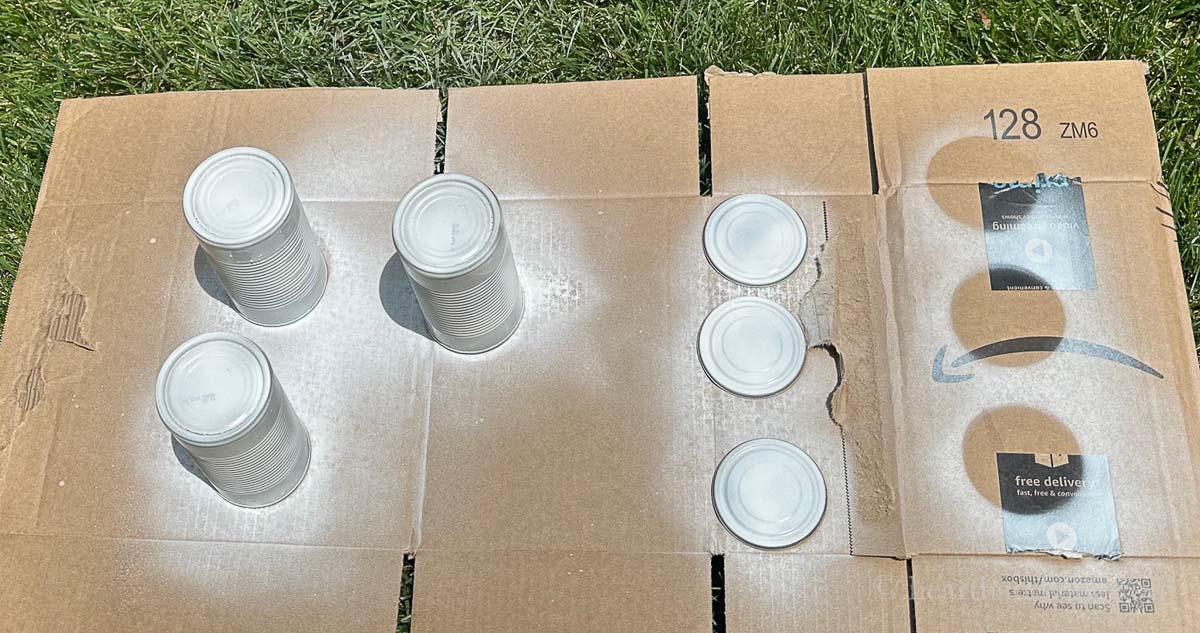
    Step 1 - Prep Tin Cans

    Remove the lids with a smooth edge can opener. Then paint the inside and out of the cans and lids white. You can use spray paint or brush on craft paint for this step.

    Three wooden knobs spray painted black.

    My knobs were basic wooden knobs leftover from my IKEA Dresser Makeover so I spray painted them black. You may also have a few lying around but if you don't you can find drawer pulls and knobs online, at craft stores, or hardware stores.

    A woodland themed cocktail napkin with the backing pulled off.

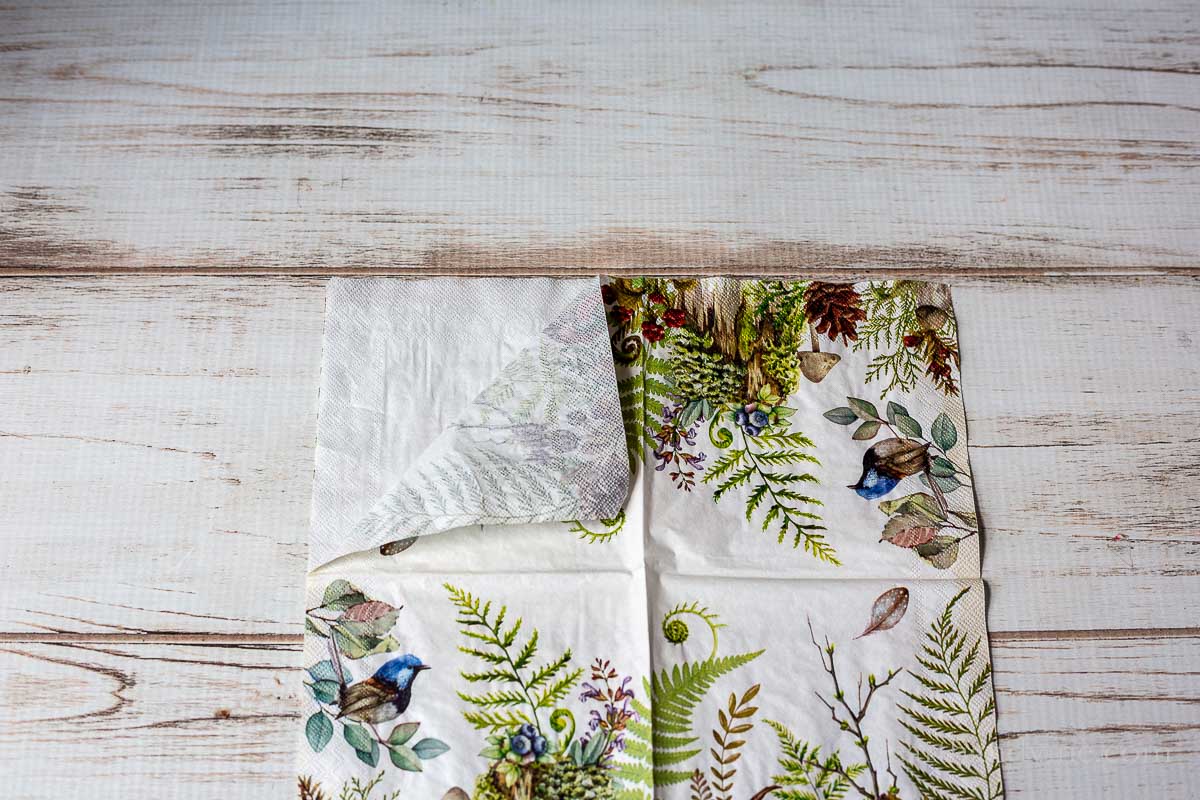
    Step 2 - Prepare Napkins for Decoupage

    Choose your paper napkin and pull off the backing so that you have a nice sheer piece with the print on it.

    Newsletter Signup
    Join Our Newsletter List!

    Be the first to receive new posts and get access to our Subscribers Only Page.

    One ply napkin print glued to a white painted tin can with mod podge.

    Step 3 - Add Napkin to Can

    Coat the sides of the can with a thin layer of Mod Podge and then carefully set the napkin in place. Allow the napkin to slightly overlap the edge where it meets the beginning.

    Napkin covered can with the top and bottom trimmed.

    Step 4 - Trim Excess Napkin Paper

    Trim the excess paper napkin to about 1/4 of an inch on the top and bottom. Let the glue dry for several minutes.

    The top of a tin can wit a napkin glued on and trimmed edges next to a small pair of scissors.

    In the meantime add more of the same paper napkin with Mod Podge to the top of the can lid. Trim with scissors again leaving 1/4 inch excess.
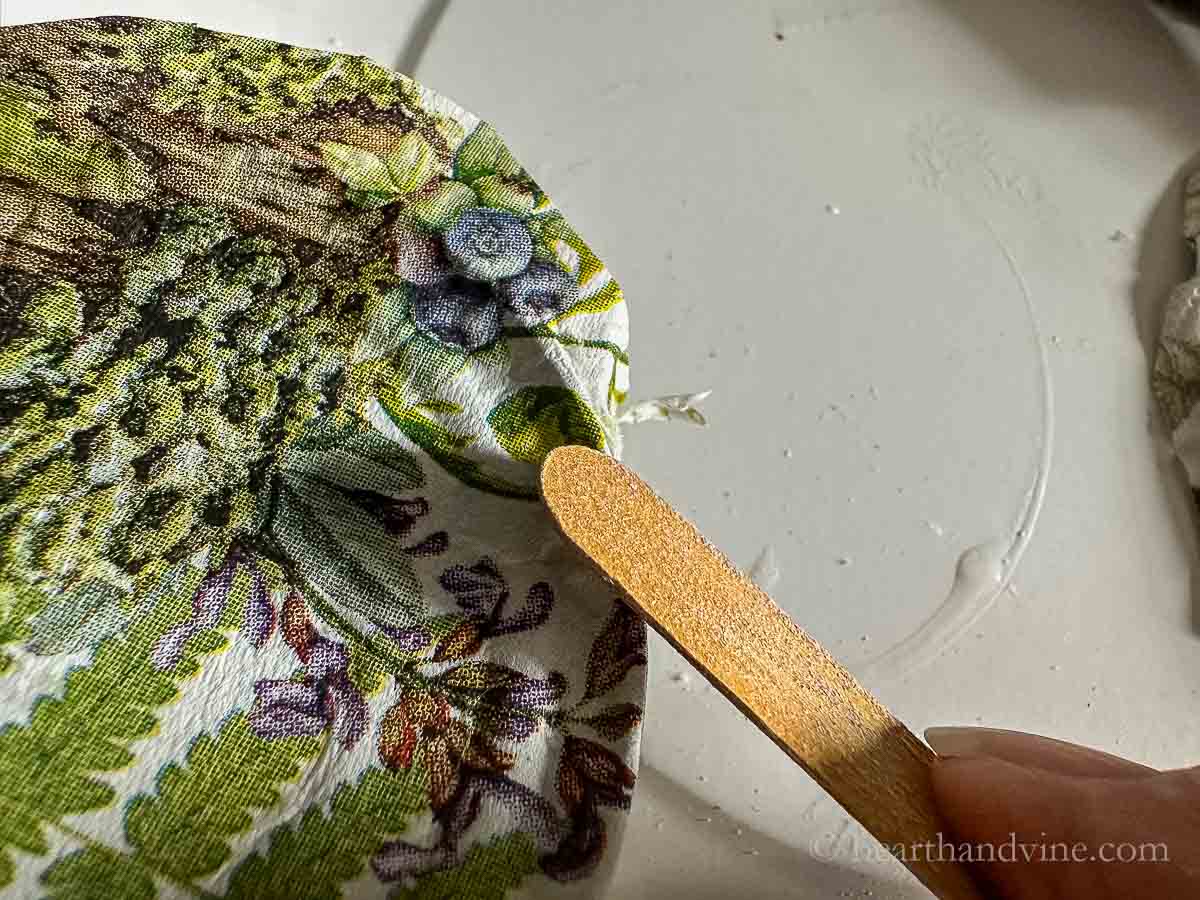
    An emery board on an angle filing off the excess napkin on the can lid.

    Step 5 - File Edges

    Use an emery board to file off the excess napkin on the lid and the can.

    Decoupaged tin can lid with partial removal of excess napkin.

    The nail file leaves a nice finished edge.

    Three decoupaged tin cans and lids.

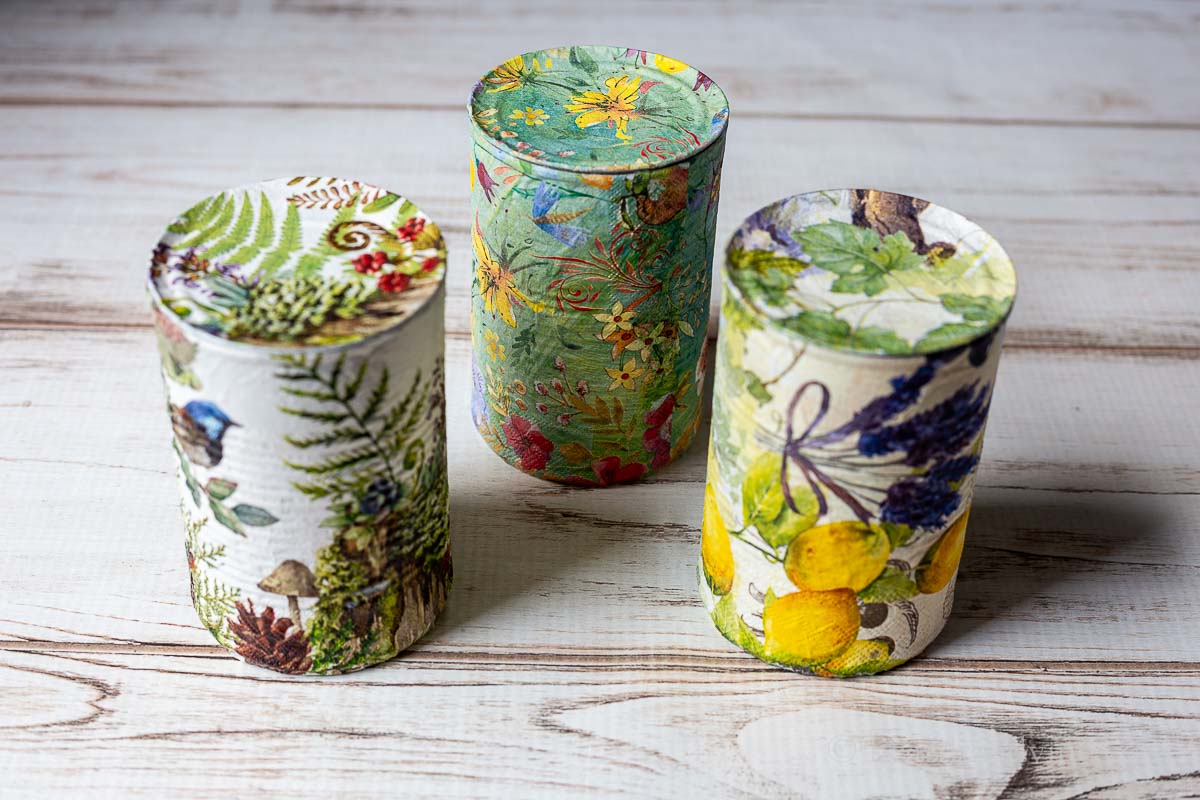
    Repeat the process with the other cans and lids.

    At this point, you can also add a top layer of Mod Podge or spray polyurethane for extra protection.

    Decoupaged tin cans with black knobs on top.

    Step 6 - Add Knobs

    Finish the container by hot gluing the knob onto the center of the lids.

    The inside of the decoupaged cans. One has cotton balls, one cotton pads and the third has cotton swabs.

    I'm using the cans to hold cotton balls, swabs, and pads in my guest bathroom. However, they would look great in a home office or anywhere you want a little pretty storage.

    Three decorative decoupaged tin cans with knob holder lids on a shelf as storage containers.

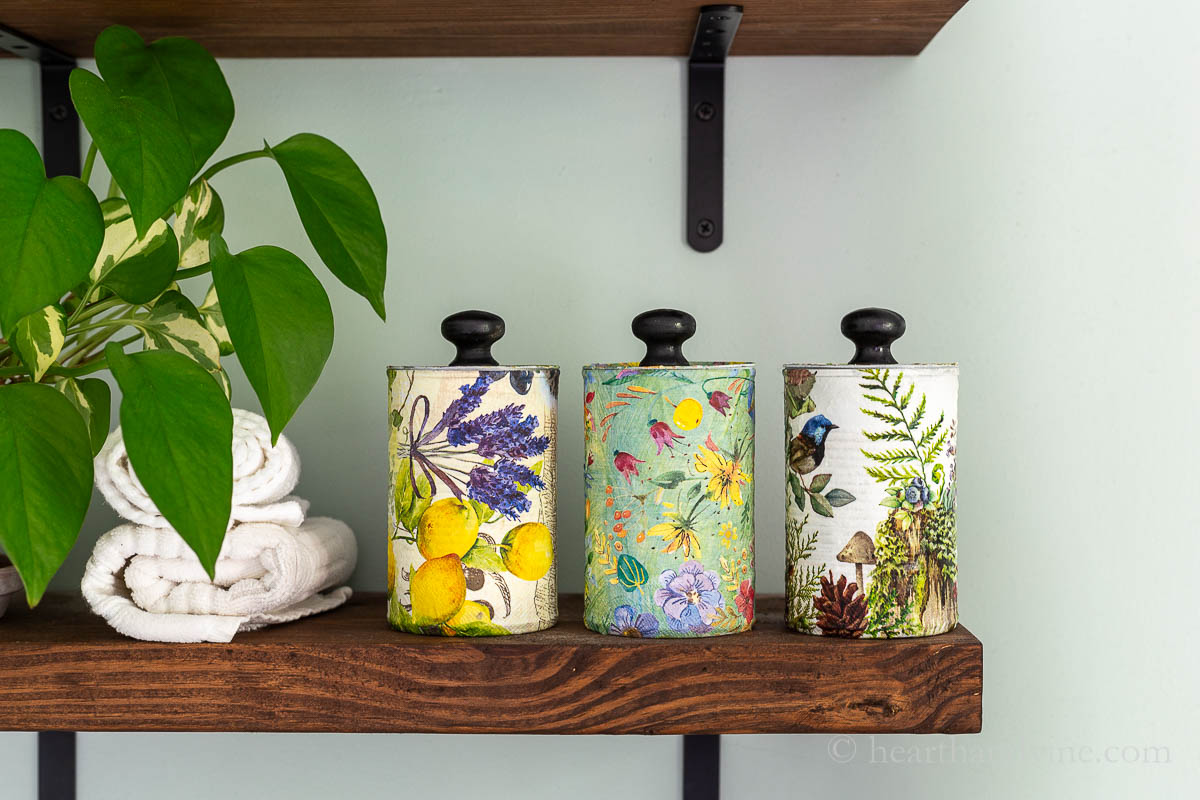
    I think these recycled tin cans look fantastic on the shelf in our guest bath. So easy and oh so pretty.

    Patti signature

    More Decoupage Craft Ideas

    • Tin Can Wind Chimes
    • Fabric Plastic Storage Drawers
    • Wood Slice Coasters
    • Magnetic Clothespins
    Three decoupaged tin cans with drawer pull tops.
    Print

    Tin Can Decoupaged Storage Containers

    Decoupage tin cans and upcycle them into beautiful storage containers for any place in your home.
    Prep Time1 hour hr
    1 hour hr

    Equipment

    • Smooth Edge Can Opener
    • Glue gun and glue sticks
    • Scissors
    • Sponge brush
    • Nail File

    Materials

    • Empty Tin Cans 16 oz
    • White Spray Paint
    • Mod Podge
    • Patterned Paper Napkins
    • Drawer knobs

    Instructions

    • Clean cans and remove the top lid.
    • Spray paint the inside and outside of the cans and lids white.
    • Separate the napkin plys and keep the top patterned piece.
    • Apply a thin coat of Mod Podge to the sides of the can with a foam brush.
    • Carefully cover with the napkin overlapping slightly.
    • Trim the top and bottom leaving about 1/4 inch hanging over.
    • Allow the glue to dry slightly.
    • Apply a thin layer of Mod Podge to the top of the lid.
    • Center napkin pattern on top and smoothly evenly.
    • Trim with scissors leaving about 1/4 inch excess.
    • Use a nail file to finish the edges and remove the excess paper napkin from both the cans and the lids.
    • Add a second layer of Mod Podge to the can and lid or use a spray polyurethane for protection.
    • Once the glue or poly have dried hot glue a drawer knob on the center of the lid.
    Tried this project?Tag @hearthnvine on Instagram
    Three colorful decoupaged tin cans upcycled as storage containers with black knobs on top.
    « DIY Copper Pipe Wind Chimes
    Blueberry Delight - A Delicious Easy No Bake Dessert »

    About Patti Estep

    Patti is the creator of Hearth and Vine, a home and garden blog filled with projects to inspire your creative side. She loves crafting, gardening, decorating and entertaining at her home in Pennsylvania. When she is not working on a project at home or searching for treasures at nurseries and thrift stores with her girlfriends, you’ll probably find her with family and friends, at a restaurant, or home party enjoying new and different food adventures.

    Reader Interactions

    Leave a Reply Cancel reply

    Your email address will not be published. Required fields are marked *

    Recipe Rating


    Primary Sidebar

    Three decoupaged tin cans on a bathroom counter with knobs for storage.
    Patti Estep Profile Picture

    Hi!

    I'm Patti

    Join me to create lots of fun DIY projects, including crafts, gardening, home decor, and tasty recipes

    More about me

    Popular Posts

    • Baked zucchini bite on a slated tray with a bowl of horseradish sauce.
      Make Tasty Zucchini Bites in Under an Hour
    • Three tin cans in descending sizes hanging from twine.
      DIY Wind Chimes with Tin Cans
    • Blue jean crossover bag
      DIY Crossbody Bag from Jeans
    • Ham barbecue sandwich on plate
      Chipped Ham Barbecue Sandwiches - A Pittsburgh Favorite
    • Echievera planter
      What to do With a Stretched Succulent
    • Make a Mason Jar Oil Candle Lamp with botanicals and essential oils. ~ gardenmatter.com
      DIY Oil Candle - Gifts for the Holidays

    Footer

    Three decoupaged tin cans on a bathroom counter with knobs for storage.

    ^ back to top

    About
    Contact
    Privacy Policy
    Disclosure Policy

    Sign Up Here!
    for our
    newsletter &
    special offers

    Follow Me

    facebook
    Pinterest
    instagram

    As an Amazon Associate, I earn from qualifying purchases. i.e. as an Amazon Associate, I earn from qualifying purchases.

    Copyright © 2025 Hearth and Vine

    Rate This Recipe

    Your vote:


    A rating is required
    A name is required
    An email is required