• Skip to primary navigation
  • Skip to main content
  • Skip to primary sidebar
  • Home
  • DIY Projects
    • Homemade Bath and Body
    • Sewing - Fabric Crafts
    • Flower Crafts/Decor
    • Thrift Store/Vintage
  • Gardening
    • Flower Gardens
    • Container Gardening
    • Houseplants
    • Indoor Gardening
    • Landscaping
    • DIY Garden Art
  • Decorate
    • Spring Decor
    • Summer Decor
    • Fall Decor
    • Winter Decor
    • Home Decor Projects
  • Recipes
    • Breakfast Recipes
    • Lunch Recipes
    • Dinner Recipes
    • Dessert
    • Salad Recipes
    • Soups and Stews
    • Side Dish Recipes
    • Appetizers and Snacks
    • Healthy Recipes
  • Holidays
    • Valentine's Day
    • Easter
    • Mother's Day
    • Halloween
    • Thanksgiving
    • Christmas
Hearth and Vine
menu icon
go to homepage
  • About
  • DIY
    • ...Flower/Gardening Crafts
    • ... Bath and Body
    • ...Sewing/Fabric Crafts
    • ...Thrift Store/Upcycle
  • Gardening
    • ...Flower Gardens
    • ...Container Gardening
    • ...Indoor Gardening
    • ...DIY Garden Art
  • Decorate
    • ...Home Decor Projects
    • ...Spring Decor
    • ...Summer Decor
    • ...Fall Decor
    • ...Winter Decor
    • ...Room Makeovers
  • Recipes
    • ...Appetizers and Snacks
    • ...Dinner Recipes
    • ...Side Dish Recipes
    • ...Salad Recipes
    • ...Dessert
    • ...Drinks
  • Holidays
    • ...Valentine's Day
    • ...Easter
    • ...Mother's Day
    • ...Halloween
    • ...Thanksgiving
    • ...Christmas
  • Subscribe
  • Instagram
    • Facebook
    • Instagram
    • Pinterest
    • Twitter
  • subscribe
    search icon
    Homepage link
    • About
    • DIY
      • ...Flower/Gardening Crafts
      • ... Bath and Body
      • ...Sewing/Fabric Crafts
      • ...Thrift Store/Upcycle
    • Gardening
      • ...Flower Gardens
      • ...Container Gardening
      • ...Indoor Gardening
      • ...DIY Garden Art
    • Decorate
      • ...Home Decor Projects
      • ...Spring Decor
      • ...Summer Decor
      • ...Fall Decor
      • ...Winter Decor
      • ...Room Makeovers
    • Recipes
      • ...Appetizers and Snacks
      • ...Dinner Recipes
      • ...Side Dish Recipes
      • ...Salad Recipes
      • ...Dessert
      • ...Drinks
    • Holidays
      • ...Valentine's Day
      • ...Easter
      • ...Mother's Day
      • ...Halloween
      • ...Thanksgiving
      • ...Christmas
    • Subscribe
    • Instagram
    • Facebook
    • Instagram
    • Pinterest
    • Twitter
  • ×
    Home » DIY Projects

    DIY Copper Pipe Wind Chimes

    by Patti Estep · Jun 30, 2024

    Jump to How-to Card

    Give this DIY copper pipe wind chimes project a try. It uses easy to find parts that you can find and customize to your preference for a beautiful piece of art and music.

    Homemade copper pipe wind chimes

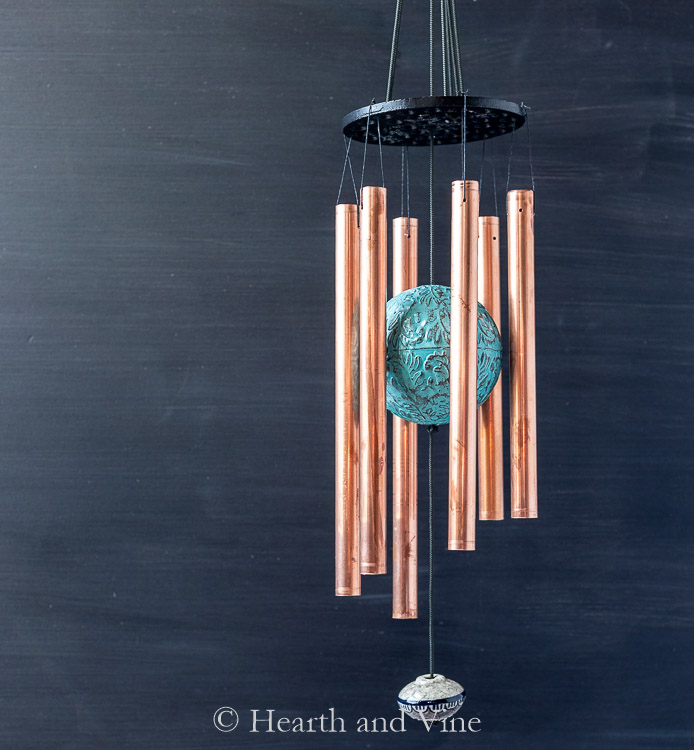
    I love the look of copper. Especially when it ages and gets that pretty patina. I'm hoping these handmade wind chimes will eventually turn and look even more gorgeous.

    Most of the supplies can be found in your local hardware store and/or craft store. Wouldn't this make a nice gift?

    This post contains some affiliate links (that means if you make a purchase after clicking a link, there's no additional cost to you, but I will earn a very small commission. ) i.e. as an Amazon Associate, I earn from qualifying purchases. Click here to read my full disclosure policy.
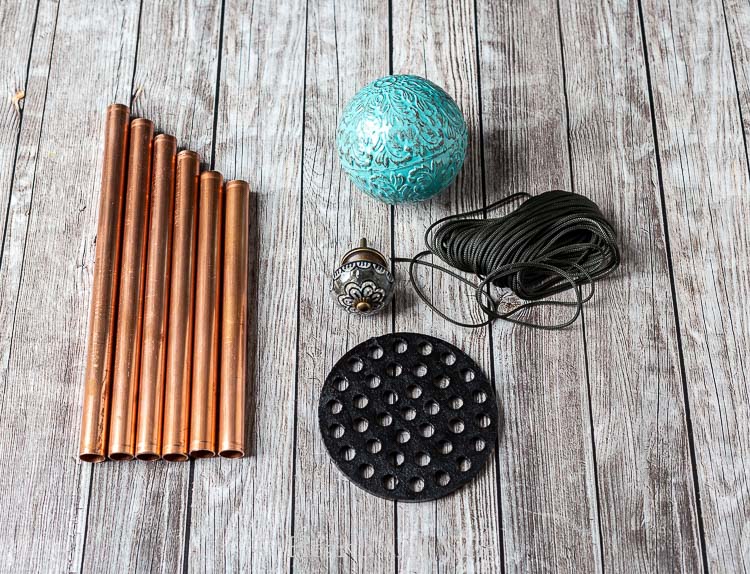
    Copper wind chime supplies

    What You'll Need

    • 6 lengths of copper pipe - I purchased 5 feet and started with 10 inches and decreased 1/2 inch for each length
    • 1 Top for hanging - I used a 6 inch cast iron drain cover from Ace Hardware.
    • Nylon cording for the top and the central cord. - I used this cording from Hobby Lobby.
    • Waxed thread for the pipes
    • Something to act as a clapper or striker -  I bought this sphere.
    • A decorative piece for the sail - I used a drawer knob from Hobby Lobby. (similar to this)
    • One - 1-inch keyring for hanging.
    • Thin wire to secure the cords holding the drain cover.


    Key ring with black cording

    How to Make Wind Chimes with Copper Pipes

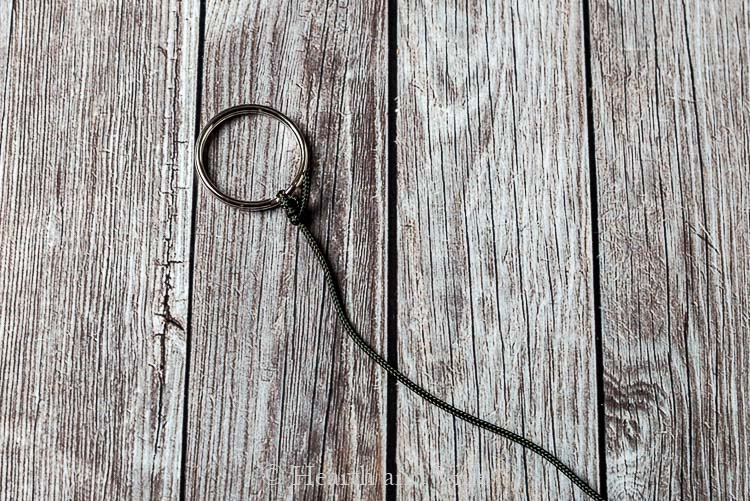
    Step 1 - Prepare the Central Cord

    Start by tying the central cord to the keyring with a few square knots to make it nice and secure. Leave plenty of cording to work with, maybe 4 feet. You can cut any excess cording later.

    Gathered cords to wire to ring

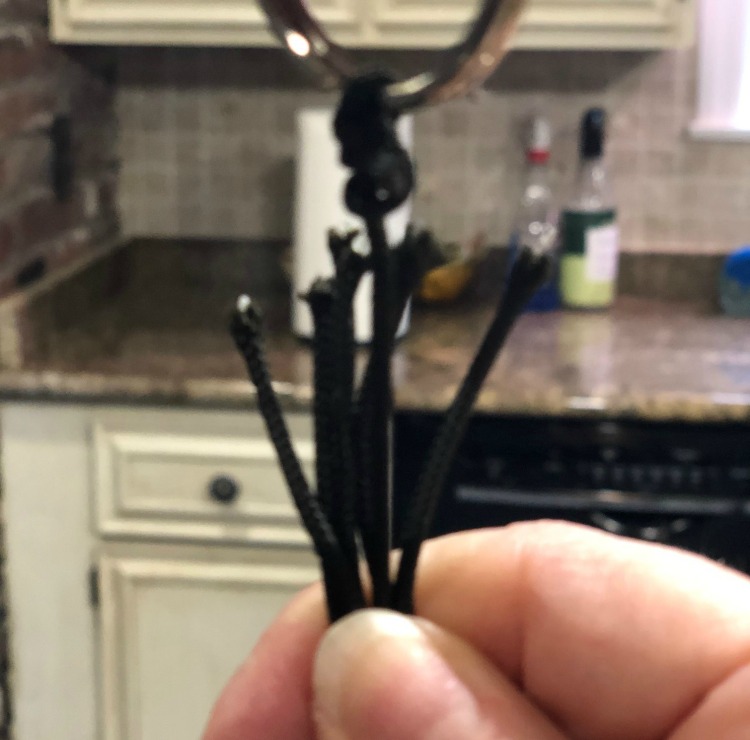
    Step 2 - Cut Cords for Pipes

    Next, cut four lengths of the cording to thread through the center of the drain and gather them together near the top of the center cord at the ring. I used 20-inch pieces for this step.

    Newsletter Signup
    Join Our Newsletter List!

    Be the first to receive new posts and get access to our Subscribers Only Page.

    Cording tied to floor drain

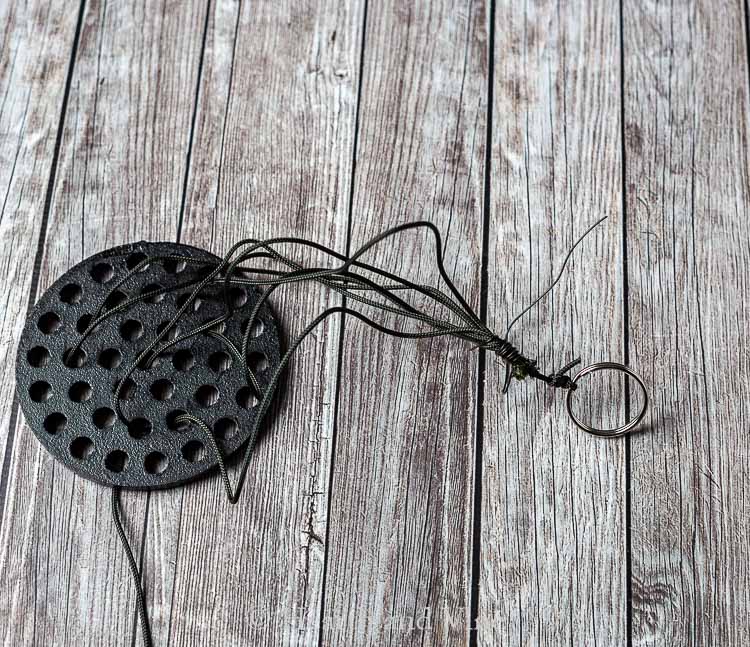
    Step 3 - Wire Cords Together

    Use some thin wire to wrap the tops of the cording sections tightly around the central cord.

    Threading cording through sphere

    Step 4 - Drill Holes in Sphere

    Drill a hole in the top and bottom of the sphere.

    Use a long toothpick or skewer to attach to the bottom of the central cord and thread the sphere up the central line.
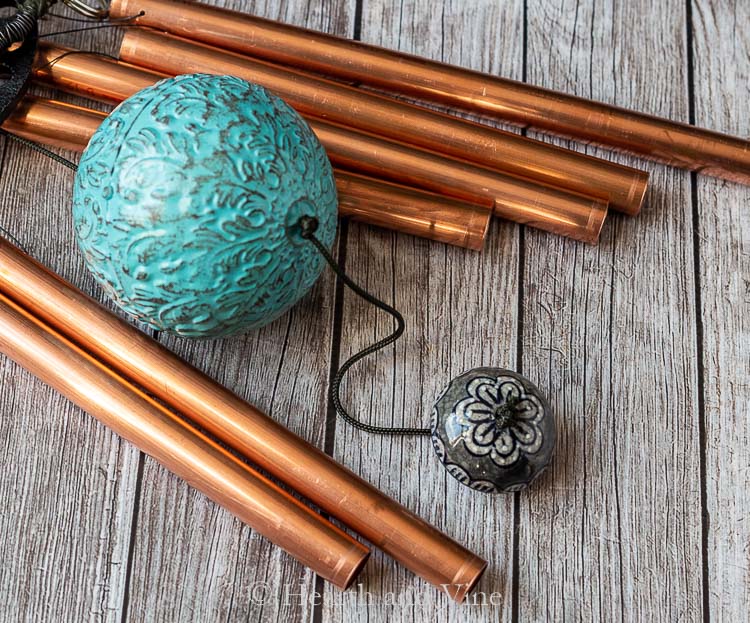
    Tying sphere and knob to cord

    Step 5 - Add Knob

    Tie a couple of knots below the sphere midway along the chimes. Then slide the knob on the bottom, a few inches below the chimes, and tie a couple of knots. Cut off any excess cording.

    Cutting copper pipe
    This little tool makes cutting copper pipes easy.

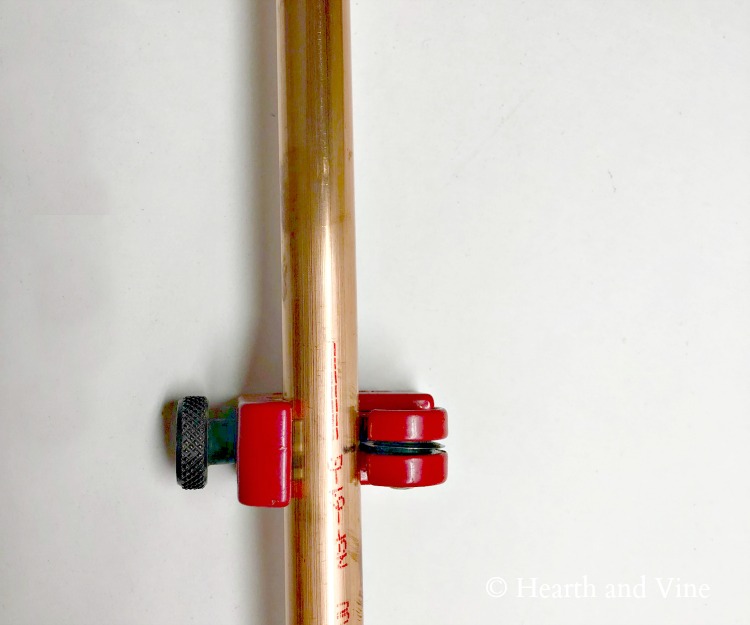
    Step 6 - Cut Copper Pipes

    Cut your pipe into six pieces. I started with 10 inches and then decreased each next piece by 1/2 inch. 

    Drilling copper pipe
    Keep the drill upright so that the holes are even with each other.

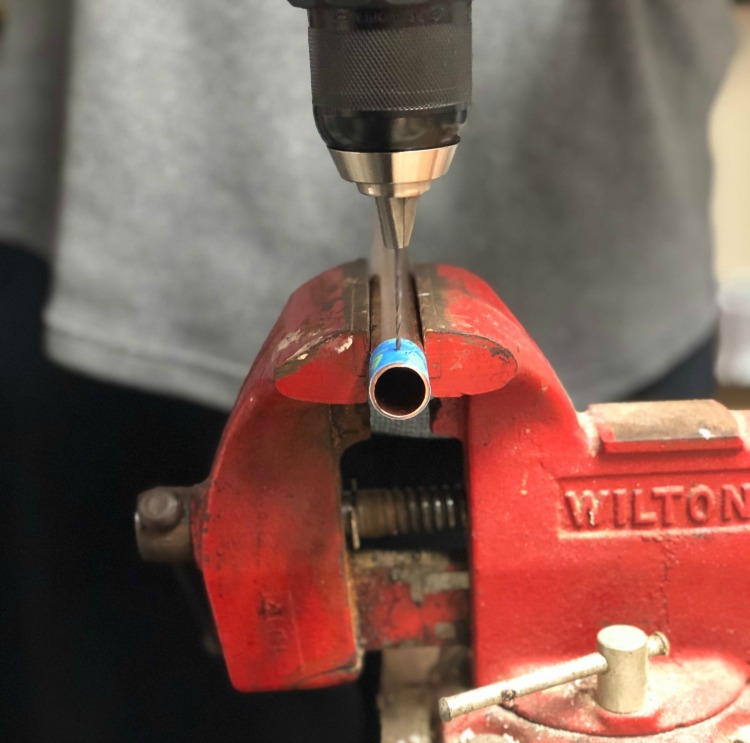
    Step 7 - Drill Holes in Pipes

    Drill a hole through each pipe about 1/2 inch below the top. Use some painter's tape or masking tape to help the drill bit stay in place.

    Step 8 - String Copper Pipe onto Cords

    Then string the copper tubes (pipes) to the edge of the drain cover in equal distant holes using waxed twine. You may want to hang the top somewhere while tying the pipes so that they hang evenly. I used a broom on a table for this step.

    Copper wind chimes hanging by front door

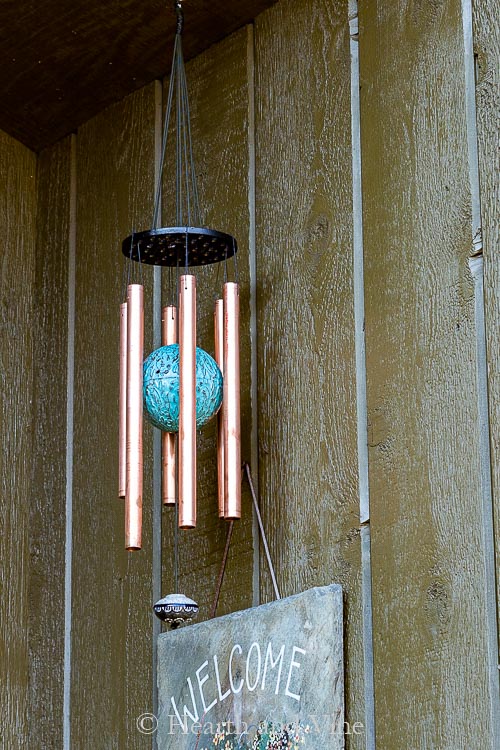
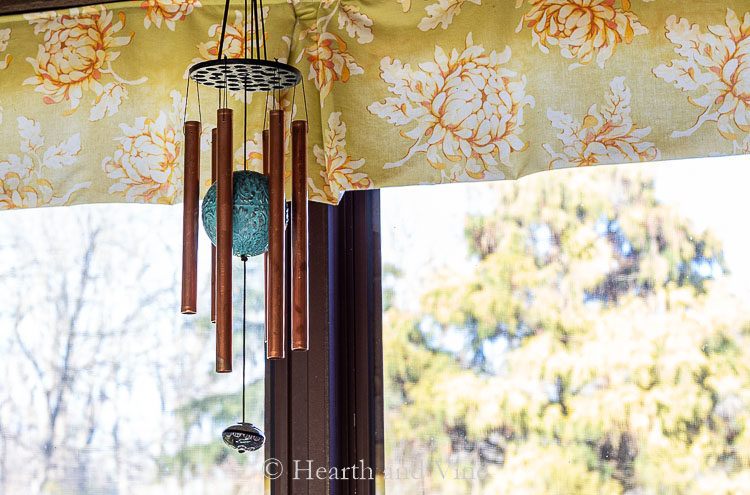
    Hang your gorgeous wind chimes outside and enjoy. Here's a pic of the wind chimes on my front porch.

    Windchimes on back porch

    However, according to Feng Shui copper wind chimes should be placed on the North, West, or Northwest side of the house.  So, my covered back porch would be a good place for it.

    Copper wind chime hanging outside

    Still, I want to have it outside to get a nice patina so I think this spot on our patio, located on the Northside of our house, is exactly the right spot. We can sit on our back porch and enjoy the beautiful sound when the wind blows.

    Patti signature

    More Wind Chime Projects

    • Seashell and Sea Glass Wind Chimes
    • Tin Can Wind Chimes


    Homemade copper pipe wind chimes
    Print

    How to Make Wind Chimes with Copper Pipes

    This DIY wind chimes tutorial was so much fun to make. Now we have a bit of musical beauty hanging on our patio.
    Prep Time30 minutes mins
    Active Time1 hour hr
    Total Time1 hour hr 30 minutes mins
    Course: DIY Garden Art
    Yield: 1
    Author: Patti Estep
    Cost: $25

    Equipment

    • Scissors
    • Needle nose pliers
    • Copper pipe cutter
    • Drill

    Materials

    • 6 lengths of copper pipe - approx. 5 feet
    • 1 - 6 inch cast iron drain cover
    • Nylon cording for the top and the central cord. ~ 4 yds
    • Waxed thread for the pipes
    • A clapper - blue sphere
    • A decorative piece for the sail - drawer knob from Hobby Lobby
    • One - 1-inch keyring for hanging.
    • Thin wire to secure the cords holding the drain cover.

    Instructions

    • Tie the central cord to the keyring with a few square knots. Leave plenty of cording to work with maybe 4 feet. You can cut the excess cording later.
    • Cut four 20 inch lengths of the cording to thread through the center of the drain and gather together at the top of the center cord by the ring.
    • Use thin dark wire to wrap the tops of the cording sections tightly around the central cord at the ring.
    • Drill a hole in the top and bottom of the sphere. Use a long toothpick or skewer and attach it to the bottom of the central cord and thread the sphere up to the central line.
    • Tie a couple of knots below the sphere to hold it in place midway alongside the chimes. Then slide the knob on the cord below the chime line and tie a couple of knots to finish off the central cord.
    • Cut your pipe into six pieces. I started with 10 inches and then decreased each next piece by 1/2 inch. 
    • Drill a hole through each pipe about 1/2 inch below the top. Use some painters tape or masking tape to help the drill bit stay in place.
    • Then string the pipes to the edge of the drain cover in equal distant holes using waxed twine. Hang the top from something to help you tie the pipes evenly around the drain.
    Tried this project?Tag @hearthnvine on Instagram
    Homemade wind chimes made from copper pipes and a decorative sphere.
    « Fresh Peach Dump Cake - Easy Recipe
    Decoupaged Tin Can Storage Tutorial »

    About Patti Estep

    Patti is the creator of Hearth and Vine, a home and garden blog filled with projects to inspire your creative side. She loves crafting, gardening, decorating and entertaining at her home in Pennsylvania. When she is not working on a project at home or searching for treasures at nurseries and thrift stores with her girlfriends, you’ll probably find her with family and friends, at a restaurant, or home party enjoying new and different food adventures.

    Reader Interactions

    Comments

    1. Connie Allen

      February 08, 2022 at 3:55 pm

      I love your beautiful windchime and your clear instructions. After hanging your chime outside for awhile now would you make any changes in your supplies? I'm thinking of having my grandchildren make these at a party, with some of the prep work done ahead of time, so if you would change anything, please reply.

      Reply
      • Patti Estep

        February 08, 2022 at 4:11 pm

        Hi Connie, I think it just depends on what you like. If I were to change anything I might use a smaller ball in the middle? Not much smaller, just a little. Have fun!

        Reply
    2. Michele

      November 28, 2021 at 7:09 pm

      Hi-quick question-How do I attach the cord to the skewer or toothpick?

      Reply
      • Patti Estep

        November 29, 2021 at 7:34 am

        Michele, I believe I taped the cord to the end of the toothpick.

        Reply
    3. Carole West

      February 14, 2020 at 8:55 am

      Well you know I love copper so this project is right up my alley. Looks pretty simple too so I might just have to ponder this one. Great instructions and thanks for all the helpful purchase links.

      Reply
      • Patti Estep

        February 14, 2020 at 10:32 am

        Thanks Carole. Some of those links are affiliate links but not all. I'm glad you found them helpful.

        Reply

    Leave a Reply Cancel reply

    Your email address will not be published. Required fields are marked *

    Recipe Rating


    Primary Sidebar

    Patti Estep Profile Picture

    Hi!

    I'm Patti

    Join me to create lots of fun DIY projects, including crafts, gardening, home decor, and tasty recipes

    More about me

    Popular Posts

    • Baked zucchini bite on a slated tray with a bowl of horseradish sauce.
      Make Tasty Zucchini Bites in Under an Hour
    • Three tin cans in descending sizes hanging from twine.
      DIY Wind Chimes with Tin Cans
    • Blue jean crossover bag
      DIY Crossbody Bag from Jeans
    • Ham barbecue sandwich on plate
      Chipped Ham Barbecue Sandwiches - A Pittsburgh Favorite
    • Echievera planter
      What to do With a Stretched Succulent
    • Make a Mason Jar Oil Candle Lamp with botanicals and essential oils. ~ gardenmatter.com
      DIY Oil Candle - Gifts for the Holidays

    Footer

    ^ back to top

    About
    Contact
    Privacy Policy
    Disclosure Policy

    Sign Up Here!
    for our
    newsletter &
    special offers

    Follow Me

    facebook
    Pinterest
    instagram

    As an Amazon Associate, I earn from qualifying purchases. i.e. as an Amazon Associate, I earn from qualifying purchases.

    Copyright © 2025 Hearth and Vine

    Rate This Recipe

    Your vote:


    A rating is required
    A name is required
    An email is required