Learn to make a freeform hypertufa planter with this easy tutorial. These rustic looking containers are perfect for succulents and shallow rooted plants.

I've been itching to make a hypertufa planter for some time now. There are tons of tutorials and recipes all over the web. One in particular from Blue Fox Farm mentioned these small "pinch pots" made without molds, and that is what inspired me to try and make a freeform hypertufa planter.
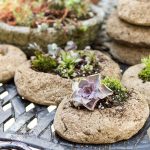
Freeform Hypertufa Planter Tutorial
These are very rustic and easy to make. The hardest part was waiting for them to "cure" before planting. Every article I read says you need to let them cure for a minimum of 2 - 4 weeks. I let mine cure for the full 4 weeks.

Materials
Portland Cement - 1 part
Peat Moss - 1 1/2 parts
Vermiculite - 1 1/2 parts
Dust Mask
Latex Gloves
Large Plastic Mixing Container
Dryer Cleaner bags or other plastic bags
Rocks for weight
Plastic container for measuring material like an old takeout soup container or sour cream container
Combine the cement, peat moss and vermiculite in a large plastic tub. For the seven planters I made, I used 2 containers of cement and 3 containers of the peat moss and vermiculite. Then slowly add water and mix with your hands.
Don't forget to wear a mask and good latex gloves.

Add enough water until you can make a ball with the mix that holds together, but is not soggy.

Place a handful on a dry cleaners bag and shape it into the desired shape. Fold the plastic over and weigh it down with a rock. Let them sit in a shady spot for 2 days.

After two days they will be firm enough to hold their shape, but still soft enough to carve or add texture. I used a wire brush, and a metal scraper to dig out some of the interior and shape up the bottoms and sides.
Re-wrap the hypertufa and set aside for 2 to 4 weeks to cure, checking occasionally to mist or wet them.

Now they are ready to plant. Use a light soilless potting mix, and choose ground covers and shallow rooted plants. Rock garden, alpine plants, succulents, and moss are good choices.


Wouldn't they make a fun little gift?

Why not try adding a little water with pebbles in one, to set out for the butterflies and bees. A little bee bath is just one way to help with our diminishing pollinator problem.
I hope you enjoyed my take on this popular garden craft, and if you haven't tried making a hypertufa planter, maybe this tutorial will inspire you to try making one of your own. For more information visit Blue Fox Farm or The Hypertufa Gardener. Both have tons of information on all kinds of hypertufa projects.

How to Make a Freeform Hypertufa Planter
Materials
- Portland Cement - 1 part
- Peat Moss - 1 1/2 parts
- Vermiculite - 1 1/2 parts
- Dust Mask
- Latex Gloves
- Large Plastic Mixing Container
- Dryer Cleaner bags or other plastic bags
- Rocks for weight
- Plastic container for measuring material
Instructions
- Combine the cement, peat moss and vermiculite in a large plastic tub.
- Slowly add water and mix with your hands until you can make a ball with the mix that holds together.
- Place a handful on a dry cleaners bag and shape it into the desired shape.
- Fold the plastic over and weigh it down with a rock.
- Let them sit in a shady spot for 2 days.
- Use a wire brush, and a metal scraper to dig out some of the interior and shape the bottoms and sides.
- Re-wrap the hypertufa and set aside for 2 to 4 weeks to cure.
- Plant your plants using a light soilless potting mix, and ground covers or shallow rooted plants.
melanie
Hi
These look great, I’ve been looking to make a form like this for a water feature, id like to partially cover it with mosaics.
Do you think they would hold water? And do you think you could use chicken wire to support more shapes and clad it in the mixture?
Patti Estep
Melanie, it should hold some water but you could try coating the inside with a sealer if you want. Also, I do think chicken wire might work well though I haven't tried it. Have fun!
Mary
Drainage holes?
Patti Estep
Mary, I did not use drainage holes. If you want them and I can understand why just make a few in the bottom while they are still wet with a large nail or stick. Make sure to remove it before the cement sets up. Conversely you could probably drill holes through the container but I would be afraid of cracking it.
judy szatkowski
Absolutely love these - can. you use a plastic garbage bag to put the material in?
Patti Estep
I think you can Judy. I used the dry cleaner bags because they were thin and clear and I could see what I was doing.
Jacki
Thanks for the shout out, Patti! I would be hesitant to use Vermiculite, I use Perlite instead, which doesn't have the risk of being contaminated with asbestos. Love your little planters though!
Patti Estep
Hi Jacki,
Thanks for the heads up on Vermiculite. I didn't think that asbestos was an issue but you bring up a great point. Perlite works just as well, and some may like it better. I simply liked the look and color of the vermiculite.
Jacki
I know, I like the look of it too! And it's not all vermiculite, just that which is mined in a place where they also mine asbestos. I didn't know how to tell them apart, so I just don't use it at all.
Ronda Eagle
I really love this idea! My daughter (who is 6) loves to make gifts for family and friends. I like it to be something they can use and enjoy for years to come as my family is very sentimental over these small treasures she makes. This is the perfect gift for her to make this year for the Holidays and would also make a great end of year teacher appreciation give with a small succulent inside.
Patti Estep
I think that is a fabulous idea. Maybe you should make the mix. Wear a mask. The cement can cause respiratory problems and burn your skin. Then both of you wearing good gloves can make the molds.
Linda
I love the idea of a bee waterer, BUT we can't leave water out like that this year because of Zita (SP???) mosquitoes, I live in Washington DC and we are being told to have absolutely NO standing water for the mosquitoes. I'd hate to think that my butterfly/bee water maimed a baby!!!!!!
Patti Estep
Hi Linda,
Yeah, that is an issue for many. I totally understand. Hopefully things will change in the future.
JulesIn MN
I live in Minnesota, also land of mosquitoes; I change the shallow water in my bird baths, if not already evaporated. My powered fountains keep water moving / preventing standing water, also helps.
Patti Estep
Julesin, mosquitoes can be a real problem. Thanks for sharing your ideas.
Kim Smith
These are very cute and I love the way you have planted them. Great photos too! Wonderful idea for the bee waterer.
Patti Estep
Thanks Kim, That's quite a complement coming from an expert like you.
Thanks for stopping by,
Patti
Paula
I can't wait to try making these containers. I love natural looking planters. Does your website have a "print" button so I can print the directions. I didn't see one but thought I would ask.
Patti Estep
Hi Paula,
I don't have a print button. I'll have to look into that for the future. I work on a PC using Chrome as my browser and I can right click a page and print it. I can also save it to a pdf. I'll save the post here and try to email it to you. I'm afraid the file may be too big but I will try it.
Hope that helps!
Patti
Carol Dal Porto
I can't wait to make these organic, rustic looking planters for my many succulents and rocks. They are a nice alternative to pots. Thank you for your very unique ideas!
Patti Estep
Hi Carol,
So glad you like the project.
Thanks for stopping by,
Patti
sue
love, love, love these - so easy and look so great. We are redoing our back garden with wildflowers so these will look great in amongst them especially in the shade garden part
🙂
Patti Estep
Hi Sue,
So glad you like them! Your garden plans sound fabulous!
Thanks for stopping by,
Patti
Ellen Ribolla
Hi Patti!
These little planters are adorable. I love the organic look they have, like lava rock from Hawaii.
I've seen others on Pinterest, etc. and thought they were out of my league because of the molds, but these, I can handle.
I'm assuming there is a drainage hole in yours. Would you suggest poking a hole in the bottom before or after the 2-day curing process?
Thanks for passing this on!
Ellen
Southington, CT
Patti Estep
Hi Ellen,
So glad you like them. I did not use drainage holes because they were so small and are pretty porous. That being said you could certainly add one, and yes, when you are carving them would be a good time. Also, I think they would be easy to drill later if that doesn't work. Who knows, I may even end up doing that if I find they need it. Thanks for stopping by and bringing up a great point.
Patti