• Skip to primary navigation
  • Skip to main content
  • Skip to primary sidebar
  • Home
  • DIY Projects
    • Homemade Bath and Body
    • Sewing - Fabric Crafts
    • Flower Crafts/Decor
    • Thrift Store/Vintage
  • Gardening
    • Flower Gardens
    • Container Gardening
    • Houseplants
    • Indoor Gardening
    • Landscaping
    • DIY Garden Art
  • Decorate
    • Spring Decor
    • Summer Decor
    • Fall Decor
    • Winter Decor
    • Home Decor Projects
  • Recipes
    • Breakfast Recipes
    • Lunch Recipes
    • Dinner Recipes
    • Dessert
    • Salad Recipes
    • Soups and Stews
    • Side Dish Recipes
    • Appetizers and Snacks
    • Healthy Recipes
  • Holidays
    • Valentine's Day
    • Easter
    • Mother's Day
    • Halloween
    • Thanksgiving
    • Christmas
Hearth and Vine
menu icon
go to homepage
  • About
  • DIY
    • ...Flower/Gardening Crafts
    • ... Bath and Body
    • ...Sewing/Fabric Crafts
    • ...Thrift Store/Upcycle
  • Gardening
    • ...Flower Gardens
    • ...Container Gardening
    • ...Indoor Gardening
    • ...DIY Garden Art
  • Decorate
    • ...Home Decor Projects
    • ...Spring Decor
    • ...Summer Decor
    • ...Fall Decor
    • ...Winter Decor
    • ...Room Makeovers
  • Recipes
    • ...Appetizers and Snacks
    • ...Dinner Recipes
    • ...Side Dish Recipes
    • ...Salad Recipes
    • ...Dessert
    • ...Drinks
  • Holidays
    • ...Valentine's Day
    • ...Easter
    • ...Mother's Day
    • ...Halloween
    • ...Thanksgiving
    • ...Christmas
  • Subscribe
  • Instagram
    • Facebook
    • Instagram
    • Pinterest
    • Twitter
  • subscribe
    search icon
    Homepage link
    • About
    • DIY
      • ...Flower/Gardening Crafts
      • ... Bath and Body
      • ...Sewing/Fabric Crafts
      • ...Thrift Store/Upcycle
    • Gardening
      • ...Flower Gardens
      • ...Container Gardening
      • ...Indoor Gardening
      • ...DIY Garden Art
    • Decorate
      • ...Home Decor Projects
      • ...Spring Decor
      • ...Summer Decor
      • ...Fall Decor
      • ...Winter Decor
      • ...Room Makeovers
    • Recipes
      • ...Appetizers and Snacks
      • ...Dinner Recipes
      • ...Side Dish Recipes
      • ...Salad Recipes
      • ...Dessert
      • ...Drinks
    • Holidays
      • ...Valentine's Day
      • ...Easter
      • ...Mother's Day
      • ...Halloween
      • ...Thanksgiving
      • ...Christmas
    • Subscribe
    • Instagram
    • Facebook
    • Instagram
    • Pinterest
    • Twitter
  • ×
    Home » DIY Projects

    Air Dry Clay Christmas Ornaments

    by Patti Estep · Nov 25, 2024

    Jump to How-to Card
    Air dry clay ornaments on a table next to a spool of red and white twine.

    Learn how to make air dry clay Christmas ornaments to use as gifts or gift tags for all the great people in your life.

    Merry Christmas air dry clay ornaments next to a spool of red and white twine.

    Air dry clay is such a fun medium to work with and this year I created some fun and fragrant ornaments to hand out as gifts.

    Sections At A Glance

    • Supplies
    • Instructions
    • Options & Inspiration
    • More Handmade Ornaments
    • Air Dry Clay Ornament How-To Card

    This post contains some affiliate links (that means if you make a purchase after clicking a link, there's no additional cost to you, but I will earn a very small commission. ) i.e. as an Amazon Associate, I earn from qualifying purchases. Click here to read my full disclosure policy.

    Supplies for air dry clay Christmas ornaments including a roller, skewer, white air dry clay, a Merry Christmas stamp and a round cookie cutter.

    How to Make Air Dry Clay Ornaments

    Supplies

    • Rolling Pin for Clay
    • 2.5 in Cookie Cutter or Jar
    • Sandpaper (optional)
    • White Air Dry Clay
    • Merry Christmas Stamp
    • Twine or Ribbon
    • Wooden Skewer or Large Toothpick
    • Glitter (optional)
    • Holiday Fragrance Oil (optional)
    Using a jar to cut out rounds for the clay ornaments.

    Instructions

    Step 1. Roll out some of the clay onto wax paper or parchment paper on a smooth flat surface to about 1/4 inch thick.

    Step 2. Use a 2.3 - 2.5 inch cookie cutter to cut out rounds of clay. You can also use a cup or jar.

    Note: I ended up using a glass jar to cut the clay as my cookie cutter was too small for the Merry Christmas stamp. Also, if you don't have a special rolling pin. A smooth glass bottle will work well too.

    Stamping the words Merry Christmas into the clay.

    Step 3. Press the "Merry Christmas" stamp into each round cut out clay shape.

    Clay ornament after stamp.

    Step 3. Remove the stamp.

    Using a skewer to make a hole in the top of the clay ornament.

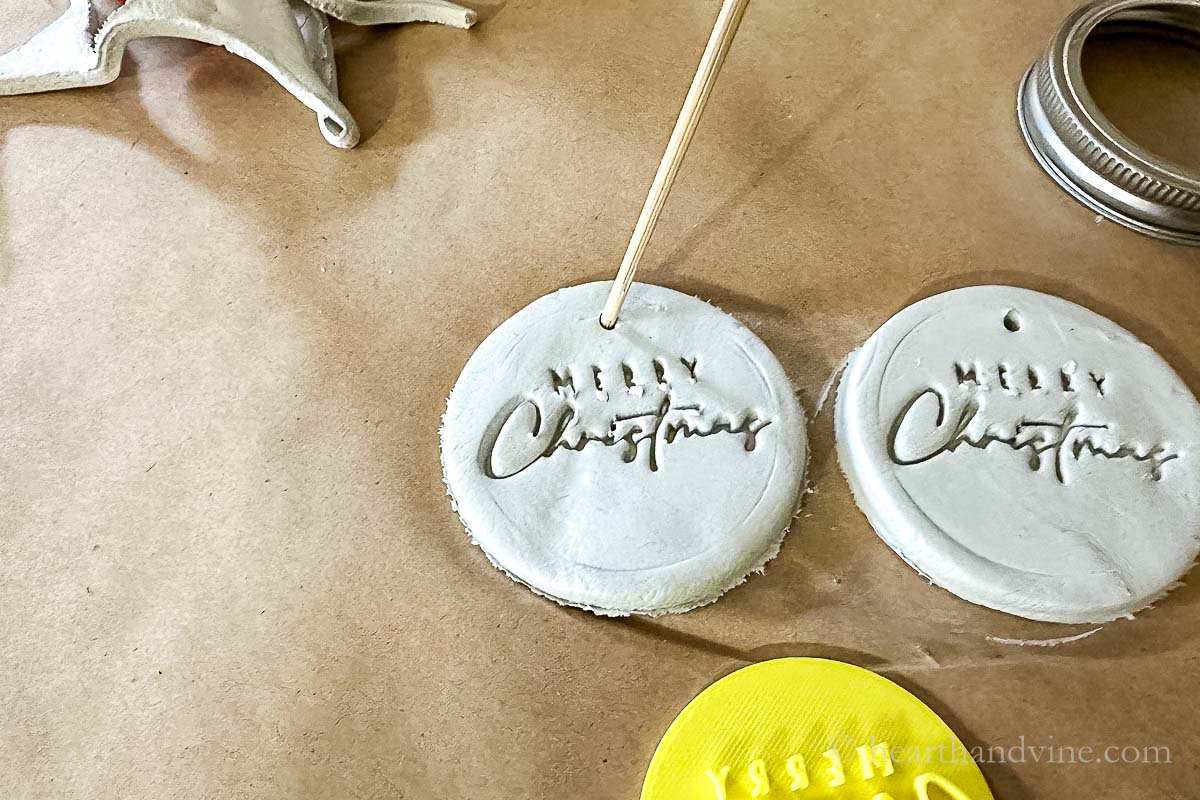
    Step 5. Use a skewer or a small straw to make a hole at the top of the ornament.

    Step 6. Using your fingertips and a little bit of water smooth out rough edges, cracks, and other imperfections.

    Dusting the ornaments with fine glitter.

    Step 7. Dust on a little fine glitter.

    Step 8. Repeat with more clay until you have used the entire package of clay. If you run out of time you can keep the clay in a sealed plastic bag for another time.

    Step 9. Let the ornaments sit for a day to dry then flip them over to finish drying for another day. You will be able to tell when they are completely dry and all the moisture is gone.

    Holding an air dry clay Christmas ornament in my hand.

    Step 10. Use sandpaper to sand away any rough spots on the edges of the ornaments if needed.

    Step 11. Give each ornament a very light spray of holiday fragrance oil if desired.

    Merry Christmas air dry clay ornament hanging on a Christmas tree.

    Hang them on your Christmas tree or bag them up for gift-giving.

    Options & Inspiration

    • Use different colored air dry clay such as terra cotta or a brown wood-look.
    • Paint the stamped area a different color such as red to match the twine.
    • Paint a glaze or Mod Podge over the dried ornaments for a shiny finish.
    • Use different stamps of shapes or other wording.
    • Use metal ornament hangers instead of twine.
    • Rub on some gold leaf or metallic rub and buff for a different look.
    Several ornament with red and white twine hangers next to a spool of the same twine an amber bottle, faux greenery and two clay stars.

    These pretty DIY handmade ornaments can also be used as gift tags for your Christmas presents making them a gift with a gift.

    It's an easy and beautiful Christmas craft to try this holiday season.

    Patti signature

    More Handmade Ornaments

    • Alcohol Ink Ornaments
    • Scented Beeswax Ornaments
    • Embroidered Sweater Ornaments
    • Kissing Ball Ornament
    • Dried Flower Ornament
    Merry Christmas air dry clay ornaments next to a spool of red and white twine.
    Print

    How to Make Air Dry Clay Christmas Ornaments

    Follow this easy step-by-step tutorial to create air dry clay ornaments that make great gifts, Christmas decorations for your tree, and gift tags for the holidays.
    Active Time2 hours hrs
    Drying Time2 days d
    Total Time2 days d 2 hours hrs
    Yield: 40

    Equipment

    • Rolling Pin for Clay or glass bottle
    • 2.5 in Cookie Cutter or Jar or glass or jar large enough to cover the stamp
    • Sandpaper optional

    Materials

    • 2 pounds White Air Dry Clay
    • 1 Merry Christmas Stamp
    • Twine or Ribbon
    • Wooden Skewer or Large Toothpick
    • Glitter optional
    • Holiday Fragrance Oil optional

    Instructions

    • Roll a piece of clay on a flat smooth surface about 1/4 inch thick.
    • Cut out the clay into 2.3 - 2.5 inch rounds.
    • Press the Merry Christmas stamp into each round.
    • Create a hole near the top with a skewer or small straw.
    • Use your hands and a little water to smooth out imperfections and edges.
    • Lightly dust with fine glitter if desired.
    • Spray on a little holiday fragrance oil if desired.
    • Repeat with more clay until it's all used up.
    • Allow the ornaments to dry overnight, then flip them over and let them continue to dry.
    • Once dry smooth any round edges with sandpaper.
    • Thread a ribbon or twine through the hole and tie it together creating a loop to hang the ornament on the tree.
    Tried this project?Tag @hearthnvine on Instagram
    Rows of "Merry Christmas" stamped air dry clay ornaments on a table next to faux pine and red and white twine.
    « Acorn Squash with Ground Turkey
    Fabric Christmas Trees »

    About Patti Estep

    Patti is the creator of Hearth and Vine, a home and garden blog filled with projects to inspire your creative side. She loves crafting, gardening, decorating and entertaining at her home in Pennsylvania. When she is not working on a project at home or searching for treasures at nurseries and thrift stores with her girlfriends, you’ll probably find her with family and friends, at a restaurant, or home party enjoying new and different food adventures.

    Reader Interactions

    Leave a Reply Cancel reply

    Your email address will not be published. Required fields are marked *

    Recipe Rating


    Primary Sidebar

    Patti Estep Profile Picture

    Hi!

    I'm Patti

    Join me to create lots of fun DIY projects, including crafts, gardening, home decor, and tasty recipes

    More about me

    Popular Posts

    • Pressed flower are in two dark frames.
      DIY Pressed Flower Art
    • Pilea peperomioides
      Pilea Plant - The Pass It On Friendship Plant
    • Serving of cream of crab soup in a red bowl.
      Easy Cream of Crab Soup
    • Small indoor water fountain
      DIY Indoor Water Fountain
    • Chicken oscar on a plate
      Easy Chicken Oscar Recipe Made with Hollandaise Sauce
    • Fabric bowl covers in 3 prints
      How to Make Fabric Bowl Covers

    Footer

    ^ back to top

    About
    Contact
    Privacy Policy
    Disclosure Policy
    Terms of Service

    Sign Up Here!
    for our
    newsletter &
    special offers

    Follow Me

    facebook
    Pinterest
    instagram

    As an Amazon Associate, I earn from qualifying purchases. i.e. as an Amazon Associate, I earn from qualifying purchases.

    Copyright © 2025 Hearth and Vine

    Rate This Recipe

    Your vote:


    A rating is required
    A name is required
    An email is required