• Skip to primary navigation
  • Skip to main content
  • Skip to primary sidebar
  • Home
  • DIY Projects
    • Homemade Bath and Body
    • Sewing - Fabric Crafts
    • Flower Crafts/Decor
    • Thrift Store/Vintage
  • Gardening
    • Flower Gardens
    • Container Gardening
    • Houseplants
    • Indoor Gardening
    • Landscaping
    • DIY Garden Art
  • Decorate
    • Spring Decor
    • Summer Decor
    • Fall Decor
    • Winter Decor
    • Home Decor Projects
  • Recipes
    • Breakfast Recipes
    • Lunch Recipes
    • Dinner Recipes
    • Dessert
    • Salad Recipes
    • Soups and Stews
    • Side Dish Recipes
    • Appetizers and Snacks
    • Healthy Recipes
  • Holidays
    • Valentine's Day
    • Easter
    • Mother's Day
    • Halloween
    • Thanksgiving
    • Christmas
Hearth and Vine
menu icon
go to homepage
  • About
  • DIY
    • ...Flower/Gardening Crafts
    • ... Bath and Body
    • ...Sewing/Fabric Crafts
    • ...Thrift Store/Upcycle
  • Gardening
    • ...Flower Gardens
    • ...Container Gardening
    • ...Indoor Gardening
    • ...DIY Garden Art
  • Decorate
    • ...Home Decor Projects
    • ...Spring Decor
    • ...Summer Decor
    • ...Fall Decor
    • ...Winter Decor
    • ...Room Makeovers
  • Recipes
    • ...Appetizers and Snacks
    • ...Dinner Recipes
    • ...Side Dish Recipes
    • ...Salad Recipes
    • ...Dessert
    • ...Drinks
  • Holidays
    • ...Valentine's Day
    • ...Easter
    • ...Mother's Day
    • ...Halloween
    • ...Thanksgiving
    • ...Christmas
  • Subscribe
  • Instagram
    • Facebook
    • Instagram
    • Pinterest
    • Twitter
  • subscribe
    search icon
    Homepage link
    • About
    • DIY
      • ...Flower/Gardening Crafts
      • ... Bath and Body
      • ...Sewing/Fabric Crafts
      • ...Thrift Store/Upcycle
    • Gardening
      • ...Flower Gardens
      • ...Container Gardening
      • ...Indoor Gardening
      • ...DIY Garden Art
    • Decorate
      • ...Home Decor Projects
      • ...Spring Decor
      • ...Summer Decor
      • ...Fall Decor
      • ...Winter Decor
      • ...Room Makeovers
    • Recipes
      • ...Appetizers and Snacks
      • ...Dinner Recipes
      • ...Side Dish Recipes
      • ...Salad Recipes
      • ...Dessert
      • ...Drinks
    • Holidays
      • ...Valentine's Day
      • ...Easter
      • ...Mother's Day
      • ...Halloween
      • ...Thanksgiving
      • ...Christmas
    • Subscribe
    • Instagram
    • Facebook
    • Instagram
    • Pinterest
    • Twitter
  • ×
    Home » DIY Projects

    DIY Wood Essential Oil Diffuser

    by Patti Estep · Aug 12, 2025

    Jump to How-to Card
    Wooden bead diffusers on twine with a pair of scissors and a bowl of beads on the side.
    Two DIY wood essential oil diffusers next to a pair of scissors over the supplies including essential oil bottle and twine.

    This DIY wood essential oil diffuser made with beads is perfect for hanging from your rearview mirror or anywhere in your home for some lovely aromatherapy.

    Two wood bead diffusers and a pair of scissors.

    When we are in need of a new car, we often don't buy new. My last car was only one year old and in great shape, except for the fact that the previous owner was a smoker. We had it detailed and hung a couple of carbon odor absorbing bags, and that helped.

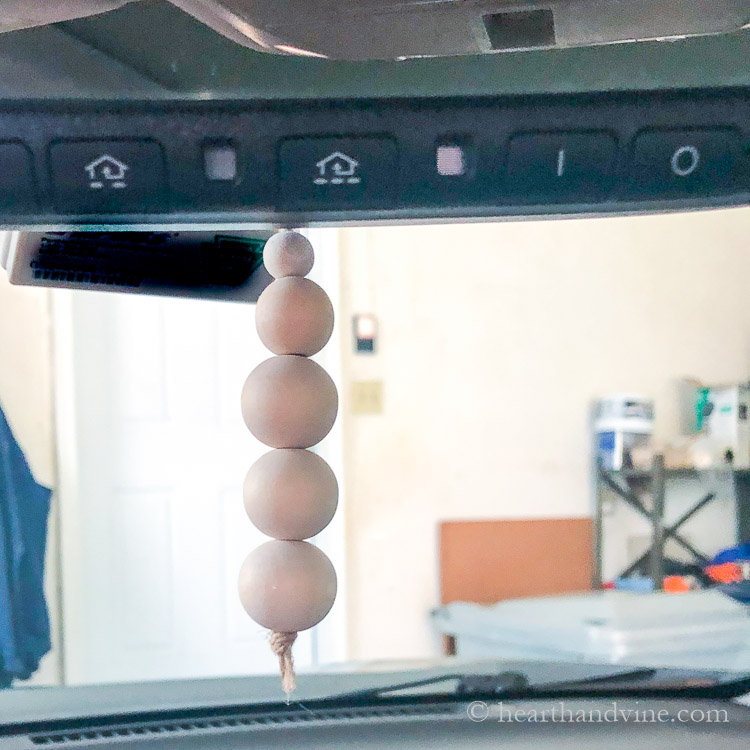
    Another thing I did was make a cute little hanging wood bead trinket from beads I had leftover from a wood bead and salt dough garland to hang from the rearview mirror.

    These beads can absorb essential oils or fragrance oils and will hold the scent for several days, making your car smell nice and giving you a bit of aromatherapy as you drive around town. You can't really do that with candles or reed diffusers.

    More Fragrance Crafts

    • DIY Terra Cotta Pot Diffuser
    • DIY Necklace Diffuser
    • Homemade Reed Diffuser

    This post contains some affiliate links (that means if you make a purchase after clicking a link, there’s no additional cost to you, but I will earn a very small commission. ) i.e. as an Amazon Associate, I earn from qualifying purchases. Click here to read my full disclosure policy.

    Wooden beads, twine, wire, scissors and a bottle of essential oil.

    How to Make a Wood Bead Diffuser
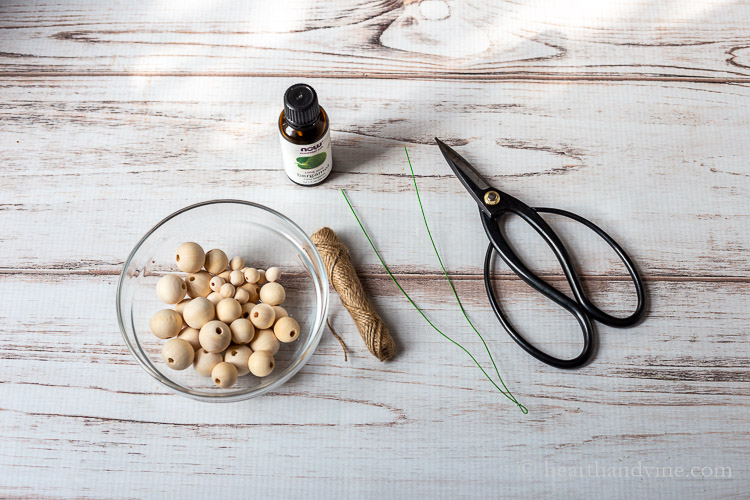
    Supplies

    • wooden beads of different sizes
    • natural twine or ribbon
    • a piece of wire
    • essential oils or fragrance oils
    Threading wood bead with wire onto twine.

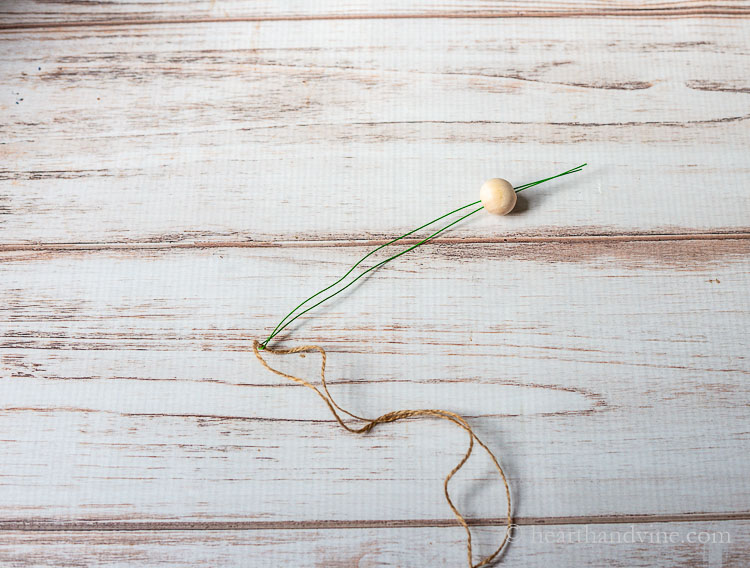
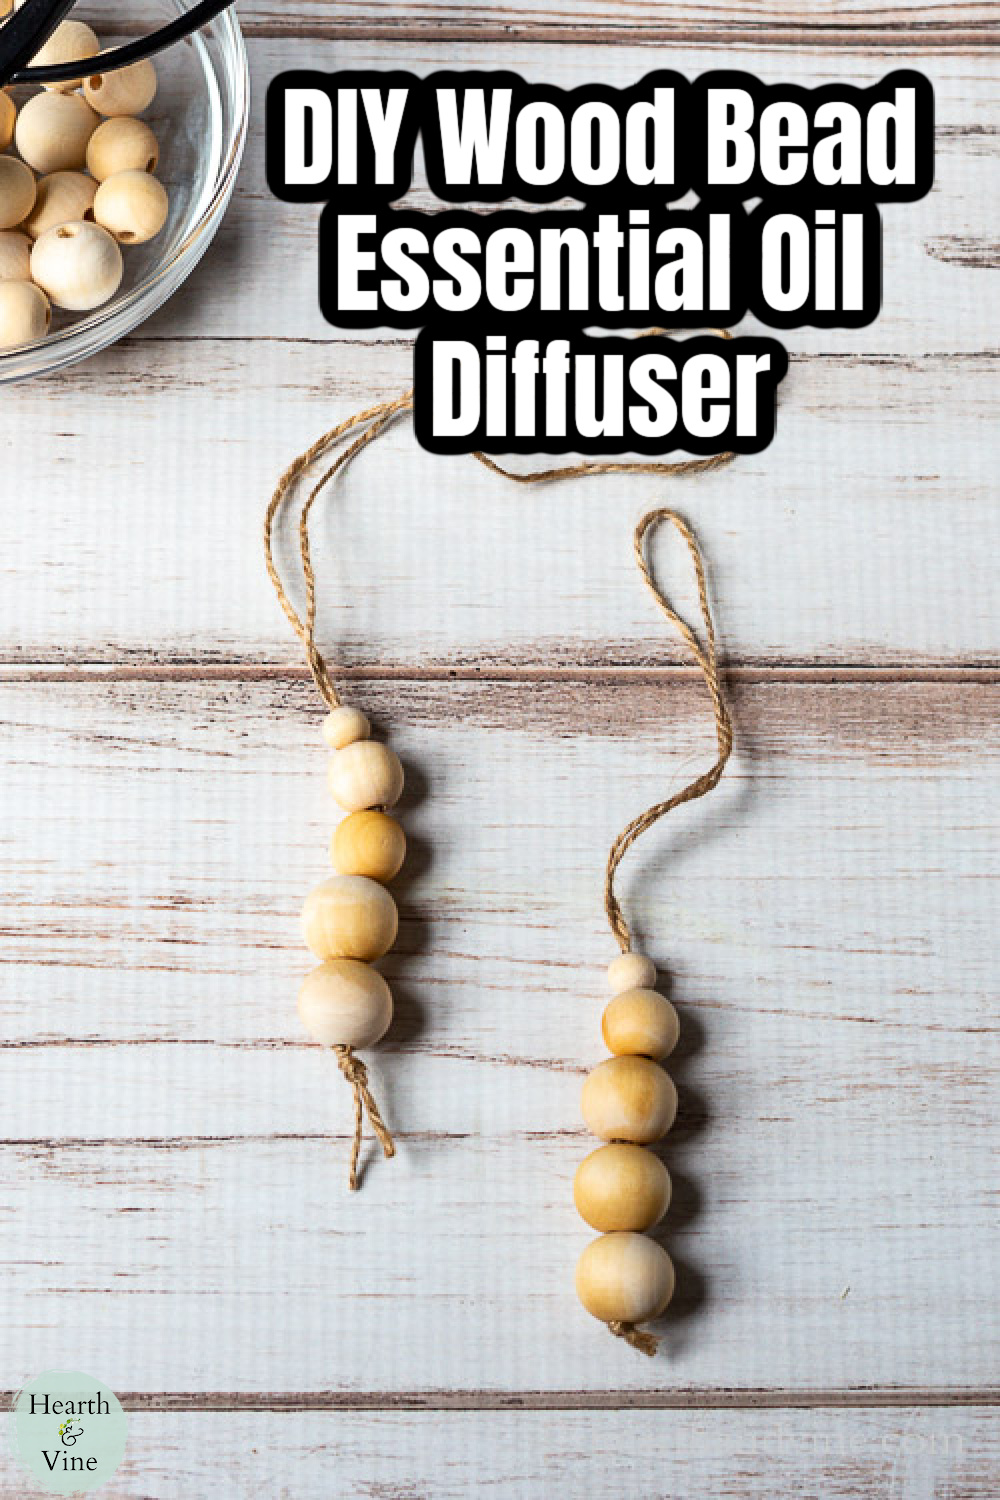
    Step 1. Start by cutting a piece of twine about 20 inches long. Fold it in half and tie a knot at the end.

    Then use a piece of thin wire to thread the beads over the folded end of the twine. To do this, bend your wire in half. Slip one side through the looped twine. Then add your beads over both ends of the wire and pull them down until you hit the knot at the end.

    Newsletter Signup
    Join Our Newsletter List!

    Be the first to receive new posts and get access to our Subscribers Only Page.

    Five wood beads threaded onto twine with a wire.

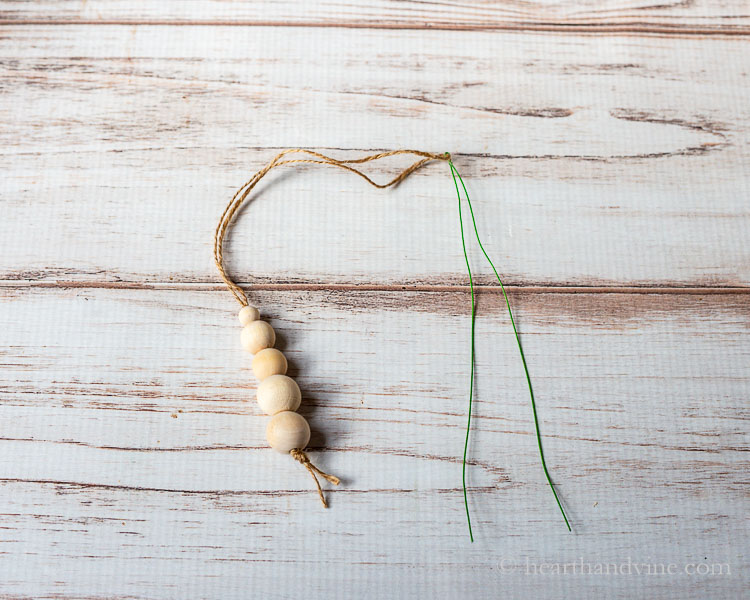
    Step 2. Continue to add beads in any pattern you want at any length you wish. Then remove the wire.

    Placing drops of essential oil on wood beads.

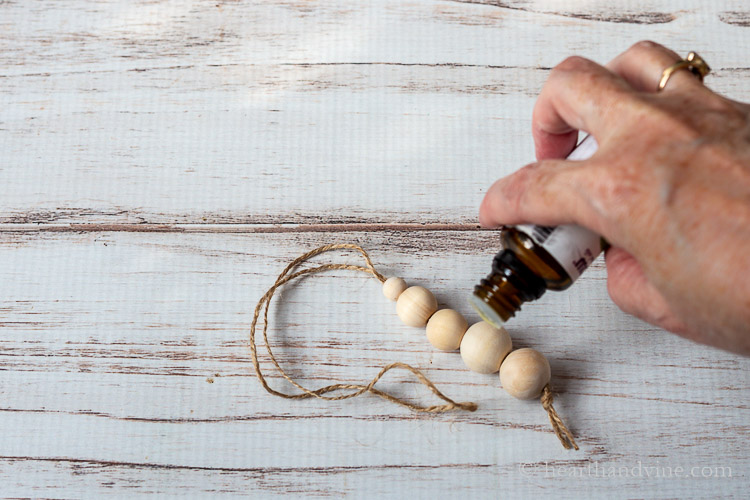
    Step 3. Add your essential oils. Add a few drops onto one or more of the beads. I love lavender for calming and lemon for freshness.

    Hanging the wood bead diffuser on the rearview mirror in a car.

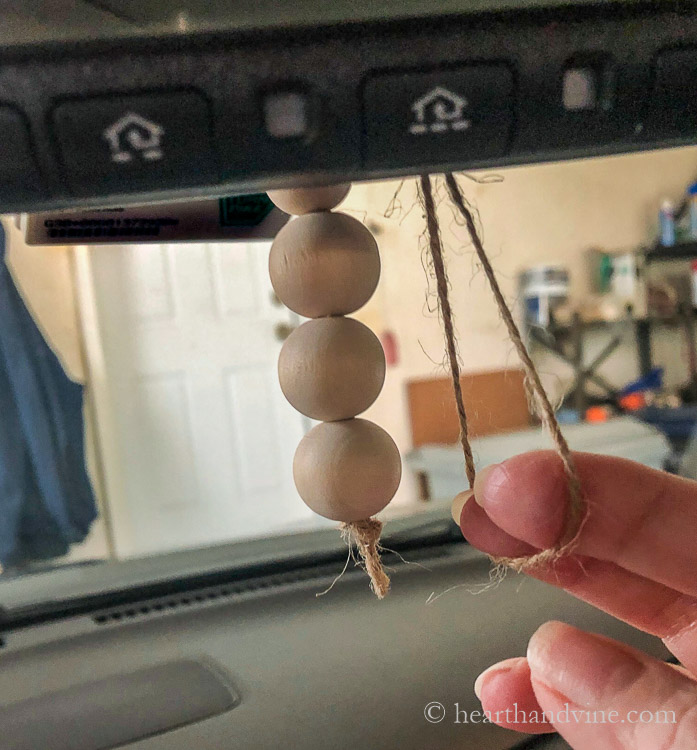
    To hang your wood diffuser onto a rearview mirror, place the twine over the bar, open the loop with your fingers, and slide the beads through the loop.

    Tying extra knot on diffuser to shorten length.

    If you find that you have too much twine, you can push up the beads and then make a second knot closer to the last bead and cut off the excess.

    Note: Be careful here. If you make it too short, you will not be able to easily remove the diffuser because you may no longer have enough twine to push the beads through.

    Finished wood bead diffuser hanging from car rearview mirror.

    Of course, you can hang these anywhere in the house. Another spot I like is hanging one from a torch floor lamp knob or arm. Or how about hanging some in the bathroom?

    I'm sure you can find lots of places to hang them, and once again, wouldn't this be a nice gift?

    Patti signature
    Two wood bead diffusers and a pair of scissors
    Print

    Make Your Own Wood Bead Diffuser

    Gather some wood beads and your favorite essential oils to create a pretty wood bead diffuser. Add some lovely aromatherapy to hang from your rearview mirror or anywhere in your home.
    Prep Time5 minutes mins
    Active Time10 minutes mins
    Total Time15 minutes mins
    Course: Essential Oils
    Yield: 1 Diffuser
    Cost: $3-$5

    Equipment

    • Scissors

    Materials

    • wooden beads of different sizes
    • natural twine or ribbon
    • a piece of wire
    • essential oils or fragrance oils

    Instructions

    • Start by cutting a piece of twine about 20 inches long.
    • Fold it in half and tie a knot at the end.
    • Use a piece of thin wire to thread the beads over the folded end of the twine.
    • To do this bend your wire in half.
    • Slip one side through the looped twine.
    • Add your beads over both ends of the wire.
    • Pull them down until you hit the knot at the end.
    • Add as many beads for the length you wish.
    • Remove the wire.  
    • Add a few drops of essential oils to one or more of the beads.
    • Hang your wood diffuser onto a rearview mirror by placing the twine over the bar.
    • Open the loop with your fingers, and slide the beads through the loop.

    Notes

    I like to use essential oils or essential oil blends; however, today you can find all kinds of artificial fragrances that work really well for fragrancing your home.
    Tried this project?Tag @hearthnvine on Instagram
    Two wooden bead diffusers hung on twine.
    « How to Make a Hanging Basket for Plants
    Patriotic Cherry Slab Pie »

    About Patti Estep

    Patti is the creator of Hearth and Vine, a home and garden blog filled with projects to inspire your creative side. She loves crafting, gardening, decorating and entertaining at her home in Pennsylvania. When she is not working on a project at home or searching for treasures at nurseries and thrift stores with her girlfriends, you’ll probably find her with family and friends, at a restaurant, or home party enjoying new and different food adventures.

    Reader Interactions

    Comments

    1. Lavonda

      October 16, 2022 at 8:54 pm

      Patti, are you still there? I would love to make one of these but I want to add 2 or 3 glass cut beads (bigger and smaller than the wood beads). Their holes are smaller and won't work with twine. Do you have any ideas on how I could make this work?

      Reply
      • Patti Estep

        October 17, 2022 at 7:07 am

        Lavonda, I'm not sure what to offer. I think you need twine or wire that is thin enough to thread your beads. Even if the twine is too thin for the wood beads but works with your glass beads it may be ok. If the twine is close but hard to thread you can try using a piece of wire bent in half. Lay the twine in the bend of the wire. Then thread both ends of the wire through the bead and pull the twine through by grasping the ends of the wire.

        Reply
    2. Jenn

      January 04, 2022 at 4:24 pm

      Hi Patti,

      What a wonderful idea! Excited to make one for my car!

      Can I add a couple of printed wood beads or they should all be natural wood only?

      Thanks,
      Jenn

      Reply
      • Patti Estep

        January 05, 2022 at 6:52 am

        Jenn, I haven't tried it but I don't see why you couldn't use printed beads in the mix.

        Reply
    3. Trish

      October 10, 2021 at 7:15 pm

      Where is the best place to buy essential oils?

      Reply
      • Patti Estep

        October 11, 2021 at 6:53 am

        Trish, there are so many places to buy essential oils. I usually order mine from Amazon. I like the NOW products but Aura Cacia is also a good one and I see it in my grocery store.

        Reply
    4. MrsSW

      August 14, 2020 at 9:33 am

      What a nice idea - unfortunately I just painted all my wood beads. I'm pinning this because I want to remember it (ha!) - will make one for the laundry room.
      Thanks, Patti,
      Sheila

      Reply
      • Patti Estep

        August 14, 2020 at 9:50 am

        Thanks Sheila, the laundry room would be a great place for them.

        Reply
        • Trish

          October 10, 2021 at 7:17 pm

          I love this idea. I am going to make these with my class and send home as a gift. Love it!!

        • Patti Estep

          October 11, 2021 at 6:54 am

          What a nice idea. I love it!

    Leave a Reply Cancel reply

    Your email address will not be published. Required fields are marked *

    Recipe Rating


    Primary Sidebar

    Patti Estep Profile Picture

    Hi!

    I'm Patti

    Join me to create lots of fun DIY projects, including crafts, gardening, home decor, and tasty recipes

    More about me

    Popular Posts

    • Baked zucchini bite on a slated tray with a bowl of horseradish sauce.
      Make Tasty Zucchini Bites in Under an Hour
    • Three tin cans in descending sizes hanging from twine.
      DIY Wind Chimes with Tin Cans
    • Blue jean crossover bag
      DIY Crossbody Bag from Jeans
    • Ham barbecue sandwich on plate
      Chipped Ham Barbecue Sandwiches - A Pittsburgh Favorite
    • Echievera planter
      What to do With a Stretched Succulent
    • Make a Mason Jar Oil Candle Lamp with botanicals and essential oils. ~ gardenmatter.com
      DIY Oil Candle - Gifts for the Holidays

    Footer

    ^ back to top

    About
    Contact
    Privacy Policy
    Disclosure Policy

    Sign Up Here!
    for our
    newsletter &
    special offers

    Follow Me

    facebook
    Pinterest
    instagram

    As an Amazon Associate, I earn from qualifying purchases. i.e. as an Amazon Associate, I earn from qualifying purchases.

    Copyright © 2025 Hearth and Vine

    Rate This Recipe

    Your vote:


    A rating is required
    A name is required
    An email is required