
• Skip to primary navigation
  • Skip to main content
  • Skip to primary sidebar
  • Home
  • DIY Projects
    • Homemade Bath and Body
    • Sewing - Fabric Crafts
    • Flower Crafts/Decor
    • Thrift Store/Vintage
  • Gardening
    • Flower Gardens
    • Container Gardening
    • Houseplants
    • Indoor Gardening
    • Landscaping
    • DIY Garden Art
  • Decorate
    • Spring Decor
    • Summer Decor
    • Fall Decor
    • Winter Decor
    • Home Decor Projects
  • Recipes
    • Breakfast Recipes
    • Lunch Recipes
    • Dinner Recipes
    • Dessert
    • Salad Recipes
    • Soups and Stews
    • Side Dish Recipes
    • Appetizers and Snacks
    • Healthy Recipes
  • Holidays
    • Valentine's Day
    • Easter
    • Mother's Day
    • Halloween
    • Thanksgiving
    • Christmas
Hearth and Vine
menu icon
go to homepage
  • About
  • DIY
    • ...Flower/Gardening Crafts
    • ... Bath and Body
    • ...Sewing/Fabric Crafts
    • ...Thrift Store/Upcycle
  • Gardening
    • ...Flower Gardens
    • ...Container Gardening
    • ...Indoor Gardening
    • ...DIY Garden Art
  • Decorate
    • ...Home Decor Projects
    • ...Spring Decor
    • ...Summer Decor
    • ...Fall Decor
    • ...Winter Decor
    • ...Room Makeovers
  • Recipes
    • ...Appetizers and Snacks
    • ...Dinner Recipes
    • ...Side Dish Recipes
    • ...Salad Recipes
    • ...Dessert
    • ...Drinks
  • Holidays
    • ...Valentine's Day
    • ...Easter
    • ...Mother's Day
    • ...Halloween
    • ...Thanksgiving
    • ...Christmas
  • Subscribe
  • Instagram
    • Facebook
    • Instagram
    • Pinterest
    • Twitter
  • subscribe
    search icon
    Homepage link
    • About
    • DIY
      • ...Flower/Gardening Crafts
      • ... Bath and Body
      • ...Sewing/Fabric Crafts
      • ...Thrift Store/Upcycle
    • Gardening
      • ...Flower Gardens
      • ...Container Gardening
      • ...Indoor Gardening
      • ...DIY Garden Art
    • Decorate
      • ...Home Decor Projects
      • ...Spring Decor
      • ...Summer Decor
      • ...Fall Decor
      • ...Winter Decor
      • ...Room Makeovers
    • Recipes
      • ...Appetizers and Snacks
      • ...Dinner Recipes
      • ...Side Dish Recipes
      • ...Salad Recipes
      • ...Dessert
      • ...Drinks
    • Holidays
      • ...Valentine's Day
      • ...Easter
      • ...Mother's Day
      • ...Halloween
      • ...Thanksgiving
      • ...Christmas
    • Subscribe
    • Instagram
    • Facebook
    • Instagram
    • Pinterest
    • Twitter
  • ×
    Home » DIY Projects

    Card Embroidery Craft

    by Patti Estep · Sep 9, 2026

    Jump to How-to Card
    Cards with embroidery of flowers and a sun.
    Two embroidered cards over the supplies needed to create them.

    Try this creative card embroidery craft, complete with a couple of printable templates to get you started.
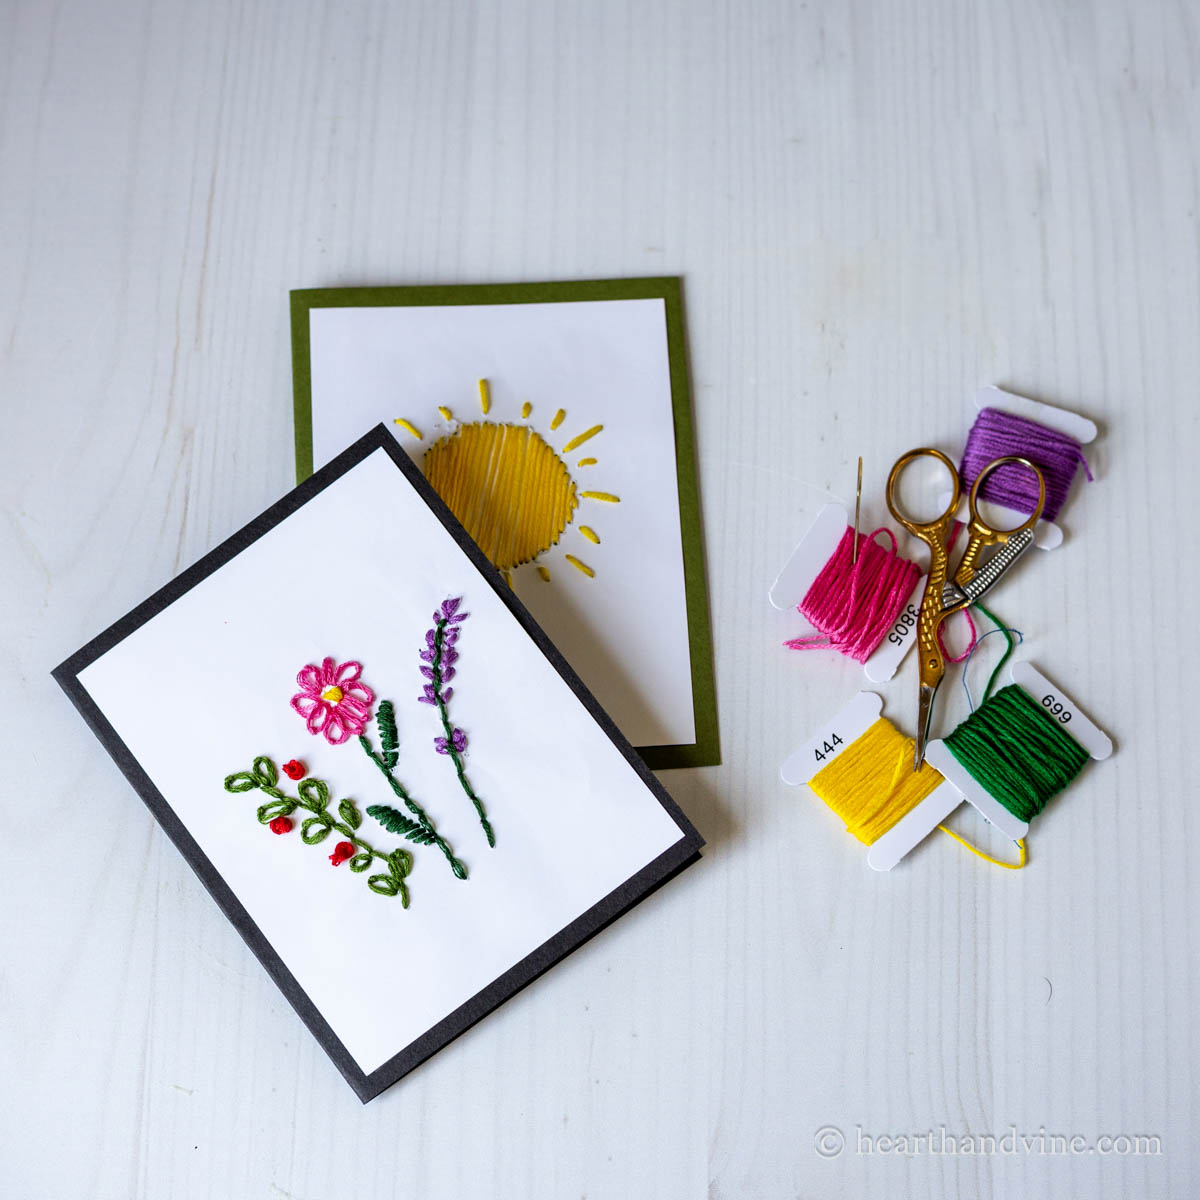
    Two embroidered cards with embroidery threads on the side.

    If you like embroidery or are interested in this fun fiber craft, you may love this card embroidery idea. You are simply embroidering on paper using a template or graphic, using your choice of stitches and colors.

    The basics are here along with a couple of templates, and then you get as creative as you like with your own ideas.

    More Paper Crafts: Eco Printing on Paper.....Making Handmade Paper.....Marbling Paper

    This post contains some affiliate links (that means if you make a purchase after clicking a link, there’s no additional cost to you, but I will earn a very small commission. ) i.e. as an Amazon Associate, I earn from qualifying purchases. Click here to read my full disclosure policy.
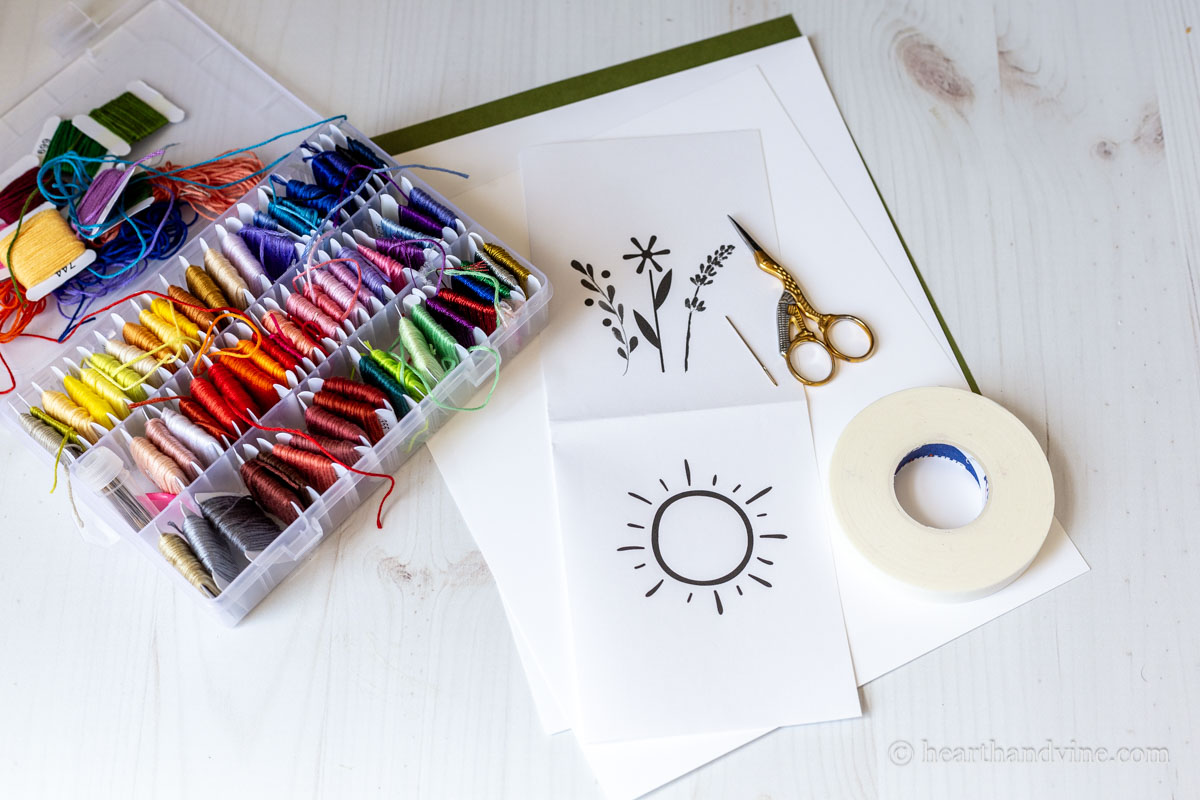
    The supplies for card embroidery including tape, scissors, embroidery thread, and paper.

    Supplies

    • Printer
    • Scissors
    • Embroidery needle
    • Pencil
    • Various Embroidery Threads
    • White Card Stock
    • Masking Tape
    • Colored Card Stock for Backing
    • Double Sided Tape
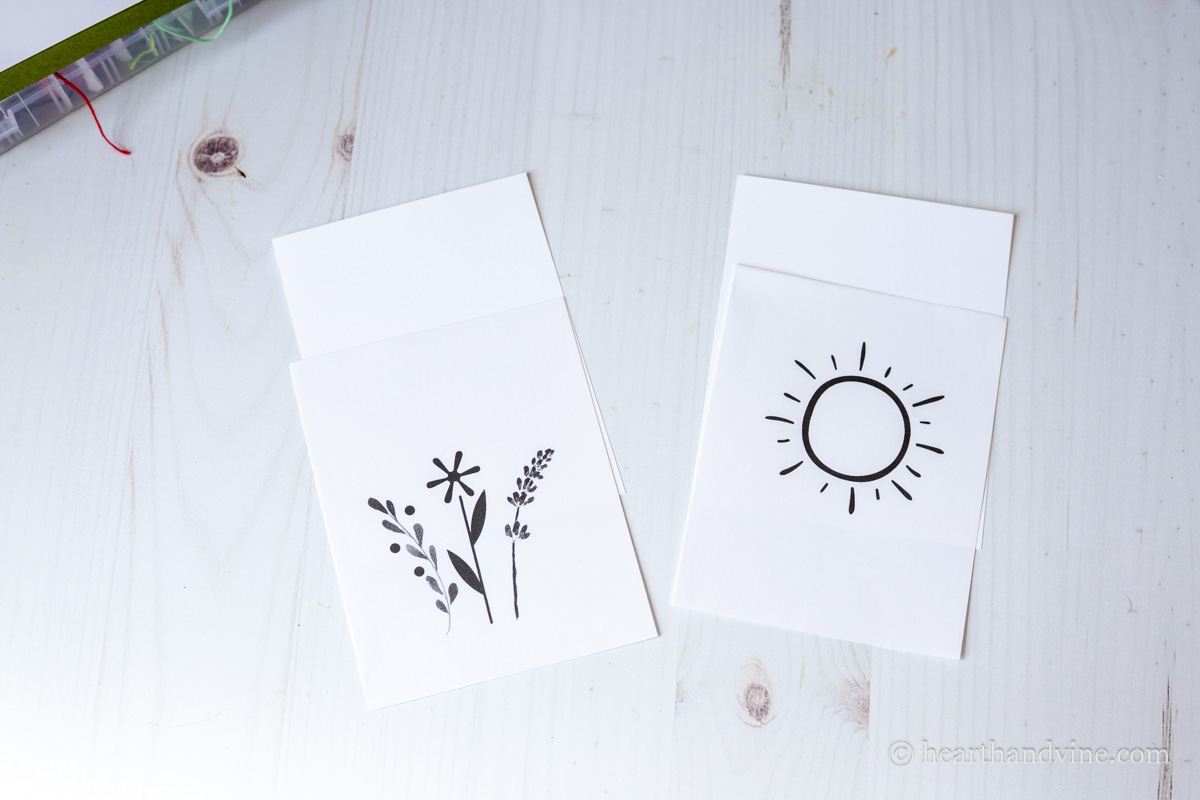
    Two card designs cut down to 1/4 page. One has three flowers and one a sun.
    Click image for PDF

    Making Embroidered Cards

    Step 1. Print out an image you want to create. You can use the ones above by clicking on the image for a printable PDF file.
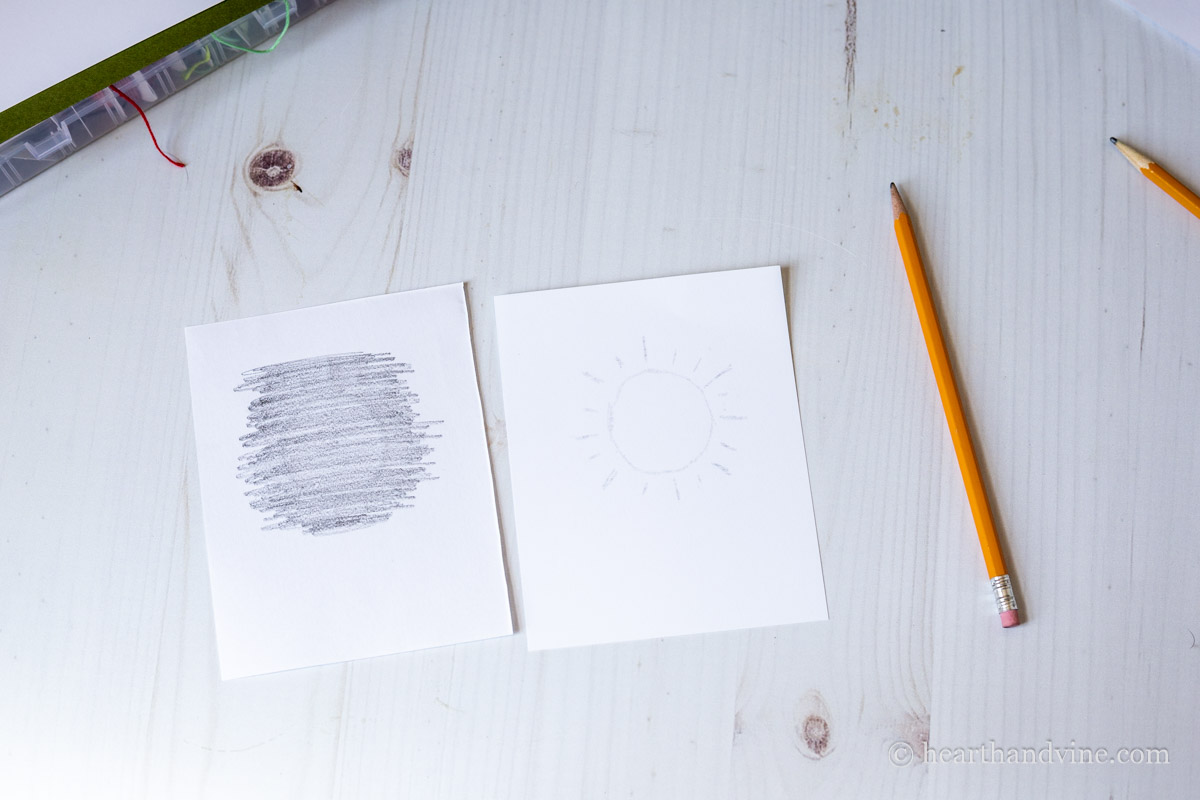
    Drawing pencil over the back of the design then tracing the design on to card stock.

    Step. 2. Cut them down to size of 1/4 page or 4.25 x 5.5 inches. Then cover the back of the template image with a pencil to trace onto cardstock paper of the same size. You can also use carbon paper.
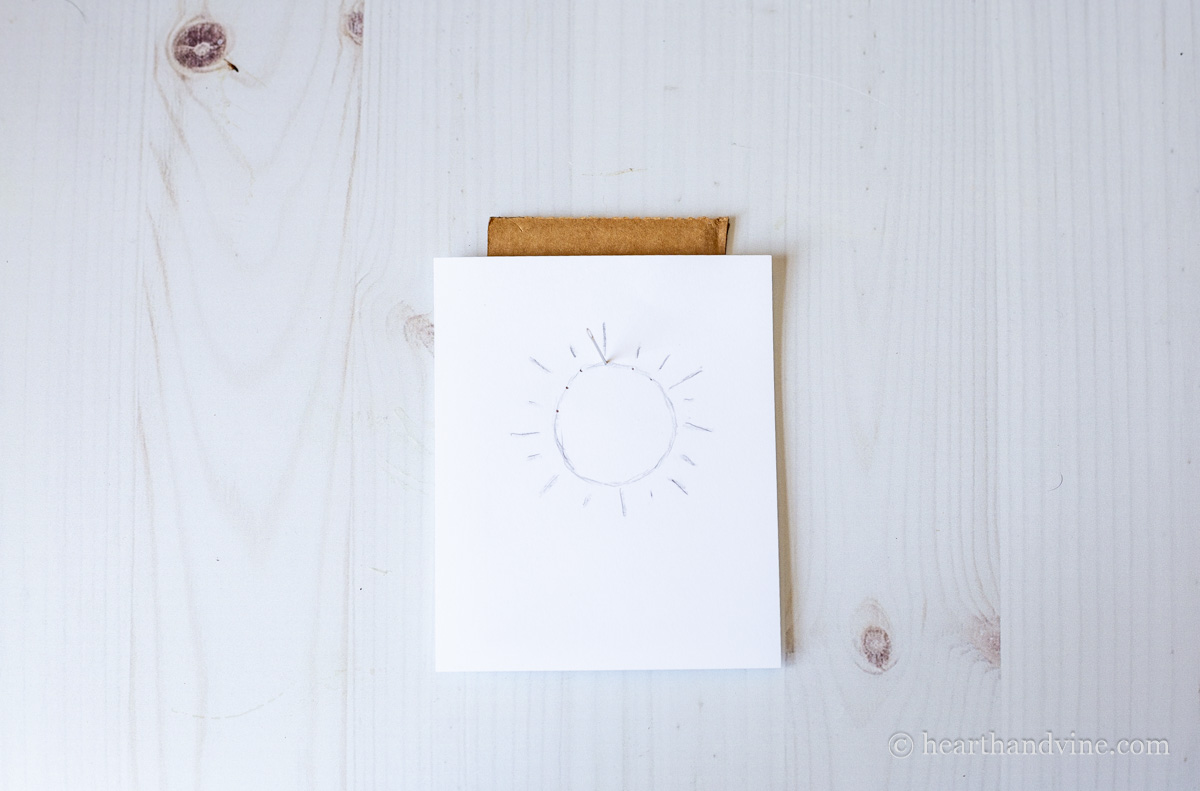
    Poking holes into card design on top of a piece of cardboard.

    Step 3. Place a piece of cardboard or foam under the traced image and use a blunt embroidery needle or an awl to make holes at various spots on the image.

    Note: It is also possible to hand embroider the image without using holes. In that case you may like a sharp embroidery needle.
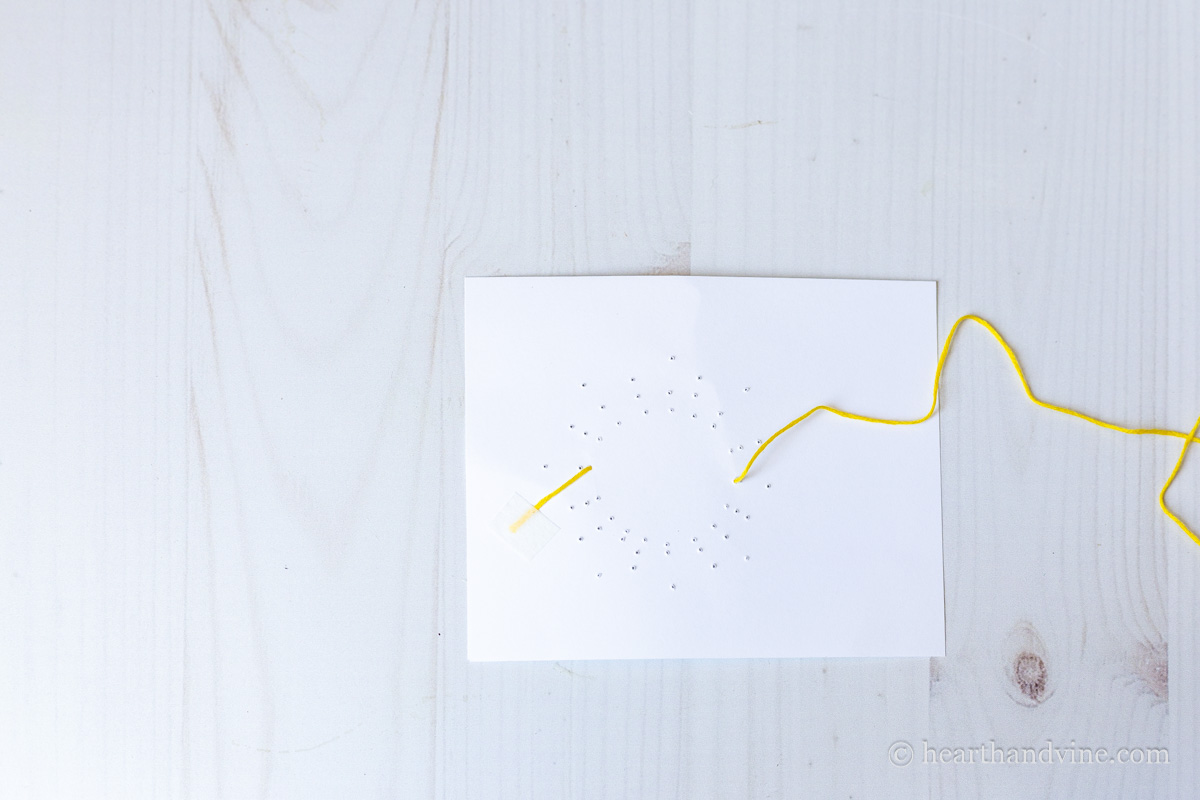
    Back of card showing the embroidery thread taped.

    Step 4. Thread a length of embroidery thread through the back of the card and tape it down with masking tape. You can use all six threads or only a few depending on the look you like. I used all six.

    Note: You could make a knot at the end instead of using tape, but the end result may look bumpy.

    Needles to Use: Blunt cross-stitch or tapestry needles are good choices that will go through the holes easily. However, if you prefer not to use the holes and eyeball the stitches, a regular embroidery needle with a sharp end would work better.
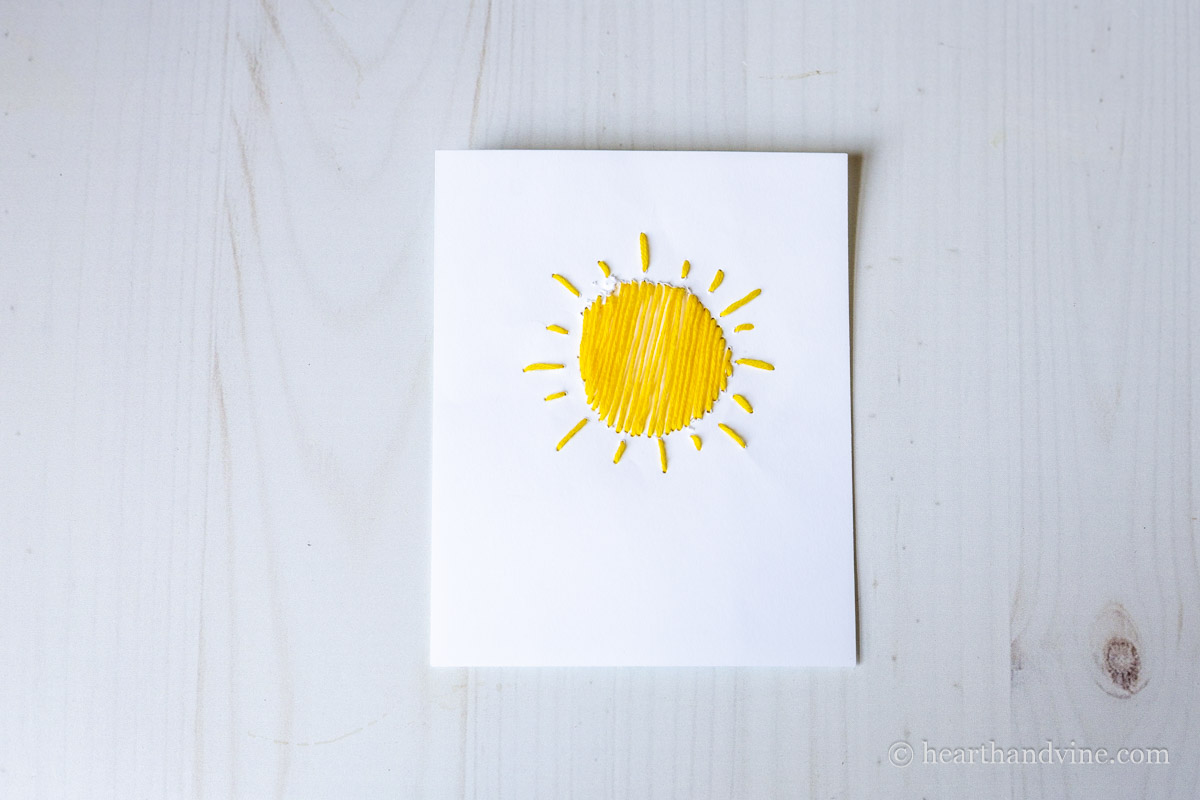
    Sun design embroidered card.

    Step 5. Sew through the holes with basic straight stitches to cover the design. When you run out of thread, tape the end in the back and repeat with a new piece of thread.
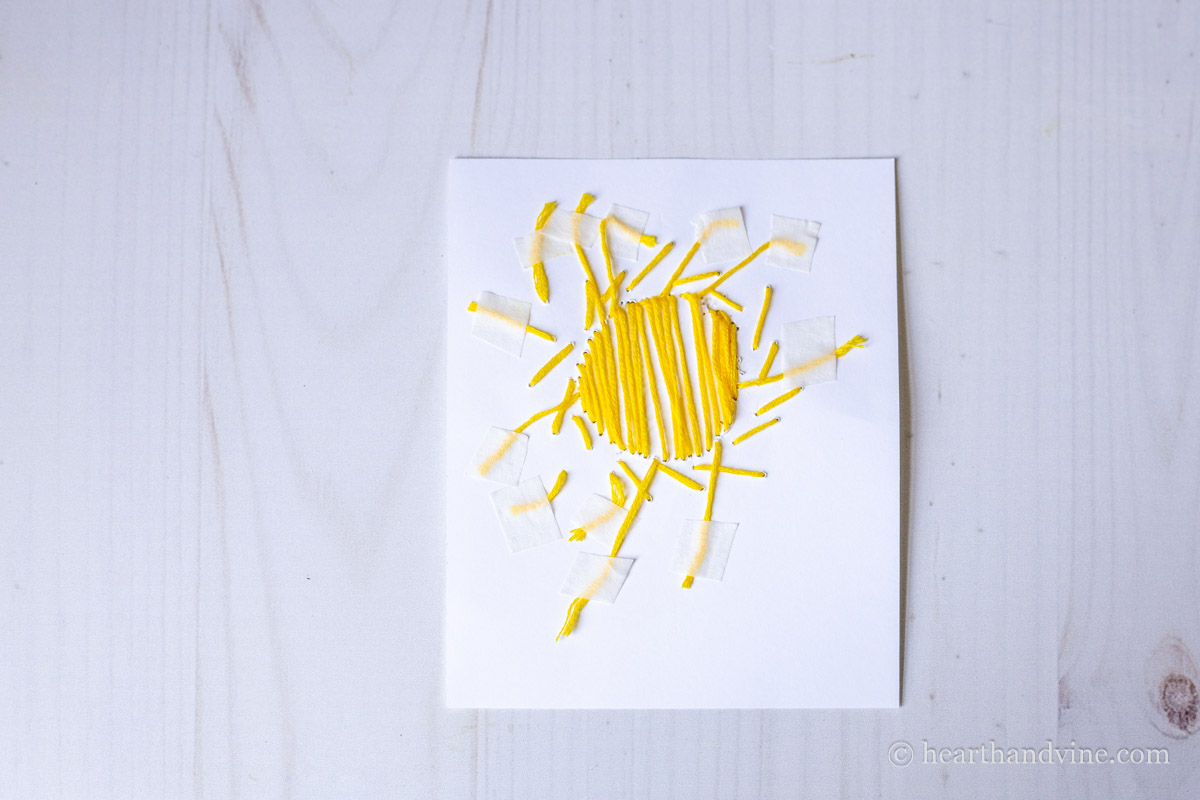
    Back of card embroidered with a sun design.

    Here's what the back looks like when it's finished. As this looks really messy, I decided to tape it to a darker cardstock paper with double-sided tape for the finished card. You could also tape it to another piece of white cardstock. If you use a dark cardstock, you may want to tape some white paper on the inside of the card to write a message.
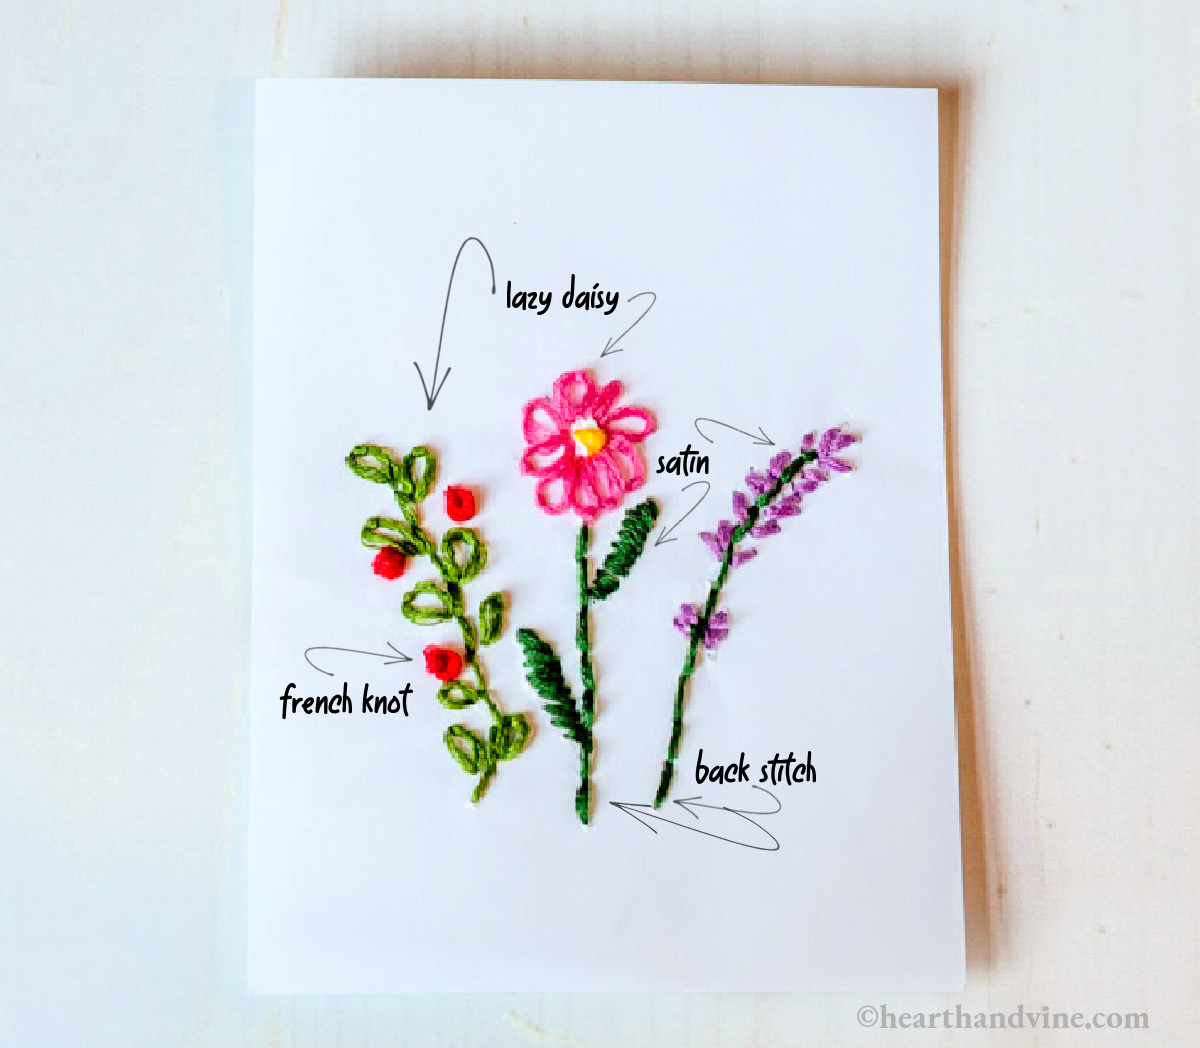
    Floral embroidered card with stitches labeled.

    For fancier stitches, try a combination of basic embroidery as shown above. If you are unfamiliar with these, you can find many easy-to-follow videos on YouTube. Here's a basic video to follow.
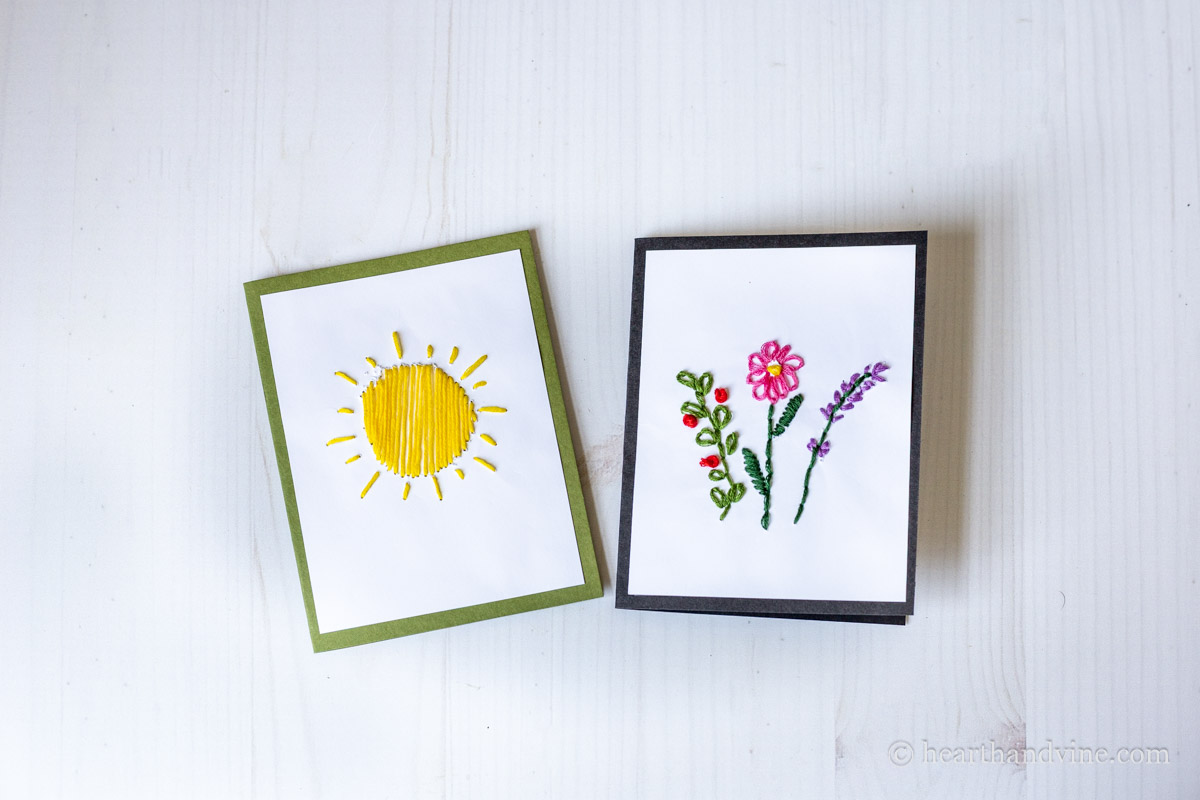
    Two finished card embroidery projects. One of a sun and one of flowers.

    These are the finished cards. Use them for any occasion, such as a thank-you card, a birthday card, or for no reason at all.

    Patti signature
    Two embroidered cards with embroidery threads on the side.
    Print

    Card Embroidery Craft

    Learn how to create card embroidery with a basic template, embroidery threads, and paper.
    Active Time1 hour hr 30 minutes mins
    Total Time1 hour hr 30 minutes mins
    Course: Crafts

    Equipment

    • Printer
    • Scissors
    • Embroidery needle
    • pencil

    Materials

    • Various Embroidery Threads
    • White Card Stock
    • Cardboard or Foam
    • Masking Tape
    • Colored Card Stock for Backing
    • Double Sided Tape

    Instructions

    • Print out your template image.
    • Trace the image onto some white cardstock paper with a pencil or carbon paper.
    • Place the traced image on some cardboard and punch holes in the image at intervals with a needle or awl.
    • Cut a length of embroidery thread and thread it through an embroidery needle.
    • Tape one end of the thread to the back of the card and start sewing up through the holes.
    • When you run out of thread, tape the end to the back and repeat with a new piece of thread.
    • Use different types of embroidery stitches to add texture and interest, such as the backstitch for straight lines or French knots for small round areas.
    • Once finished, mount the card with double-sided tape to another card to hide the messy threads on the back.

    Notes

    You can simply use straight stitches to fill in the image. However, you could also add interest with many basic embroidery stitches, such as a satin stitch or the lazy daisy stitch.
    You don't need to punch holes. You can eyeball the areas to complete the design.
    You can mount the final card onto more white cardstock if preferred.
     
    Tried this project?Tag @hearthnvine on Instagram
    « Grow Lights for Indoor Plants
    Loaded Potato Bites »

    About Patti Estep

    Patti is the creator of Hearth and Vine, a home and garden blog filled with projects to inspire your creative side. She loves crafting, gardening, decorating and entertaining at her home in Pennsylvania. When she is not working on a project at home or searching for treasures at nurseries and thrift stores with her girlfriends, you’ll probably find her with family and friends, at a restaurant, or home party enjoying new and different food adventures.

    Reader Interactions

    Comments

    1. Paula

      September 09, 2026 at 10:33 am

      Patti, I make all my cards and do some of these also. I really enjoy doing Christmas ones like this. I will definitely be trying these. Thanks for sharing.

      Reply
      • Patti Estep

        September 09, 2026 at 11:12 am

        ​So glad to hear you liked the post Paula.

        Reply

    Leave a Reply Cancel reply

    Your email address will not be published. Required fields are marked *

    Recipe Rating


    Primary Sidebar

    Patti Estep Profile Picture

    Hi!

    I'm Patti

    Join me to create lots of fun DIY projects, including crafts, gardening, home decor, and tasty recipes

    More about me

    Popular Posts

    • Pressed flower are in two dark frames.
      DIY Pressed Flower Art
    • Pilea peperomioides
      Pilea Plant - The Pass It On Friendship Plant
    • Serving of cream of crab soup in a red bowl.
      Easy Cream of Crab Soup
    • Small indoor water fountain
      DIY Indoor Water Fountain
    • Chicken oscar on a plate
      Easy Chicken Oscar Recipe Made with Hollandaise Sauce
    • Fabric bowl covers in 3 prints
      How to Make Fabric Bowl Covers

    Footer

    ^ back to top

    About
    Contact
    Privacy Policy
    Disclosure Policy
    Terms of Service

    Sign Up Here!
    for our
    newsletter &
    special offers

    Follow Me

    facebook
    Pinterest
    instagram

    As an Amazon Associate, I earn from qualifying purchases. i.e. as an Amazon Associate, I earn from qualifying purchases.

    Copyright © 2026 Hearth and Vine

    Rate This Recipe

    Your vote:


    A rating is required
    A name is required
    An email is required