• Skip to primary navigation
  • Skip to main content
  • Skip to primary sidebar
  • Home
  • DIY Projects
    • Homemade Bath and Body
    • Sewing - Fabric Crafts
    • Flower Crafts/Decor
    • Thrift Store/Vintage
  • Gardening
    • Flower Gardens
    • Container Gardening
    • Houseplants
    • Indoor Gardening
    • Landscaping
    • DIY Garden Art
  • Decorate
    • Spring Decor
    • Summer Decor
    • Fall Decor
    • Winter Decor
    • Home Decor Projects
  • Recipes
    • Breakfast Recipes
    • Lunch Recipes
    • Dinner Recipes
    • Dessert
    • Salad Recipes
    • Soups and Stews
    • Side Dish Recipes
    • Appetizers and Snacks
    • Healthy Recipes
  • Holidays
    • Valentine's Day
    • Easter
    • Mother's Day
    • Halloween
    • Thanksgiving
    • Christmas
Hearth and Vine
menu icon
go to homepage
  • About
  • DIY
    • ...Flower/Gardening Crafts
    • ... Bath and Body
    • ...Sewing/Fabric Crafts
    • ...Thrift Store/Upcycle
  • Gardening
    • ...Flower Gardens
    • ...Container Gardening
    • ...Indoor Gardening
    • ...DIY Garden Art
  • Decorate
    • ...Home Decor Projects
    • ...Spring Decor
    • ...Summer Decor
    • ...Fall Decor
    • ...Winter Decor
    • ...Room Makeovers
  • Recipes
    • ...Appetizers and Snacks
    • ...Dinner Recipes
    • ...Side Dish Recipes
    • ...Salad Recipes
    • ...Dessert
    • ...Drinks
  • Holidays
    • ...Valentine's Day
    • ...Easter
    • ...Mother's Day
    • ...Halloween
    • ...Thanksgiving
    • ...Christmas
  • Subscribe
  • Instagram
    • Facebook
    • Instagram
    • Pinterest
    • Twitter
  • subscribe
    search icon
    Homepage link
    • About
    • DIY
      • ...Flower/Gardening Crafts
      • ... Bath and Body
      • ...Sewing/Fabric Crafts
      • ...Thrift Store/Upcycle
    • Gardening
      • ...Flower Gardens
      • ...Container Gardening
      • ...Indoor Gardening
      • ...DIY Garden Art
    • Decorate
      • ...Home Decor Projects
      • ...Spring Decor
      • ...Summer Decor
      • ...Fall Decor
      • ...Winter Decor
      • ...Room Makeovers
    • Recipes
      • ...Appetizers and Snacks
      • ...Dinner Recipes
      • ...Side Dish Recipes
      • ...Salad Recipes
      • ...Dessert
      • ...Drinks
    • Holidays
      • ...Valentine's Day
      • ...Easter
      • ...Mother's Day
      • ...Halloween
      • ...Thanksgiving
      • ...Christmas
    • Subscribe
    • Instagram
    • Facebook
    • Instagram
    • Pinterest
    • Twitter
  • ×
    Home » DIY Projects

    DIY Credit Card Holder: No Sewing Machine Necessary

    by Patti Estep · Apr 5, 2023

    Jump to How-to Card
    Small leather hand stitched card holder in blue with credit cards inside.
    Phone and credit card holder peeking out of a small clutch over same card holder showing the top down view.

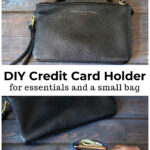
    Learn how to make a card holder for ID, a credit card, and a few bills. Perfect for a special event when you want to carry a small purse or clutch.

    Leather card holder next to a small black purse.

    Here's a fast and easy craft that may come in handy the next time you go out but don't want to carry your large everyday handbag.

    The inspiration to create this credit card holder came from my daughter's card holder which is attached to the back of her phone. However, I have a pop socket on the back of my phone so this is a separate item.

    This post contains some affiliate links (that means if you make a purchase after clicking a link, there’s no additional cost to you, but I will earn a very small commission. ) i.e. as an Amazon Associate, I earn from qualifying purchases. Click here to read my full disclosure policy.

    Large wallet with keys and store cards on the ring.

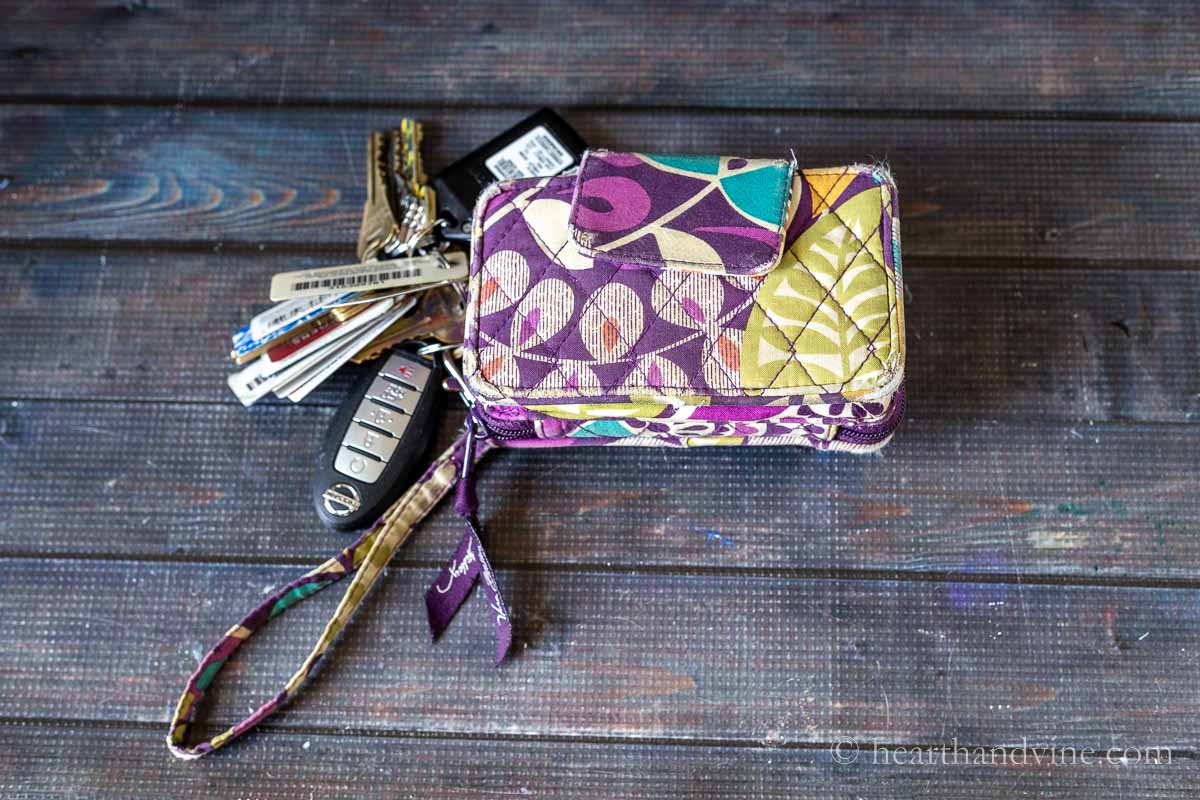
    Here's what my wallet looks like. It's stuffed with different cards, ID, bills, coins, and various coupons. Never mind the large purse filled with everything under the sun that I usually carry it in.

    Not practical for a wedding reception or other outing when you don't want to carry so much but still need the basics.

    If you have been following me for a while you may recall that I made a small fabric wallet a few years back for this purpose. However, it's still large and this seemed like something I would like to try.

    Newsletter Signup
    Join Our Newsletter List!

    Be the first to receive new posts and get access to our Subscribers Only Page.

    What You Will Need

    • small piece of leather, faux leather, or vinyl
    • skein of complementary or contrasting embroidery thread
    • sewing needle
    • scissors
    • ruler
    • marking pen or chalk
    Blue faux leather, a green plastic ruler and a chalk marker outlining a rectangle on the edge.

    How to Make a Card Holder

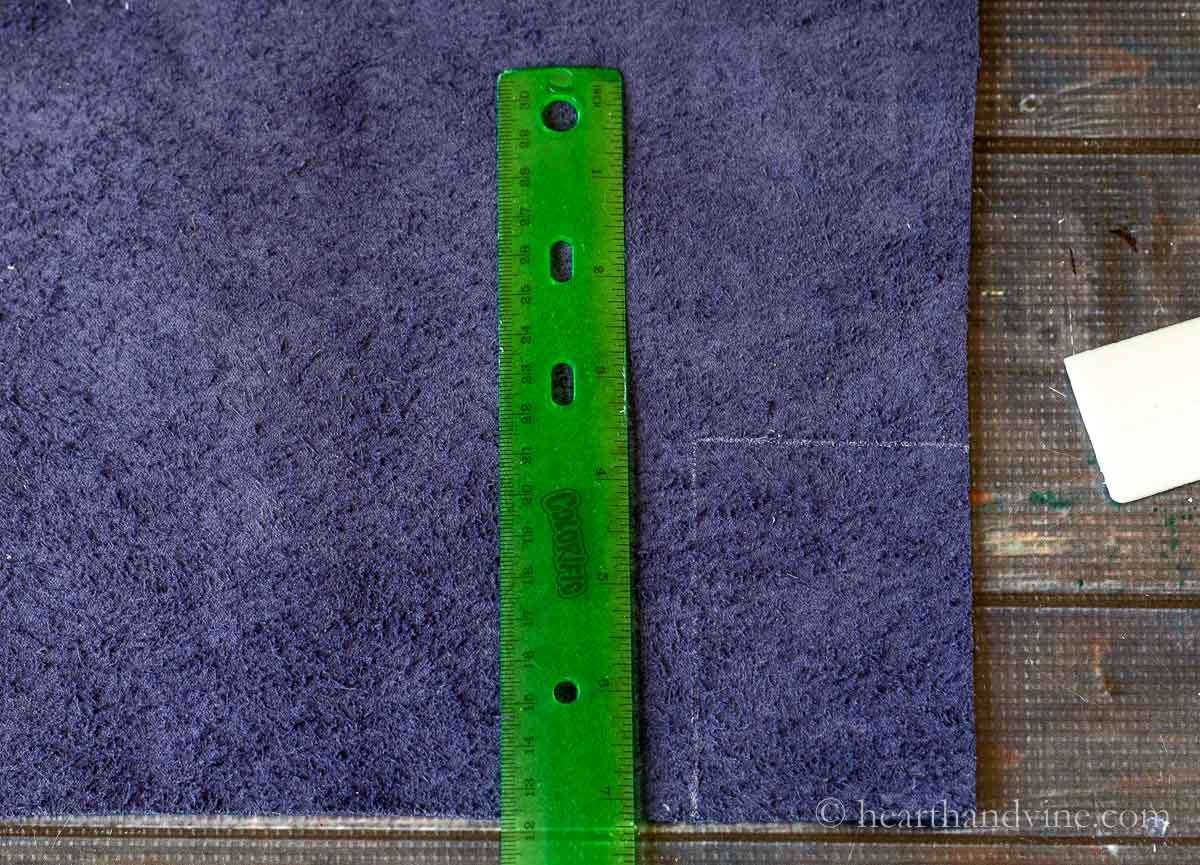
    1. Cut out two pieces of fabric. I used a 2.25 inch width by 3 3/8 inch length. However, you can adjust this size if you like.
    A rectangle of blue faux leather and a white chalk mark on the top left corner to the right side.

    2. Draw a line on the top piece with a ruler and chalk from the upper corner to the side.

    Two pieces of faux blue leather with wrong side together and top piece with a cut out from top left corner to right side.

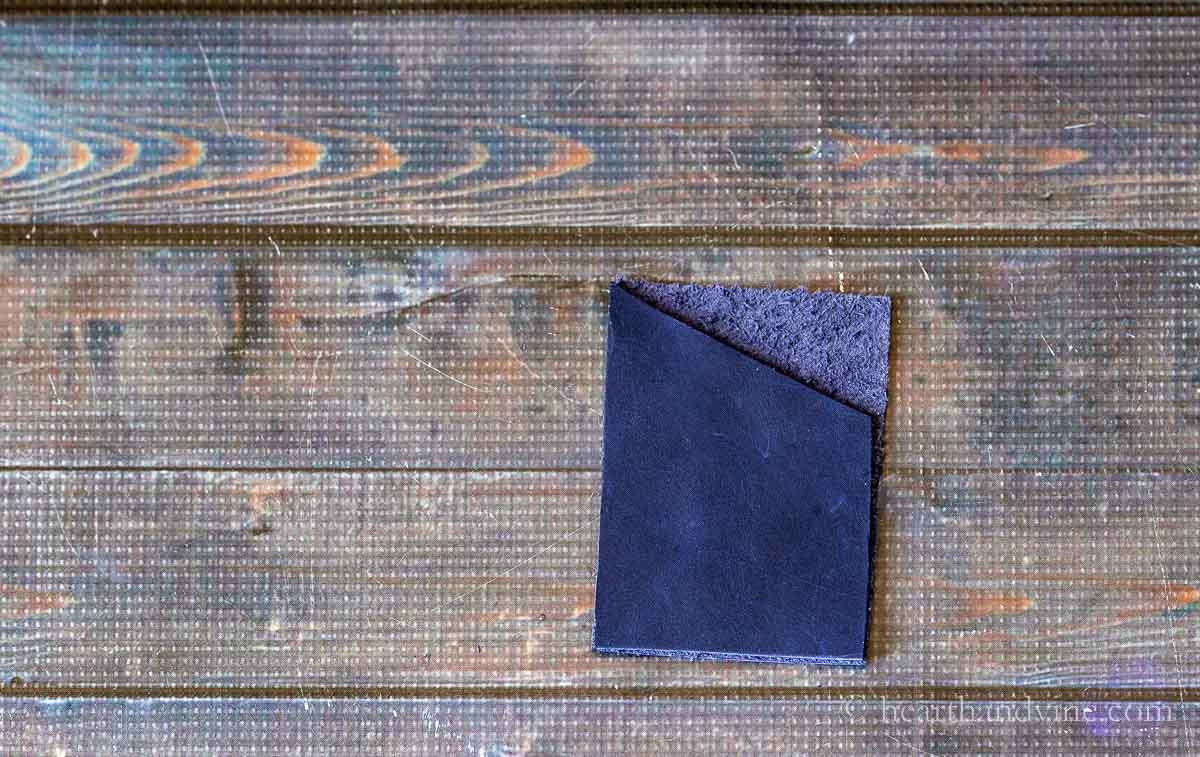
    3. Cut along the line and discard the fabric. This will make it easier to slide out a card.

    Teal embroidery thread sewing two pieces of faux leather together with a blanket stitch.

    4. Place your leather pieces with the wrong sides together.

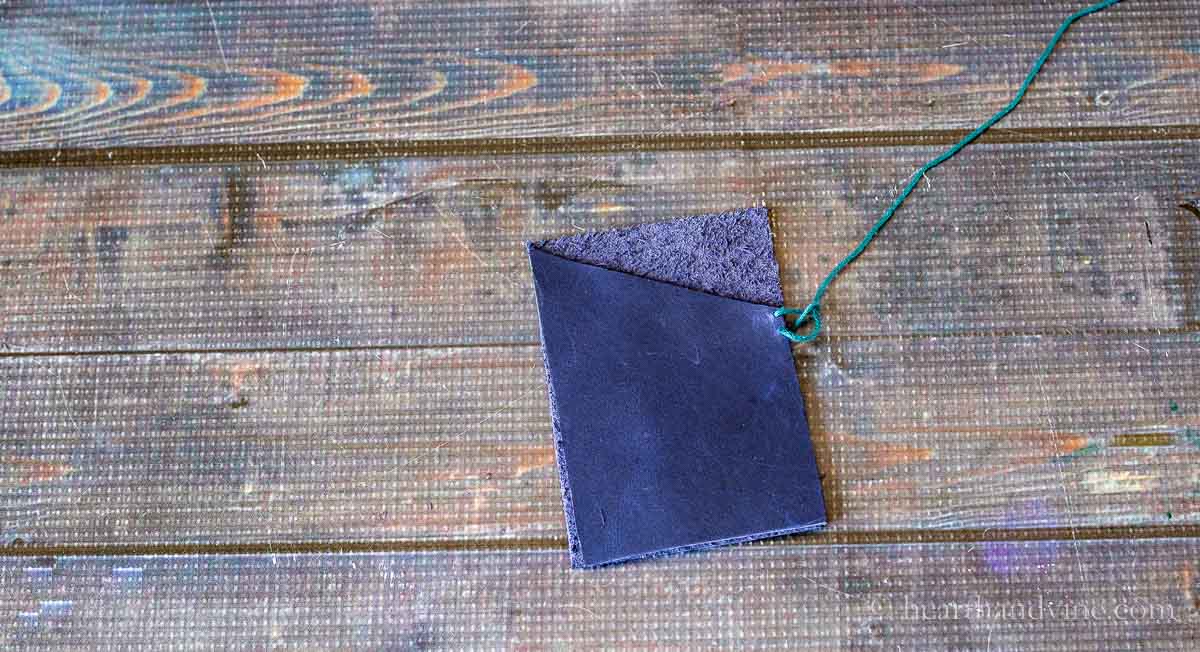
    5. Make a knot in your embroidery thread and start sewing on the side where the two pieces meet. Do this on the inside first to hide the knot.

    6. Then sew the sides together with a blanket stitch. This is when you make a stitch and come through the loop just before you pull it all the way through.

    7. Continue hand sewing until you reach the other corner. Tie a knot and hide it inside at the end.

    A small blue faux leather card holder on top of a small black clutch.

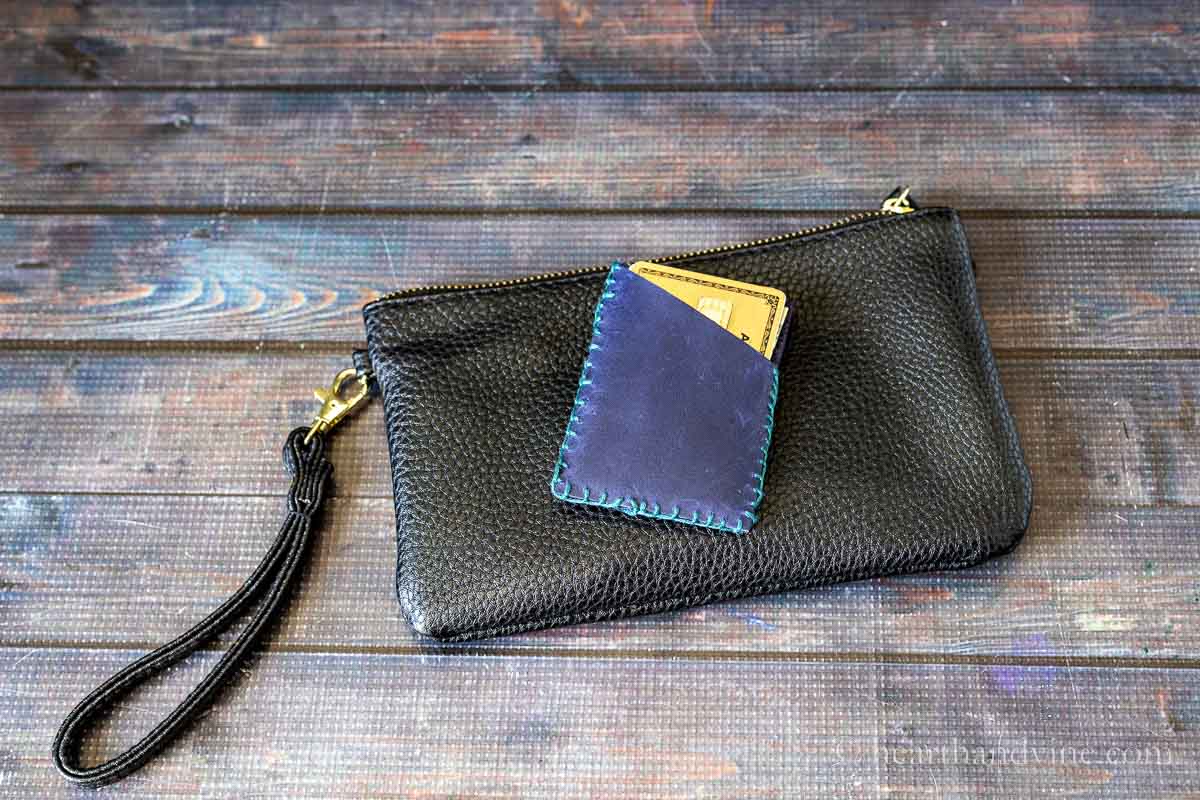
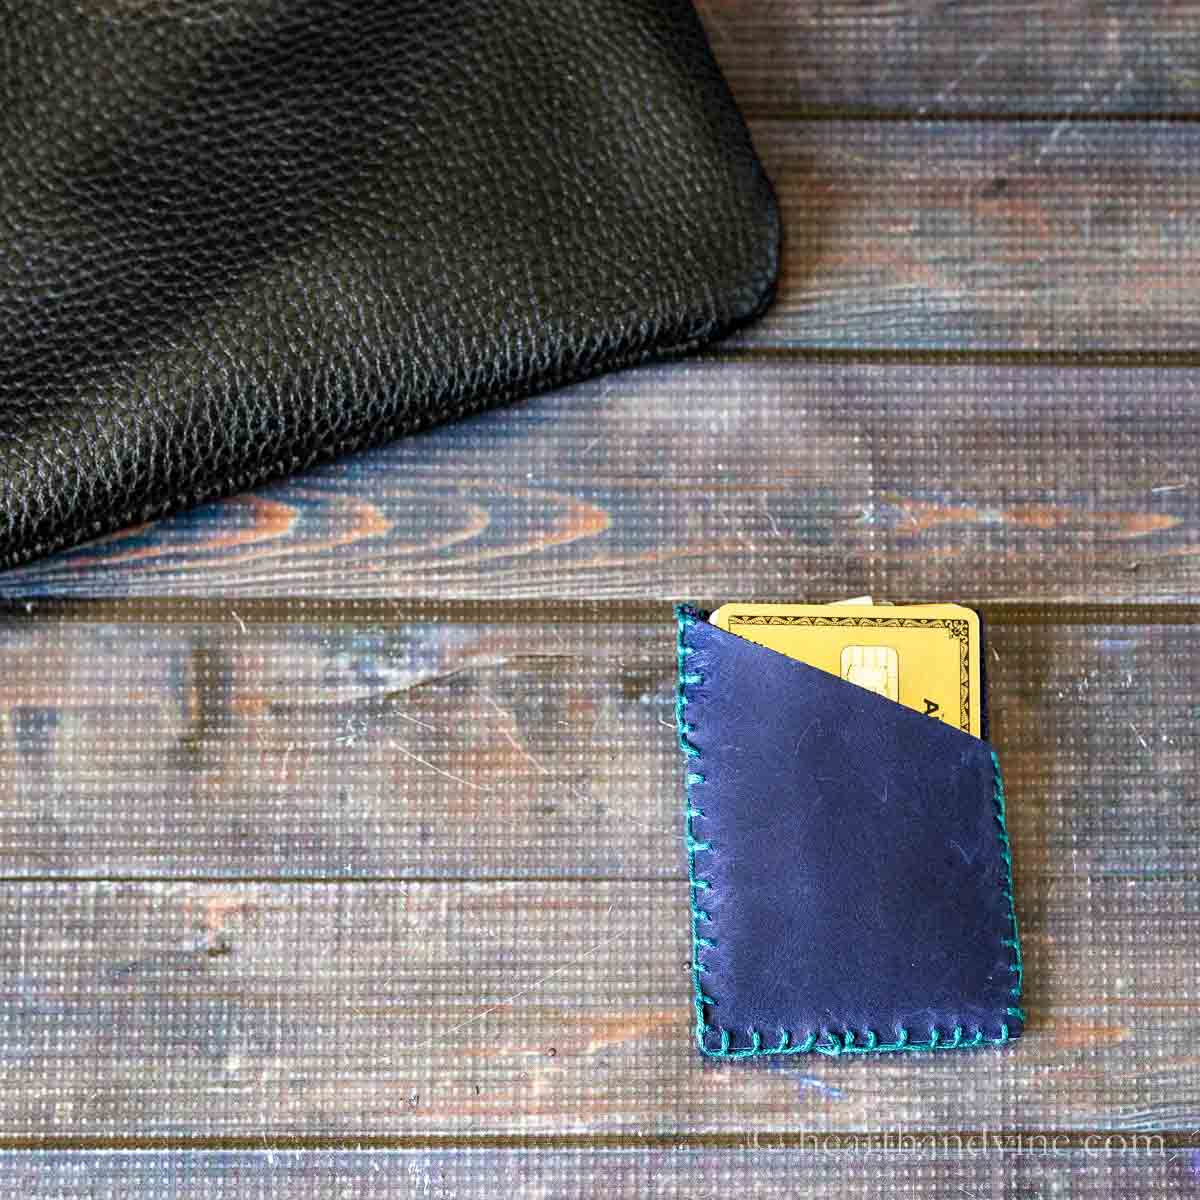
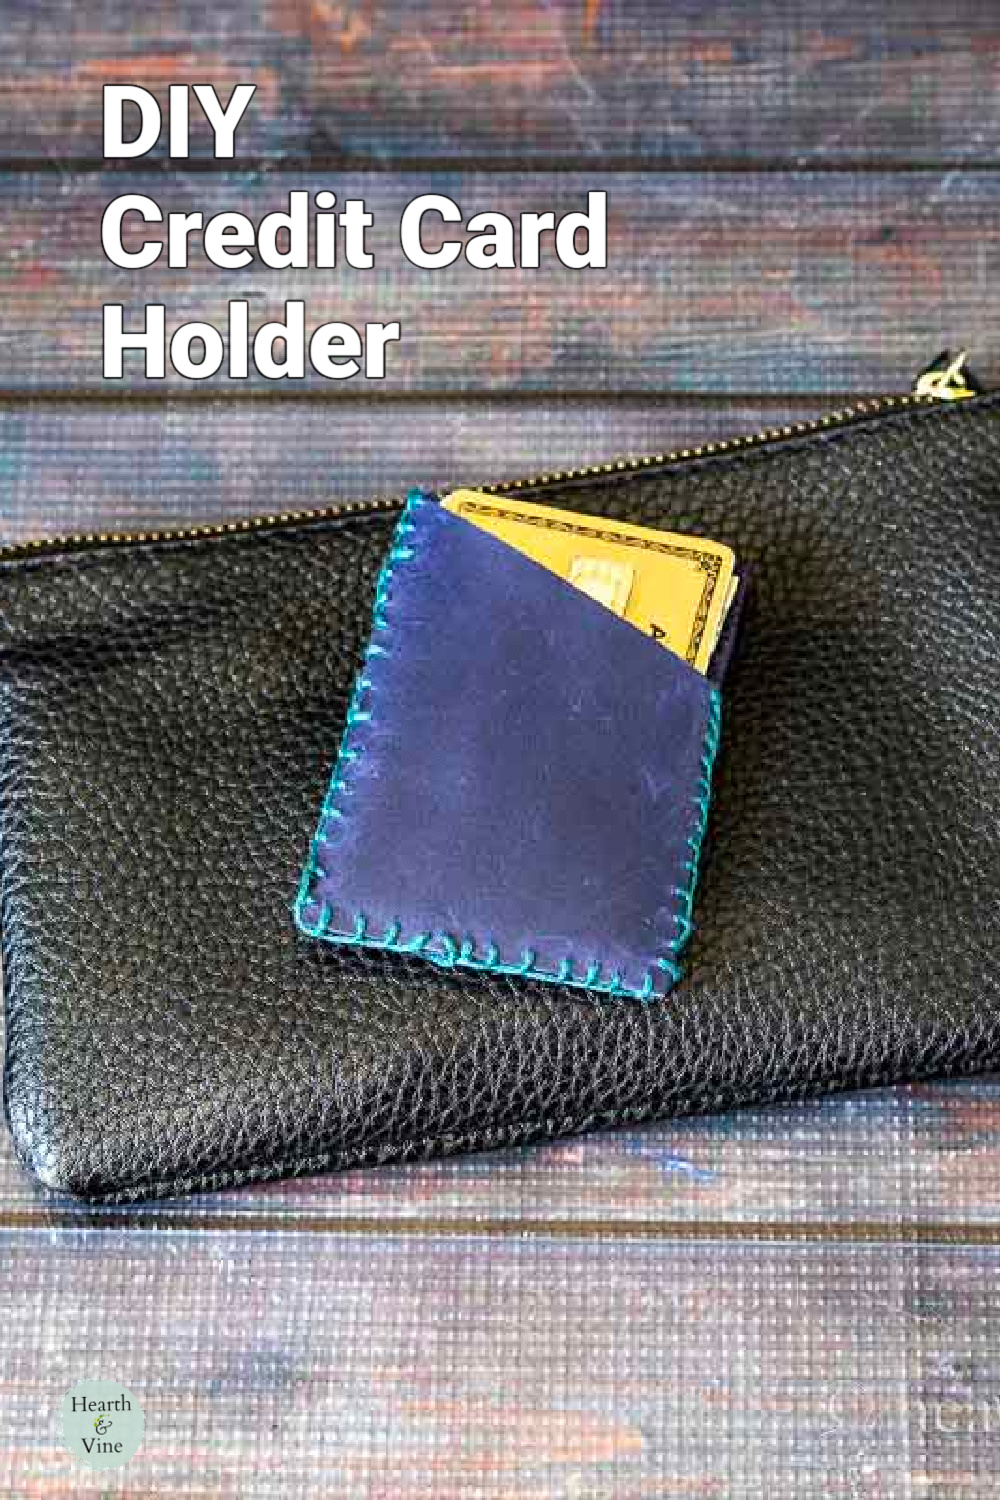
    I think the blanket stitch is pretty and also a nice secure stitch. However, as you can see my stitches could have been a little more uniform.

    Also, I may have chosen a darker blue but I wanted to make sure that you can see the stitches in this tutorial. The choice of color is totally up to you.

    Top view of credit card holder showing a few cards and a few bills inside.

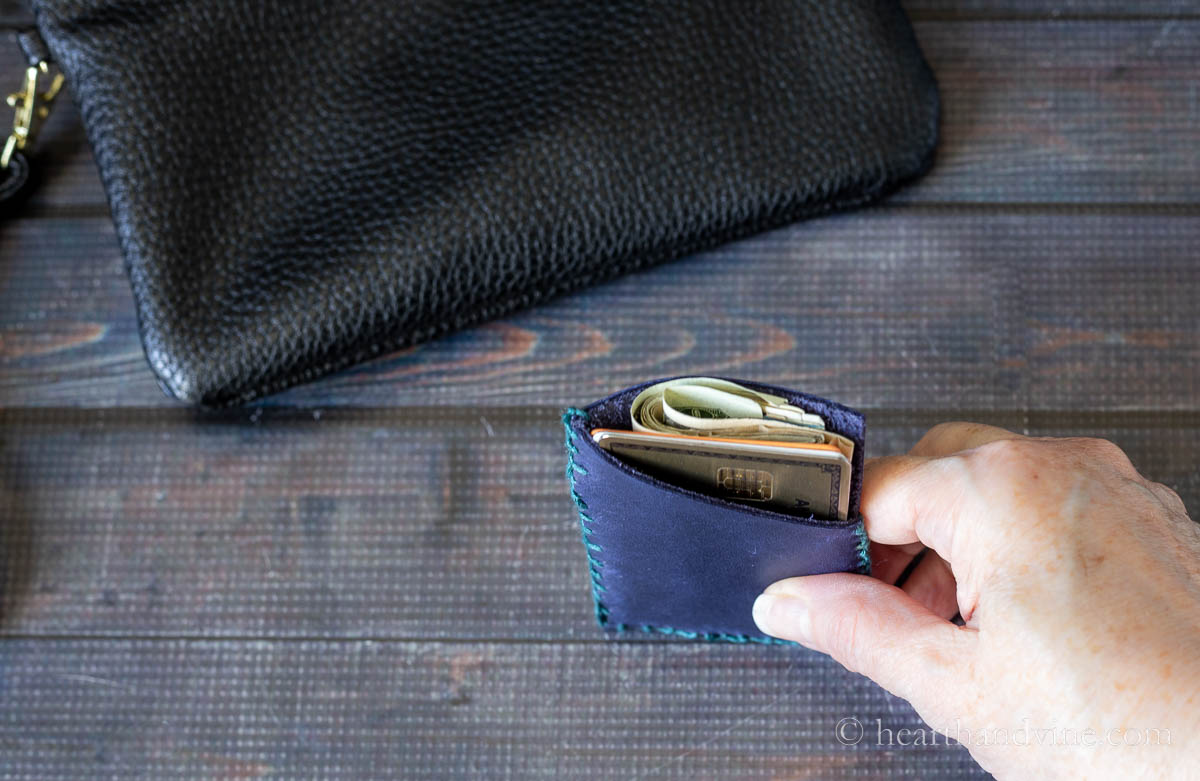
    As you can see this nifty little credit card holder easily holds a couple of credit cards, my ID, and a few bills. Perfect!

    A black evening clutch with a phone and a credit card holder peeking out the top.

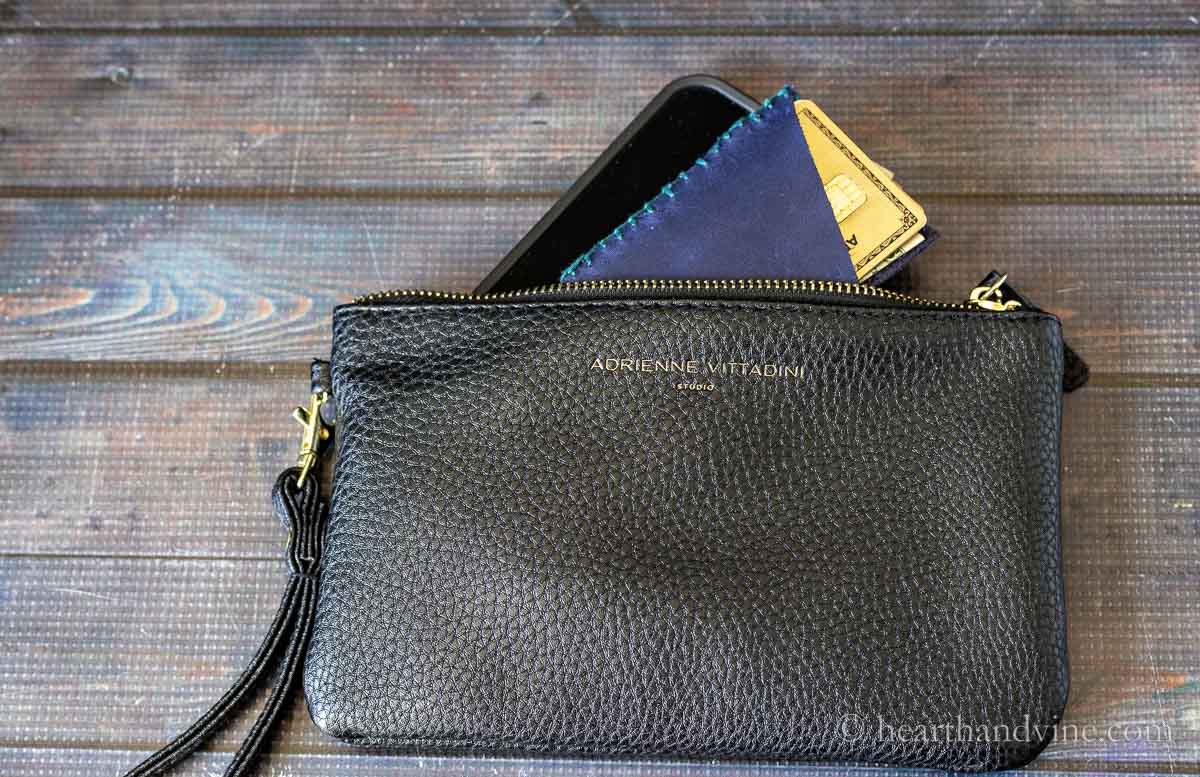
    Now I can easily toss my own card holder wallet in a small bag with my phone and maybe some lipstick and I'm all set for a night out without carrying my large everyday bag.

    Wouldn't this make a great gift?

    Patti signature

    More Easy Fabric Projects

    • DIY Pin Cushion Craft
    • Leaf Printing on Fabric
    • Making Beeswax Wraps
    • Fabric Twine Coasters
    Small leather credit card holder on top of a black clutch.
    Leather card holder next to a small black purse.
    Print

    DIY Credit Card Holder

    Learn how to make a cardholder with a couple pieces of faux leather and embroidery thread.
    Active Time1 hour hr
    Total Time1 hour hr
    Yield: 1
    Cost: $10

    Equipment

    • 1 sewing needle
    • pair of scissors
    • Ruler
    • marking pen or chalk

    Materials

    • 1 piece leather or faux leather
    • 1 skein embroidery floss

    Instructions

    • Cut two pieces of your fabric about 2.25 inches wide by 3 3/8 inches tall.
    • Draw a line with chalk from the top corner of the top piece to the side edge.
    • Cut the fabric off the top piece along the line.
    • Tie a knot in a long piece of 6 strand embroidery floss.
    • With wrong sides together start sewing a blanket stitch where the bottom of the new cut edge meets the back piece.
    • Begin on the inside to hide the knot.
    • Continue sewing along the edge down the right side, accros the bottom and up the left side until you reach the top left corner.
    • Tie a knot and hide it inside the cardholder.

    Notes

    You can use less than 6 strands if you want depending on the thickness of the material and the look you want.
    You can use a different material other than leather or faux leather such as vinyl. Just use something with a heavier weight to hold up to the cards and bills. If it's not heavy enough you could add fusible interfacing but then you're getting into more work. Also, you may need to finish the rough edges first. You can do this by cutting out a larger piece and pressing under the edges before sewing.
    Tried this project?Tag @hearthnvine on Instagram
    « Pruning Butterfly Bushes - The When, How, and Why
    Refreshing Fruit Tea Recipe »

    About Patti Estep

    Patti is the creator of Hearth and Vine, a home and garden blog filled with projects to inspire your creative side. She loves crafting, gardening, decorating and entertaining at her home in Pennsylvania. When she is not working on a project at home or searching for treasures at nurseries and thrift stores with her girlfriends, you’ll probably find her with family and friends, at a restaurant, or home party enjoying new and different food adventures.

    Reader Interactions

    Leave a Reply Cancel reply

    Your email address will not be published. Required fields are marked *

    Recipe Rating


    Primary Sidebar

    Patti Estep Profile Picture

    Hi!

    I'm Patti

    Join me to create lots of fun DIY projects, including crafts, gardening, home decor, and tasty recipes

    More about me

    Popular Posts

    • Baked zucchini bite on a slated tray with a bowl of horseradish sauce.
      Make Tasty Zucchini Bites in Under an Hour
    • Three tin cans in descending sizes hanging from twine.
      DIY Wind Chimes with Tin Cans
    • Blue jean crossover bag
      DIY Crossbody Bag from Jeans
    • Ham barbecue sandwich on plate
      Chipped Ham Barbecue Sandwiches - A Pittsburgh Favorite
    • Echievera planter
      What to do With a Stretched Succulent
    • Make a Mason Jar Oil Candle Lamp with botanicals and essential oils. ~ gardenmatter.com
      DIY Oil Candle - Gifts for the Holidays

    Footer

    ^ back to top

    About
    Contact
    Privacy Policy
    Disclosure Policy
    Terms of Service

    Sign Up Here!
    for our
    newsletter &
    special offers

    Follow Me

    facebook
    Pinterest
    instagram

    As an Amazon Associate, I earn from qualifying purchases. i.e. as an Amazon Associate, I earn from qualifying purchases.

    Copyright © 2025 Hearth and Vine

    Rate This Recipe

    Your vote:


    A rating is required
    A name is required
    An email is required