• Skip to primary navigation
  • Skip to main content
  • Skip to primary sidebar
  • Home
  • DIY Projects
    • Homemade Bath and Body
    • Sewing - Fabric Crafts
    • Flower Crafts/Decor
    • Thrift Store/Vintage
  • Gardening
    • Flower Gardens
    • Container Gardening
    • Houseplants
    • Indoor Gardening
    • Landscaping
    • DIY Garden Art
  • Decorate
    • Spring Decor
    • Summer Decor
    • Fall Decor
    • Winter Decor
    • Home Decor Projects
  • Recipes
    • Breakfast Recipes
    • Lunch Recipes
    • Dinner Recipes
    • Dessert
    • Salad Recipes
    • Soups and Stews
    • Side Dish Recipes
    • Appetizers and Snacks
    • Healthy Recipes
  • Holidays
    • Valentine's Day
    • Easter
    • Mother's Day
    • Halloween
    • Thanksgiving
    • Christmas
Hearth and Vine
menu icon
go to homepage
  • About
  • DIY
    • ...Flower/Gardening Crafts
    • ... Bath and Body
    • ...Sewing/Fabric Crafts
    • ...Thrift Store/Upcycle
  • Gardening
    • ...Flower Gardens
    • ...Container Gardening
    • ...Indoor Gardening
    • ...DIY Garden Art
  • Decorate
    • ...Home Decor Projects
    • ...Spring Decor
    • ...Summer Decor
    • ...Fall Decor
    • ...Winter Decor
    • ...Room Makeovers
  • Recipes
    • ...Appetizers and Snacks
    • ...Dinner Recipes
    • ...Side Dish Recipes
    • ...Salad Recipes
    • ...Dessert
    • ...Drinks
  • Holidays
    • ...Valentine's Day
    • ...Easter
    • ...Mother's Day
    • ...Halloween
    • ...Thanksgiving
    • ...Christmas
  • Subscribe
  • Instagram
    • Facebook
    • Instagram
    • Pinterest
    • Twitter
  • subscribe
    search icon
    Homepage link
    • About
    • DIY
      • ...Flower/Gardening Crafts
      • ... Bath and Body
      • ...Sewing/Fabric Crafts
      • ...Thrift Store/Upcycle
    • Gardening
      • ...Flower Gardens
      • ...Container Gardening
      • ...Indoor Gardening
      • ...DIY Garden Art
    • Decorate
      • ...Home Decor Projects
      • ...Spring Decor
      • ...Summer Decor
      • ...Fall Decor
      • ...Winter Decor
      • ...Room Makeovers
    • Recipes
      • ...Appetizers and Snacks
      • ...Dinner Recipes
      • ...Side Dish Recipes
      • ...Salad Recipes
      • ...Dessert
      • ...Drinks
    • Holidays
      • ...Valentine's Day
      • ...Easter
      • ...Mother's Day
      • ...Halloween
      • ...Thanksgiving
      • ...Christmas
    • Subscribe
    • Instagram
    • Facebook
    • Instagram
    • Pinterest
    • Twitter
  • ×
    Home » DIY Projects

    DIY Felt Christmas Trees

    by Patti Estep · Dec 1, 2025

    Jump to How-to Card
    Mini Christmas trees made with green felt, gold stars and wood round bases.

    These DIY felt Christmas trees are easy to create and add a festive and cozy feel to your holiday decor. Great for entryways, coffee tables, mantels, or anyplace you want to add a little Christmas goodness.

    Four felt Christmas trees on a table.

    I've made tabletop Christmas trees in the past. (see below) And I've made a lot of felt crafts. There's just something about the softness of felt that's so cozy and inviting, making it the perfect medium to create some new Christmas trees for our holiday home decor.

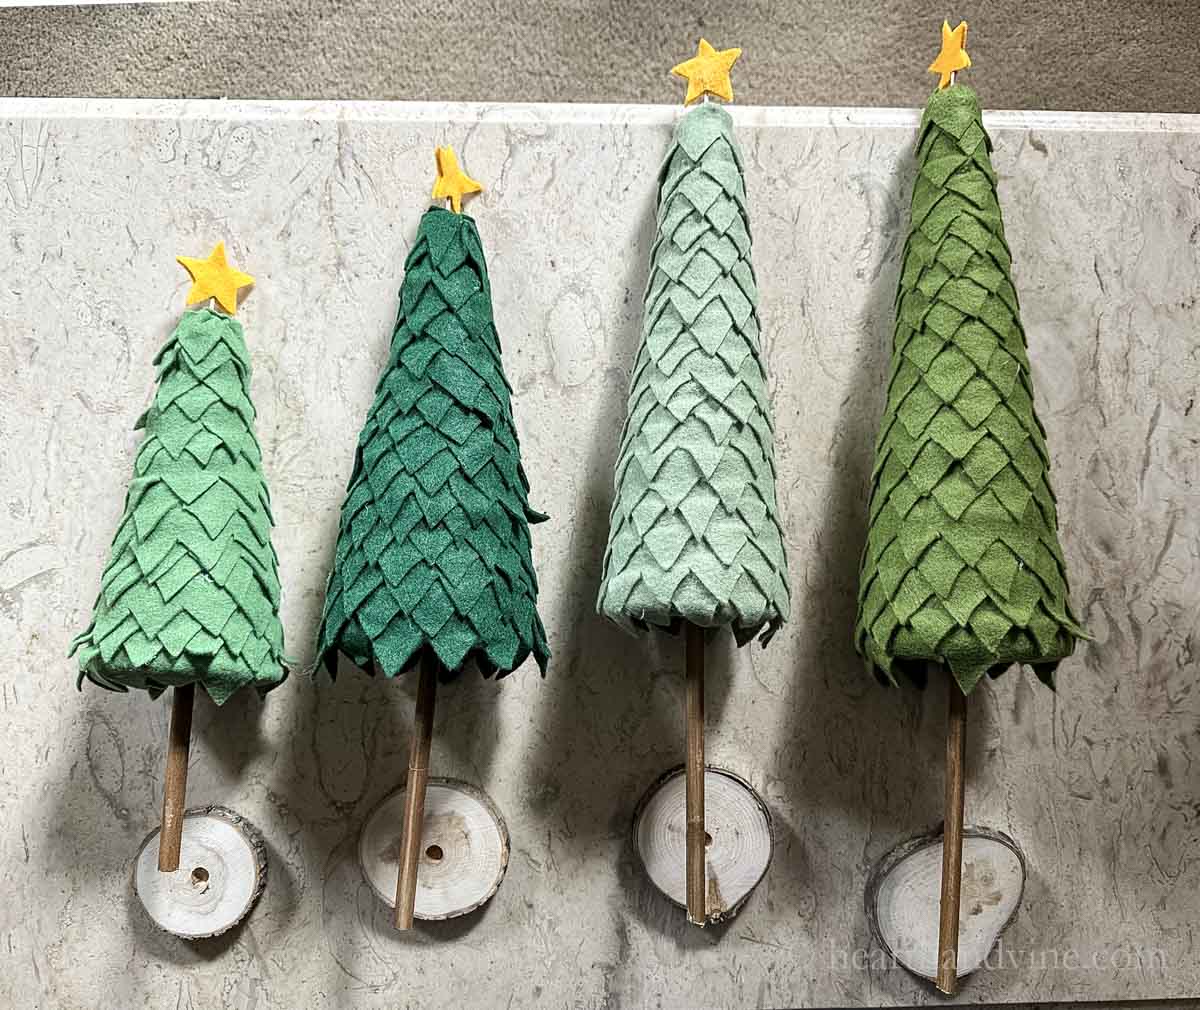
    I chose shades of green for my trees, but you can get creative and make them any color or multiple colors. You can even use different shades of a single color by using scraps of leftover felt for each row of leaves for an interesting look.

    I also created a star for the top of the trees from gold felt. However, you could make some bows out of ribbon to top the trees instead.

    More Christmas Tree Ideas

    • Pine Cone Trees
    • Grapevine Trees
    • Twig Mini Christmas Trees
    • Branch Tree with Metallic Ornaments
    • Fabric Christmas Trees

    This post contains some affiliate links (that means if you make a purchase after clicking a link, there’s no additional cost to you, but I will earn a very small commission. ) i.e. as an Amazon Associate, I earn from qualifying purchases. Click here to read my full disclosure policy.

    Felt Christmas trees supplies including, a dowel road felt in shades of green, glue sticks a glue gun, floral foam cones, wood slices and scissors.

    Supplies

    • Scissors
    • Printer
    • Pencil or Chalk for Tracing
    • Hot glue gun and glue sticks
    • Drill - optional
    • Star Cookie Cutter - optional
    • Serrated knife
    • Floral Cones
    • Felt
    • Printable Card Stock Paper
    • Tooth Picks
    • Dowel rods painted brown (or tree branches)
    • Wood Rounds
    Four green floral foam cones with a portion cut from the bottom and a serrated knife.

    How to Make Felt Christmas Trees

    Step 1. Decide on how many trees you want and what sizes you'd like. I went with four in slightly varying heights. The foam cones usually come in packs of two of the same size, but they are easily cut down with a serrated knife.

    P.S. You can find these (foam cones) online, but also at any craft store, and often at the dollar stores.

    Step 2. Print out the leaf template (below) by clicking on it. You can then print the PDF file. Either print it onto cardstock paper or use regular paper. If you use regular printer paper, you may want to then cut out the template and trace it onto something heavier, like cardboard, before using it to cut out the felt.

    Leaf chain template.
    Click for PDF Leaf Template
    Leaf shape banner template traced onto the edge of felt.

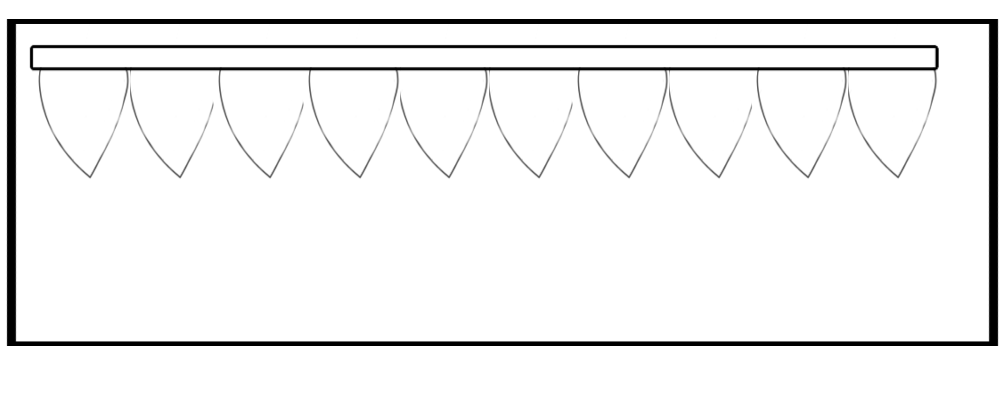
    Step 3. Trace the template onto some felt and then cut it out.

    A band of leaf shaped cutouts glued to the bottom edge of a floral cone.

    Step 4. Hot glue the felt leaf chain on the bottom of the foam cone, leaving some overhanging.

    Cutting the next group of leaves from felt.

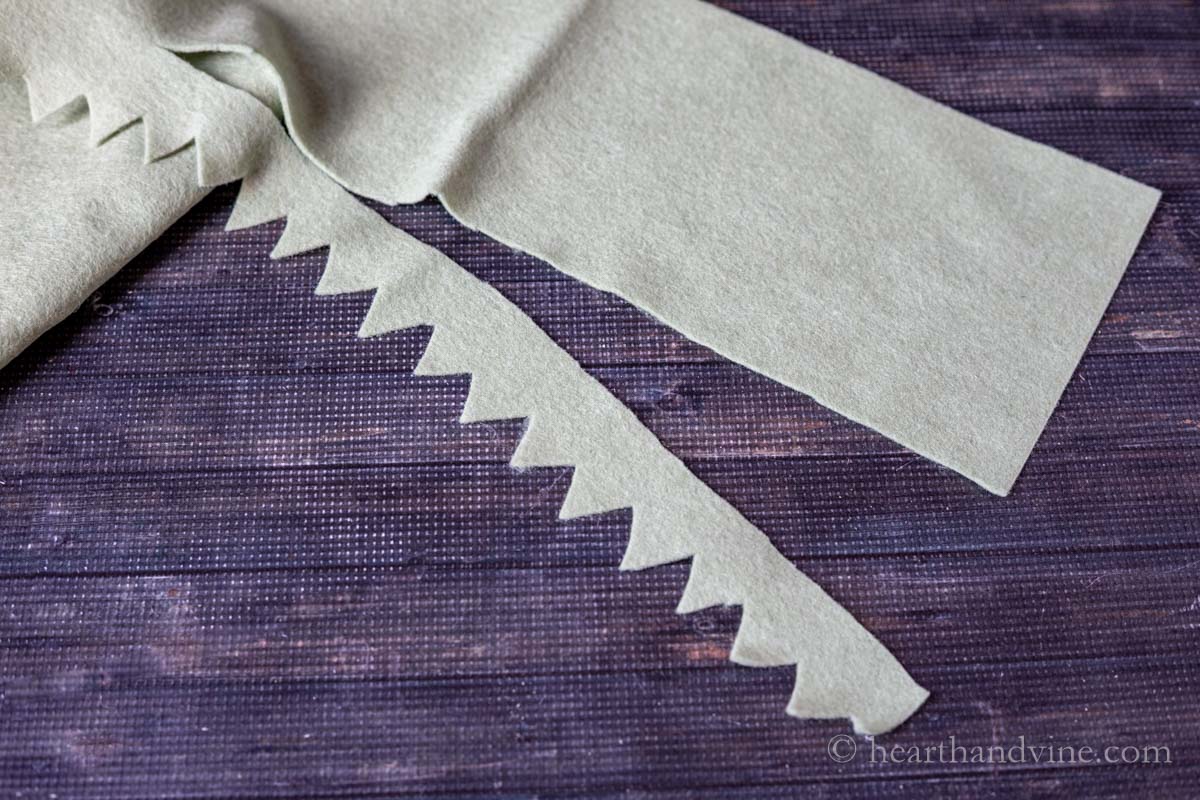
    Step 5. For the next strip of leaves, you can use the felt left from cutting out the template as shown above.

    Rows of dark green leaves glued to a green foam cone on the bottom.

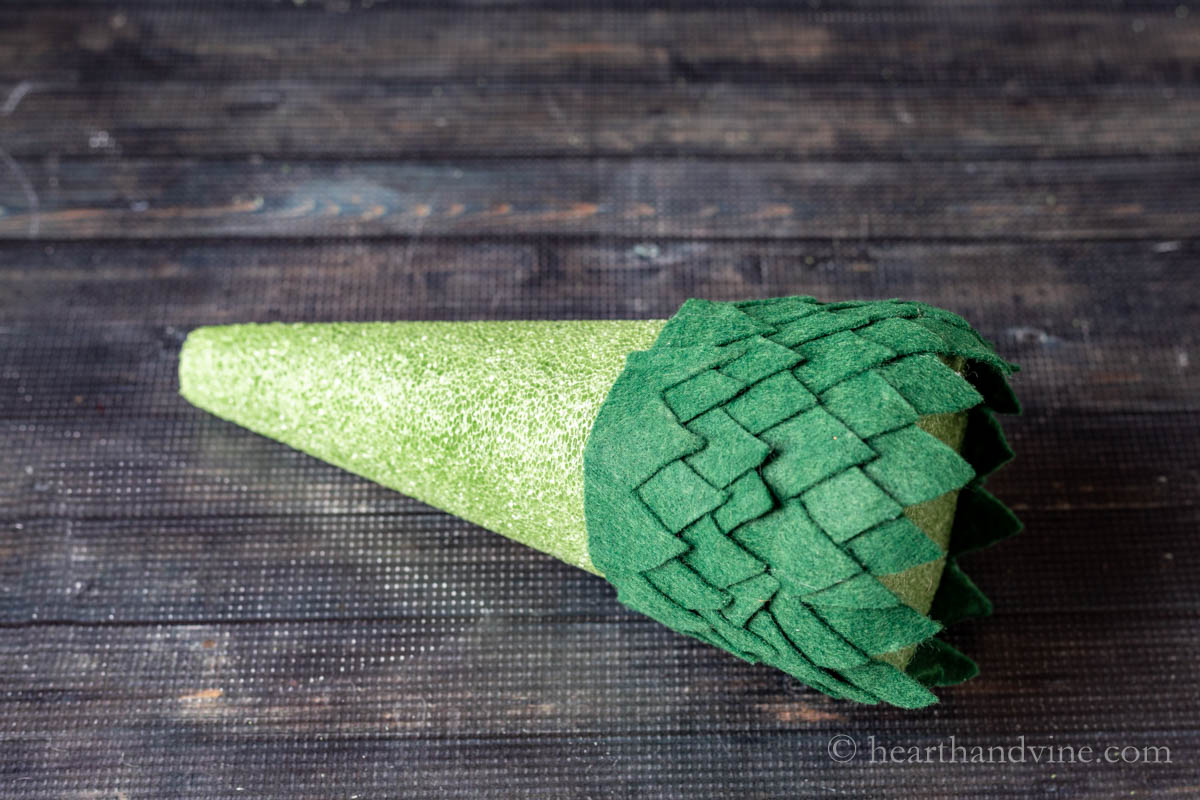
    Step 6. Continue gluing the strips of leaves onto the foam cone, overlapping vertically and horizontally if possible, until you cover the cone.

    Step 7. Cut out a small circle of the same felt to cover the top and glue it on.

    A star shaped cookie cutter on gold felt and a wooden toothpick.

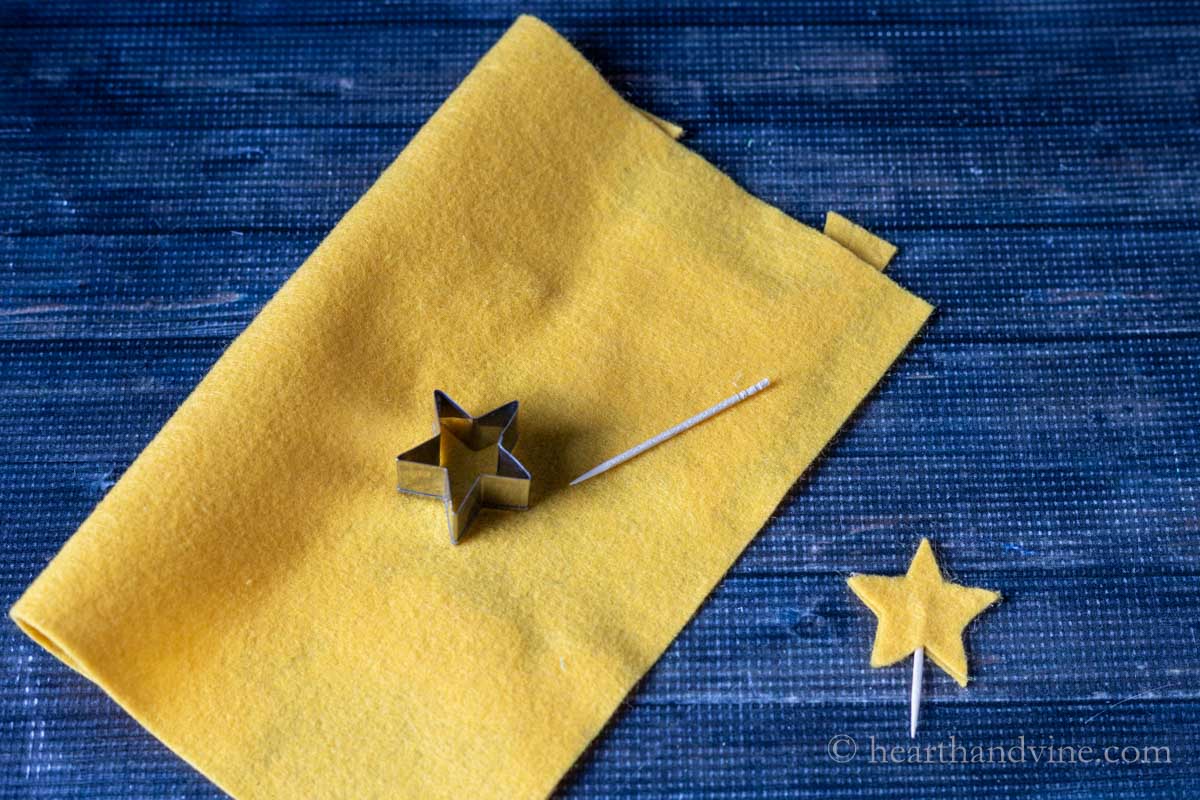
    Step 8. Fold a piece of gold felt and use a star cookie cutter to trace a pattern. Cut out two stars. Then glue a toothpick in between the two stars. Press the toothpick into the top center of the cone.

    Note: You can hand-draw stars instead of using a cookie cutter.

    Four brown painted dowel rods in different sizes next to a stack of drilled wood slices.

    Step 9. Drill an indentation into the center of a wood slice the width of your dowel rod or branch.

    Note: If you don't have or don't want to drill holes, you can try gluing the rods directly to the bases, but they may not be quite as stable.

    Four felt Christmas trees on a table on their sides with drilled wood slices.

    Step 10. Decide on the height you like for the trees and push the dowel into the bottom center of each cone. Then, hot glue them into the drilled holes of the wood slice tree base.

    Four different shades of green felted trees with yellow stars on top on a mantel.

    Place your beautiful felt Christmas trees on your mantel, entryway table, dining room hutch, or anyplace in your home for a warm and cozy holiday look.

    Patti signature
    Four felt Christmas trees on a table.
    Print

    DIY Felt Christmas Trees

    Make fun and festive felt Christmas trees to adorn your mantel, entry table, or any surface in your home this holiday season.
    Active Time2 hours hrs 30 minutes mins
    Total Time2 hours hrs 30 minutes mins
    Course: Christmas Crafts

    Equipment

    • Scissors
    • Printer
    • pencil
    • Hot glue gun and glue sticks
    • Drill optional
    • Star Cookie Cutter optional
    • Serrated knife

    Materials

    • Floral Cones
    • Felt
    • Printable Card Stock Paper
    • Tooth Picks
    • Dowel rods or sticks from outdoors painted brown
    • Wood Rounds

    Instructions

    • Cut down cones to different shapes with a serrated knife.
    • Print out the template for the felt onto cardstock. Or use regular paper and transfer it onto cardboard.
    • Trace the pattern onto felt and cut it out.
    • Add hot glue to the cone and place the first set of leaves onto the bottom, leaving some overhang.
    • Cut the next set from the image left from the first cut out.
    • Glue the next layer on top of the first layer, overlapping the first layer. Offset the leaves where possible.
    • Repeat the process until you have covered the cone.
    • Cut out a circle for the top and glue it and the other top edges together.
    • Trace a star onto gold felt folded in half cutting out two stars.
    • Glue a toothpick in between the stars and press it into the top of the tree.
    • Drill a small amount of the wood slice in the center to fit the dowel rod or stick.
    • Insert the rod or stick into the foam at a height you like, then glue it into the wood slice.
    • Repeat the same process for all the trees and arrange them as you like.

    Notes

    You can use different colors of felt for each tree or different shades on a single tree.
    You can use thin branches from outdoors instead of a dowel rod.
    You can make the trees all the same height or vary them.
    Tried this project?Tag @hearthnvine on Instagram
    Four felt tabletop Christmas trees in shades of green.
    « Apple Bread Loaf
    Christmas Gifts Under $20 »

    About Patti Estep

    Patti is the creator of Hearth and Vine, a home and garden blog filled with projects to inspire your creative side. She loves crafting, gardening, decorating and entertaining at her home in Pennsylvania. When she is not working on a project at home or searching for treasures at nurseries and thrift stores with her girlfriends, you’ll probably find her with family and friends, at a restaurant, or home party enjoying new and different food adventures.

    Reader Interactions

    Leave a Reply Cancel reply

    Your email address will not be published. Required fields are marked *

    Recipe Rating


    Primary Sidebar

    Patti Estep Profile Picture

    Hi!

    I'm Patti

    Join me to create lots of fun DIY projects, including crafts, gardening, home decor, and tasty recipes

    More about me

    Popular Posts

    • Pressed flower are in two dark frames.
      DIY Pressed Flower Art
    • Pilea peperomioides
      Pilea Plant - The Pass It On Friendship Plant
    • Serving of cream of crab soup in a red bowl.
      Easy Cream of Crab Soup
    • Small indoor water fountain
      DIY Indoor Water Fountain
    • Chicken oscar on a plate
      Easy Chicken Oscar Recipe Made with Hollandaise Sauce
    • Fabric bowl covers in 3 prints
      How to Make Fabric Bowl Covers

    Footer

    ^ back to top

    About
    Contact
    Privacy Policy
    Disclosure Policy
    Terms of Service

    Sign Up Here!
    for our
    newsletter &
    special offers

    Follow Me

    facebook
    Pinterest
    instagram

    As an Amazon Associate, I earn from qualifying purchases. i.e. as an Amazon Associate, I earn from qualifying purchases.

    Copyright © 2026 Hearth and Vine

    Rate This Recipe

    Your vote:


    A rating is required
    A name is required
    An email is required