• Skip to primary navigation
  • Skip to main content
  • Skip to primary sidebar
  • Home
  • DIY Projects
    • Homemade Bath and Body
    • Sewing - Fabric Crafts
    • Flower Crafts/Decor
    • Thrift Store/Vintage
  • Gardening
    • Flower Gardens
    • Container Gardening
    • Houseplants
    • Indoor Gardening
    • Landscaping
    • DIY Garden Art
  • Decorate
    • Spring Decor
    • Summer Decor
    • Fall Decor
    • Winter Decor
    • Home Decor Projects
  • Recipes
    • Breakfast Recipes
    • Lunch Recipes
    • Dinner Recipes
    • Dessert
    • Salad Recipes
    • Soups and Stews
    • Side Dish Recipes
    • Appetizers and Snacks
    • Healthy Recipes
  • Holidays
    • Valentine's Day
    • Easter
    • Mother's Day
    • Halloween
    • Thanksgiving
    • Christmas
Hearth and Vine
menu icon
go to homepage
  • About
  • DIY
    • ...Flower/Gardening Crafts
    • ... Bath and Body
    • ...Sewing/Fabric Crafts
    • ...Thrift Store/Upcycle
  • Gardening
    • ...Flower Gardens
    • ...Container Gardening
    • ...Indoor Gardening
    • ...DIY Garden Art
  • Decorate
    • ...Home Decor Projects
    • ...Spring Decor
    • ...Summer Decor
    • ...Fall Decor
    • ...Winter Decor
    • ...Room Makeovers
  • Recipes
    • ...Appetizers and Snacks
    • ...Dinner Recipes
    • ...Side Dish Recipes
    • ...Salad Recipes
    • ...Dessert
    • ...Drinks
  • Holidays
    • ...Valentine's Day
    • ...Easter
    • ...Mother's Day
    • ...Halloween
    • ...Thanksgiving
    • ...Christmas
  • Subscribe
  • Instagram
    • Facebook
    • Instagram
    • Pinterest
    • Twitter
  • subscribe
    search icon
    Homepage link
    • About
    • DIY
      • ...Flower/Gardening Crafts
      • ... Bath and Body
      • ...Sewing/Fabric Crafts
      • ...Thrift Store/Upcycle
    • Gardening
      • ...Flower Gardens
      • ...Container Gardening
      • ...Indoor Gardening
      • ...DIY Garden Art
    • Decorate
      • ...Home Decor Projects
      • ...Spring Decor
      • ...Summer Decor
      • ...Fall Decor
      • ...Winter Decor
      • ...Room Makeovers
    • Recipes
      • ...Appetizers and Snacks
      • ...Dinner Recipes
      • ...Side Dish Recipes
      • ...Salad Recipes
      • ...Dessert
      • ...Drinks
    • Holidays
      • ...Valentine's Day
      • ...Easter
      • ...Mother's Day
      • ...Halloween
      • ...Thanksgiving
      • ...Christmas
    • Subscribe
    • Instagram
    • Facebook
    • Instagram
    • Pinterest
    • Twitter
  • ×
    Home » Decorate

    DIY Lampshade Makeover

    by Patti Estep · Apr 24, 2016

    Jump to How-to Card

    This DIY lampshade makeover is so easy. For just a few dollars you can cover your existing shades and totally update the entire look and feel of the space.

    Finished lamp ~ DIY Fabric Lampshade Makeover ~ gardenmatter.com

    I found these two small table lamps at an estate sale many years ago. The shades were faded, but a nice shape, so I used some wine-color stain to spruce them up. It's several years later and they are in need of a makeover. This DIY lampshade makeover couldn't be easier, and I hope it will inspire you to update some of your lampshades too.

    DIY Lampshade Makeover

    I found some really pretty fabric, at this wonderful textile store in the strip district, while shopping with my sister and friend. They have tons of high end fabrics, including many small remnants, at much more affordable prices. This particular fabric, is a heavier weight cotton, possibly a drapery fabric. That made it easy to work with, and gave the shade great coverage.

    Original Lamp ~ DIY Fabric Lampshade Makeover ~ gardenmatter.com

    Here's what the lamp looked like before. Not too bad I think, but maybe kind of dated.

    Old Lampshade ~ DIY Fabric Lampshade Makeover ~ gardenmatter.com

    The trim, especially at the top was looking ratty, so I removed them both. At first I thought about painting the trim or adding trim but then I thought, no, because I the fabric print was strong enough on its own.

    Tracing Pattern on Fabric ~ DIY Fabric Lampshade Makeover ~ gardenmatter.com

    To cover your lampshade with fabric, simple lay it on its side and trace a pattern. Start at a seam so that you can easily tell where to end.  Then give yourself an extra inch or two.

    Also, make sure to give yourself extra material on the bottom, and when you cut the top, add a good 1 inch.

    Newsletter Signup
    Join Our Newsletter List!

    Be the first to receive new posts and get access to our Subscribers Only Page.

    uneven edge of fabric ~ DIY Fabric Lampshade Makeover ~ gardenmatter.com

    If your shade is smaller at the top than the bottom, like mine, you will probably have this uneven effect shown above.  Just make sure it nice and taut with enough fabric to turn over on the top and bottom.

    Then start with one edge. Glue it in place with a hot glue gun. Even up the other edge by cutting with scissors, or  just folding under to make a straight edge and glue in place.

    Extra fabric at top ~ DIY Fabric Lampshade Makeover ~ gardenmatter.com

    Next you can cut the top and bottom to even up the fabric, then fold over and set in place with more glue, just inside the top edge.

    Finished lampshade ~ DIY Fabric Lampshade Makeover ~ gardenmatter.com

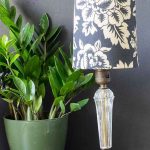
    Here's the new look! I love the modern feel this lampshade now has.

    The floral print is fresh and neutral in color, so I think they would look good anywhere in the home.

    Finished lamps ~ DIY Fabric Lampshade Makeover ~ gardenmatter.com

    Here's the finished lamp with its mate. They will look great in their original home on my dining room buffet.

    This DIY lampshade makeover is so easy. For just a few dollars you can cover your existing shades and totally update the entire look and feel of the space.
    DIY Lampshade Makeover ~ gardenmatter.com
    Print

    DIY Lampshade Makeover

    This budget-friendly DIY lampshade makeover is a quick project that can totally transform an old shade.
    Prep Time15 minutes mins
    Active Time15 minutes mins
    Total Time30 minutes mins
    Course: DIY Projects
    Yield: 1 Lamp Shade
    Author: Patti Estep
    Cost: $5-$10

    Equipment

    • Fabric scissors
    • Hot glue gun

    Materials

    • Lampshade
    • Fabric

    Instructions

    • Remove any old trim from the lampshade.
    • Lay the shade on its side on top of the fabric and trace a pattern.
    • Start at a seam and give yourself an extra inch or two.
    • Glue the fabric in place with a hot glue gun starting at one edge.
    • Even up the other edge by cutting it with scissors.
    • Glue in place.
    • Cut the top and bottom to even up the fabric.
    • Fold over and secure with more glue.
    Tried this project?Tag @hearthnvine on Instagram
    « Gardening Gifts for Mom
    3 Tiered Basket Stand Made from a Hanging Basket »

    About Patti Estep

    Patti is the creator of Hearth and Vine, a home and garden blog filled with projects to inspire your creative side. She loves crafting, gardening, decorating and entertaining at her home in Pennsylvania. When she is not working on a project at home or searching for treasures at nurseries and thrift stores with her girlfriends, you’ll probably find her with family and friends, at a restaurant, or home party enjoying new and different food adventures.

    Reader Interactions

    Comments

    1. Elen Ribolla

      April 24, 2016 at 8:31 am

      Very cute.
      And the color looks perfect in the photo.
      I would like to see the lamp 'workings' camouflaged, though.
      Perhaps a fringe, or something else would do the trick nicely.
      Just a thought.
      I took a lamp shade frame that I liked, stripped off the fabric and replaced it with a pressed paper I found at our local art store, for a floor lamp I have. It has a very organic look to it, which fits my decor.
      Silly, how people spend so much money for store-bought things that could be made or customized so easily.
      Nice job, Patti! Happy Spring!

      Reply
      • Patti Estep

        April 24, 2016 at 9:18 am

        Hi Elen,

        You are right on about camouflaging the interior and I love your paper usage idea too.
        Thanks for stopping by,
        Patti

        Reply

    Leave a Reply Cancel reply

    Your email address will not be published. Required fields are marked *

    Recipe Rating


    Primary Sidebar

    Patti Estep Profile Picture

    Hi!

    I'm Patti

    Join me to create lots of fun DIY projects, including crafts, gardening, home decor, and tasty recipes

    More about me

    Popular Posts

    • Baked zucchini bite on a slated tray with a bowl of horseradish sauce.
      Make Tasty Zucchini Bites in Under an Hour
    • Three tin cans in descending sizes hanging from twine.
      DIY Wind Chimes with Tin Cans
    • Blue jean crossover bag
      DIY Crossbody Bag from Jeans
    • Ham barbecue sandwich on plate
      Chipped Ham Barbecue Sandwiches - A Pittsburgh Favorite
    • Echievera planter
      What to do With a Stretched Succulent
    • Make a Mason Jar Oil Candle Lamp with botanicals and essential oils. ~ gardenmatter.com
      DIY Oil Candle - Gifts for the Holidays

    Footer

    ^ back to top

    About
    Contact
    Privacy Policy
    Disclosure Policy

    Sign Up Here!
    for our
    newsletter &
    special offers

    Follow Me

    facebook
    Pinterest
    instagram

    As an Amazon Associate, I earn from qualifying purchases. i.e. as an Amazon Associate, I earn from qualifying purchases.

    Copyright © 2025 Hearth and Vine

    Rate This Recipe

    Your vote:


    A rating is required
    A name is required
    An email is required