• Skip to primary navigation
  • Skip to main content
  • Skip to primary sidebar
  • Home
  • DIY Projects
    • Homemade Bath and Body
    • Sewing - Fabric Crafts
    • Flower Crafts/Decor
    • Thrift Store/Vintage
  • Gardening
    • Flower Gardens
    • Container Gardening
    • Houseplants
    • Indoor Gardening
    • Landscaping
    • DIY Garden Art
  • Decorate
    • Spring Decor
    • Summer Decor
    • Fall Decor
    • Winter Decor
    • Home Decor Projects
  • Recipes
    • Breakfast Recipes
    • Lunch Recipes
    • Dinner Recipes
    • Dessert
    • Salad Recipes
    • Soups and Stews
    • Side Dish Recipes
    • Appetizers and Snacks
    • Healthy Recipes
  • Holidays
    • Valentine's Day
    • Easter
    • Mother's Day
    • Halloween
    • Thanksgiving
    • Christmas
Hearth and Vine
menu icon
go to homepage
  • About
  • DIY
    • ...Flower/Gardening Crafts
    • ... Bath and Body
    • ...Sewing/Fabric Crafts
    • ...Thrift Store/Upcycle
  • Gardening
    • ...Flower Gardens
    • ...Container Gardening
    • ...Indoor Gardening
    • ...DIY Garden Art
  • Decorate
    • ...Home Decor Projects
    • ...Spring Decor
    • ...Summer Decor
    • ...Fall Decor
    • ...Winter Decor
    • ...Room Makeovers
  • Recipes
    • ...Appetizers and Snacks
    • ...Dinner Recipes
    • ...Side Dish Recipes
    • ...Salad Recipes
    • ...Dessert
    • ...Drinks
  • Holidays
    • ...Valentine's Day
    • ...Easter
    • ...Mother's Day
    • ...Halloween
    • ...Thanksgiving
    • ...Christmas
  • Subscribe
  • Instagram
    • Facebook
    • Instagram
    • Pinterest
    • Twitter
  • subscribe
    search icon
    Homepage link
    • About
    • DIY
      • ...Flower/Gardening Crafts
      • ... Bath and Body
      • ...Sewing/Fabric Crafts
      • ...Thrift Store/Upcycle
    • Gardening
      • ...Flower Gardens
      • ...Container Gardening
      • ...Indoor Gardening
      • ...DIY Garden Art
    • Decorate
      • ...Home Decor Projects
      • ...Spring Decor
      • ...Summer Decor
      • ...Fall Decor
      • ...Winter Decor
      • ...Room Makeovers
    • Recipes
      • ...Appetizers and Snacks
      • ...Dinner Recipes
      • ...Side Dish Recipes
      • ...Salad Recipes
      • ...Dessert
      • ...Drinks
    • Holidays
      • ...Valentine's Day
      • ...Easter
      • ...Mother's Day
      • ...Halloween
      • ...Thanksgiving
      • ...Christmas
    • Subscribe
    • Instagram
    • Facebook
    • Instagram
    • Pinterest
    • Twitter
  • ×
    Home » DIY Projects

    How to Flame Paint Copper

    by Patti Estep · Jun 18, 2025

    Jump to How-to Card
    Pliers holding a flame painted copper bracelet over supplies including a kitchen torch, sandpaper and a bowl of water.

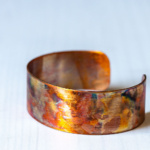
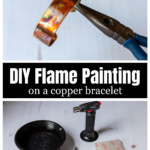
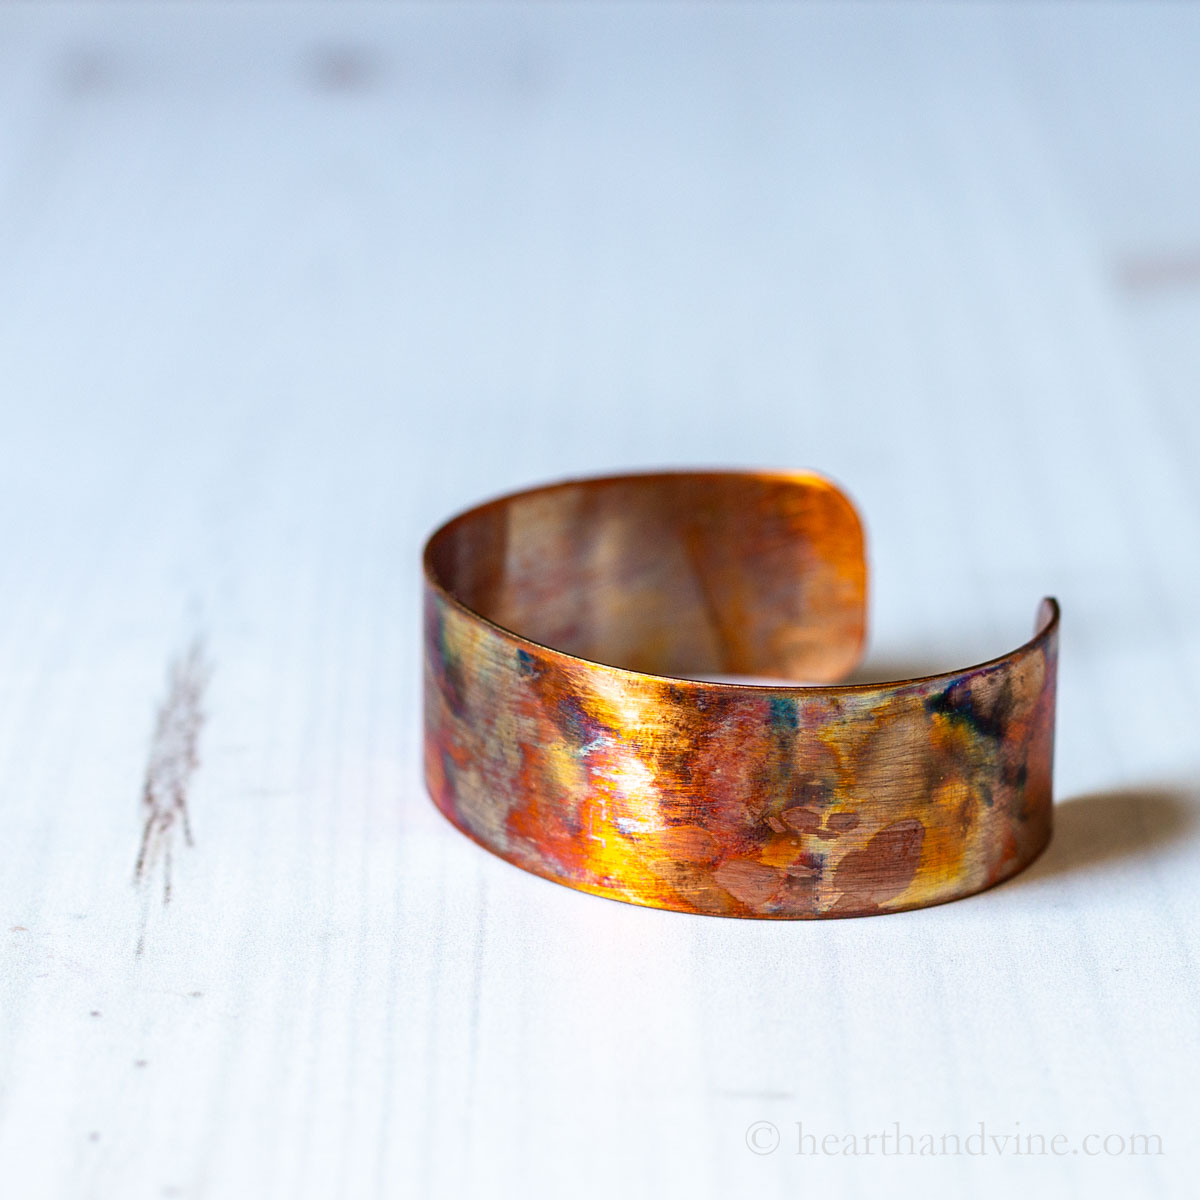
    Learn how to flame paint copper to give an ordinary copper bracelet a beautiful and colorful patina.

    A close look as a flame painted copper bracelet cuff.

    Flame painting copper? I never heard of this before, but once I did, I had to try it.
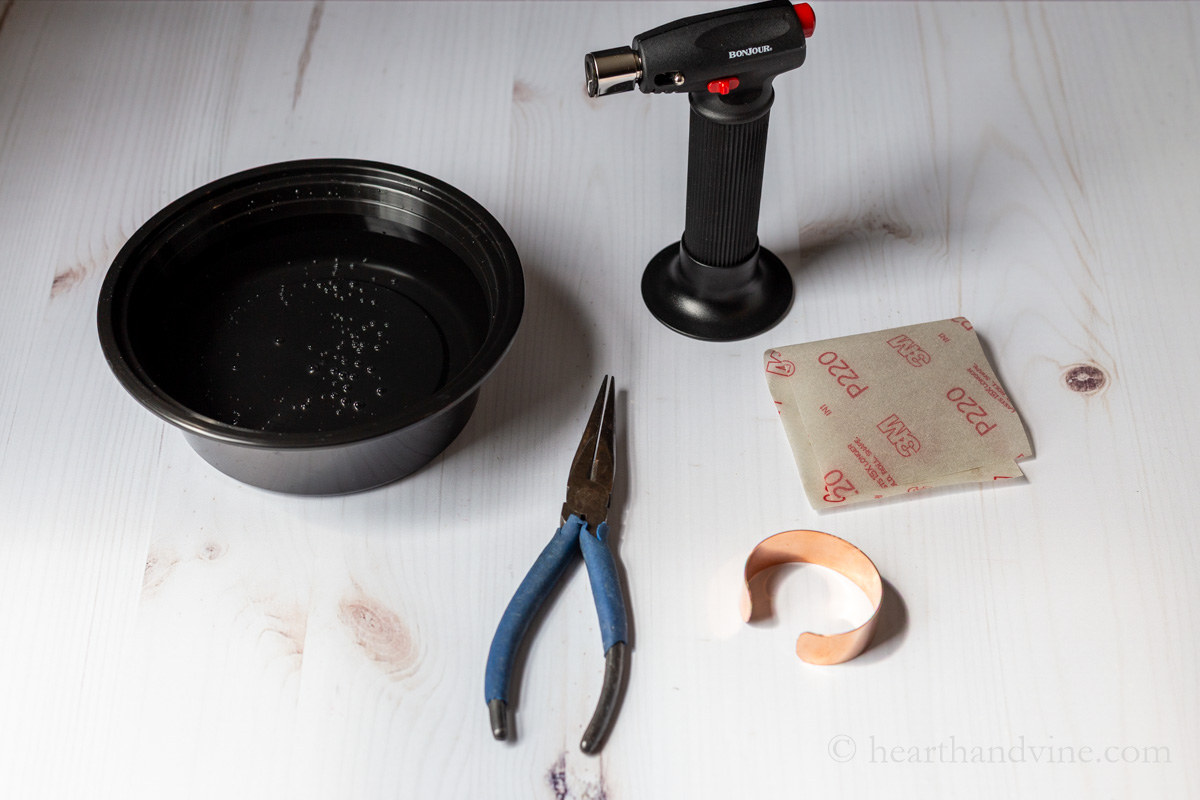
    Supplies to flame paint a copper bracelet including needle nose pliers, sandpaper, a bowl of water and a kitchen torch.

    Supplies

    • Needle nose pliers
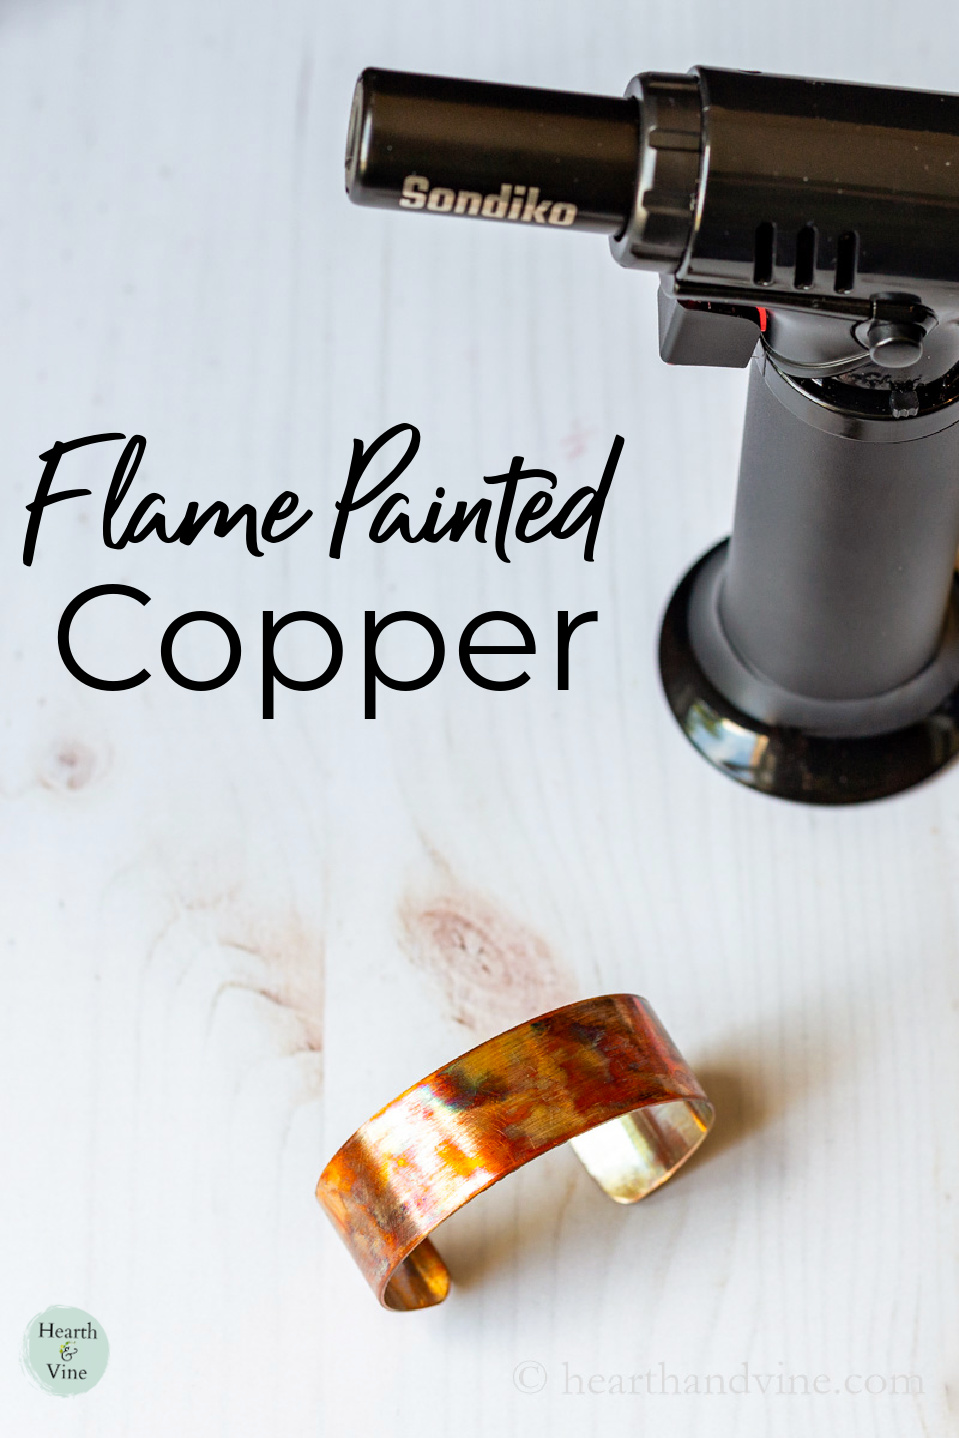
    • Kitchen Torch and Butane
    • Copper bracelet
    • Fine Sandpaper
    • Bowl of water
    • Spray Polyurethane or other clear sealer
    Fine sandpaper used on a new copper bracelet.

    How to Flame Paint a Copper Bracelet

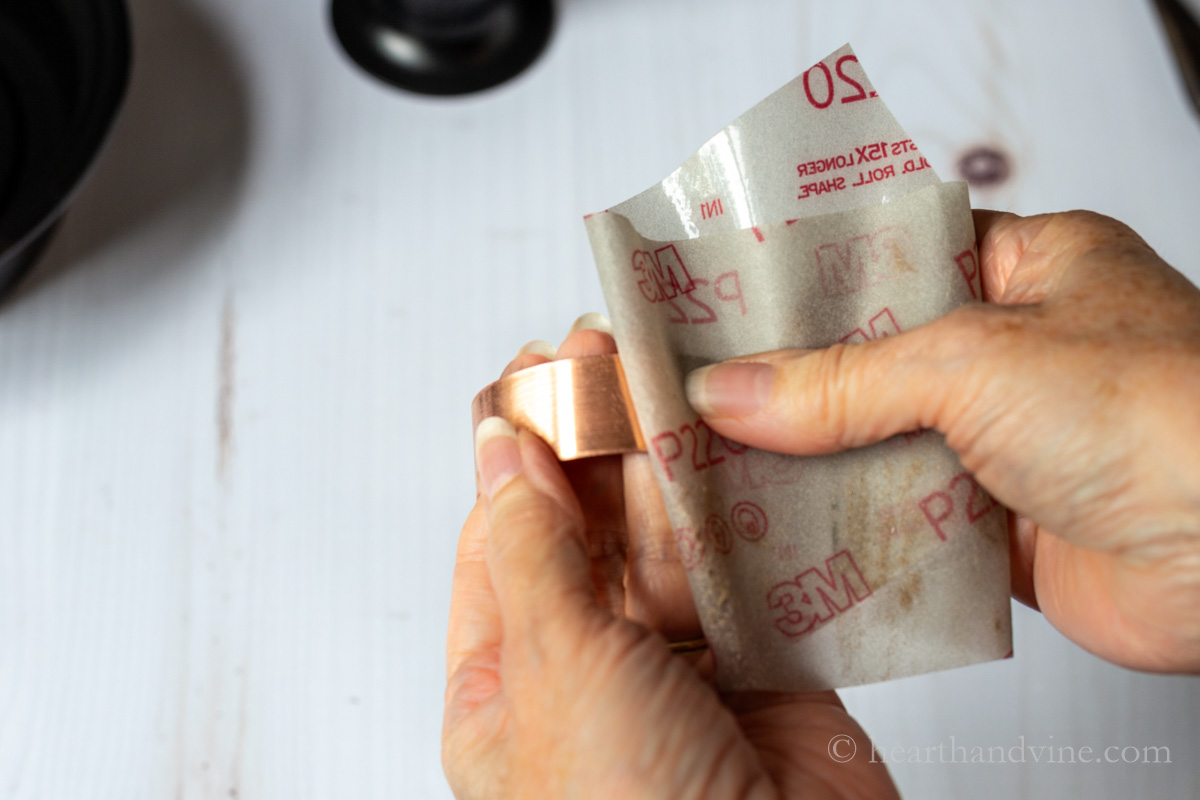
    Step 1. Clean the bracelet, removing any dirt or grease. Then, using fine grit sandpaper, gently sand off any coating that may be there.

    A kitchen torch heating a copper cuff that is held with pliers.

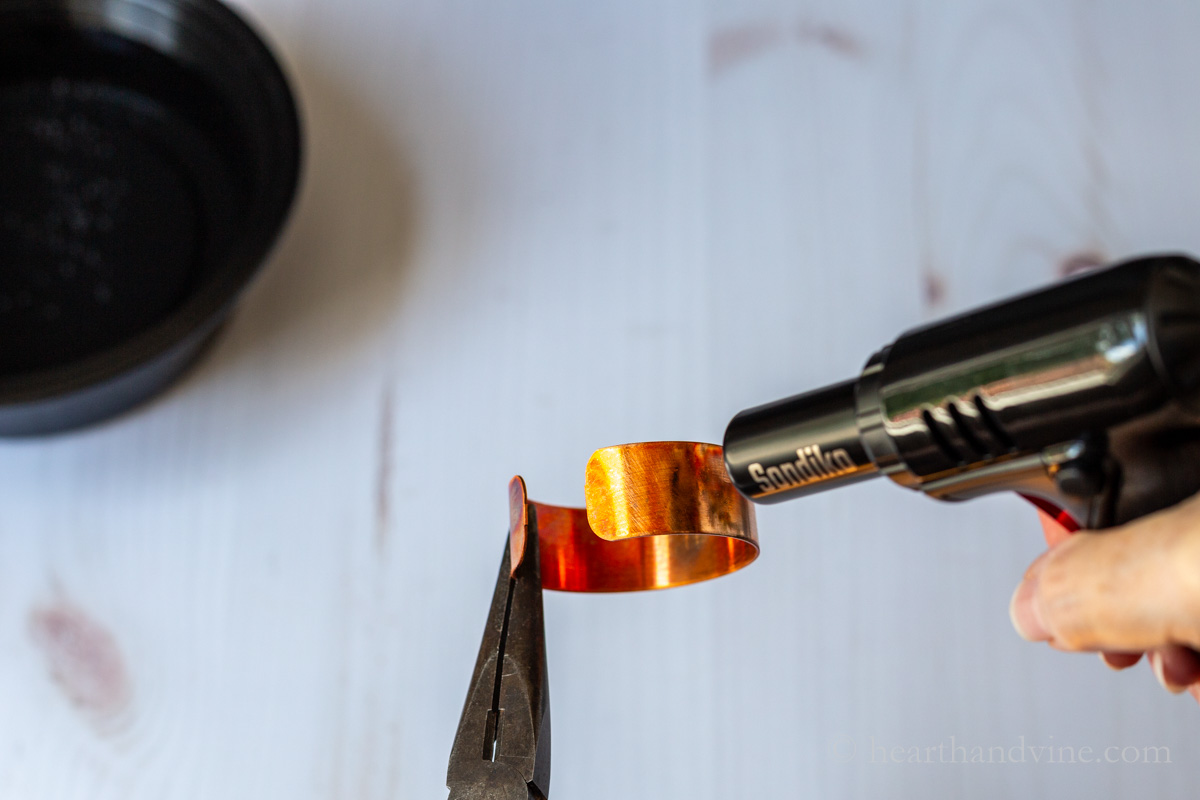
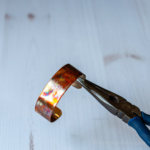
    Step 2. Start the painting process by holding one end of the bracelet with long needle nose pliers while you use the torch in your other hand.

    Keep a bowl of water nearby in case you need to set it down or cool it off. It will be very hot.

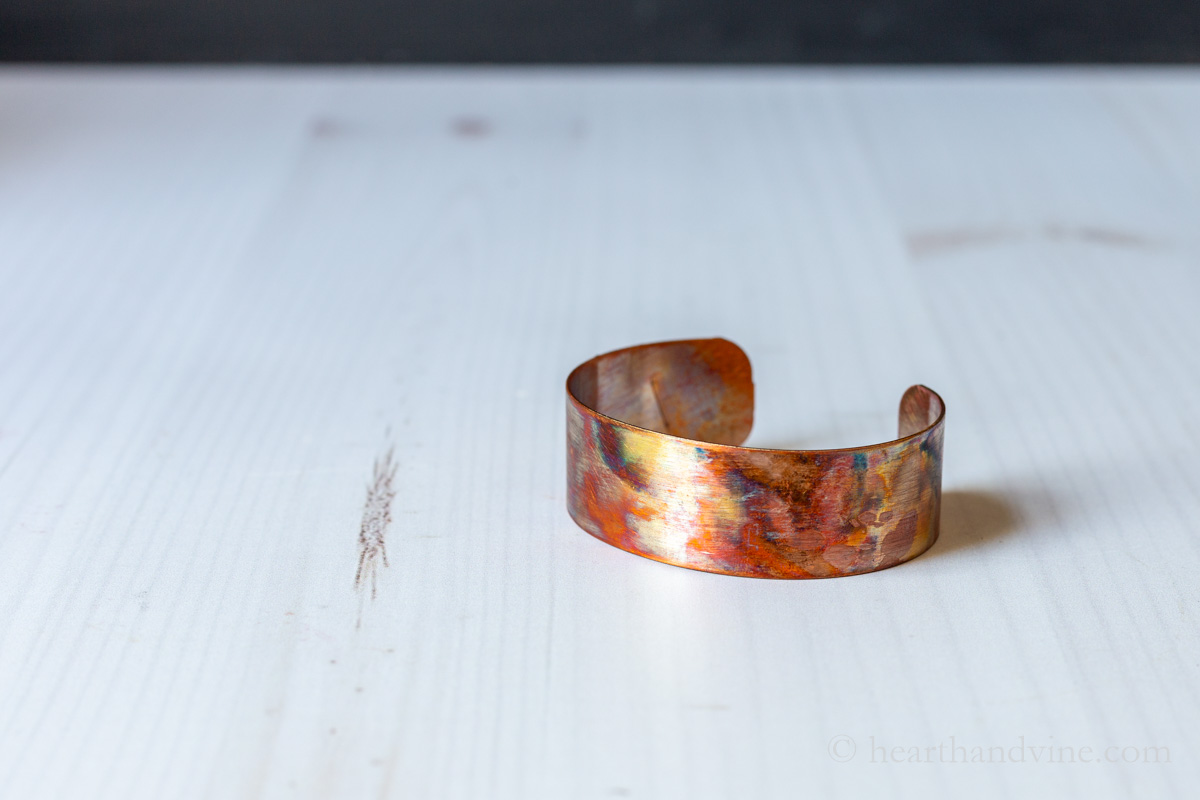
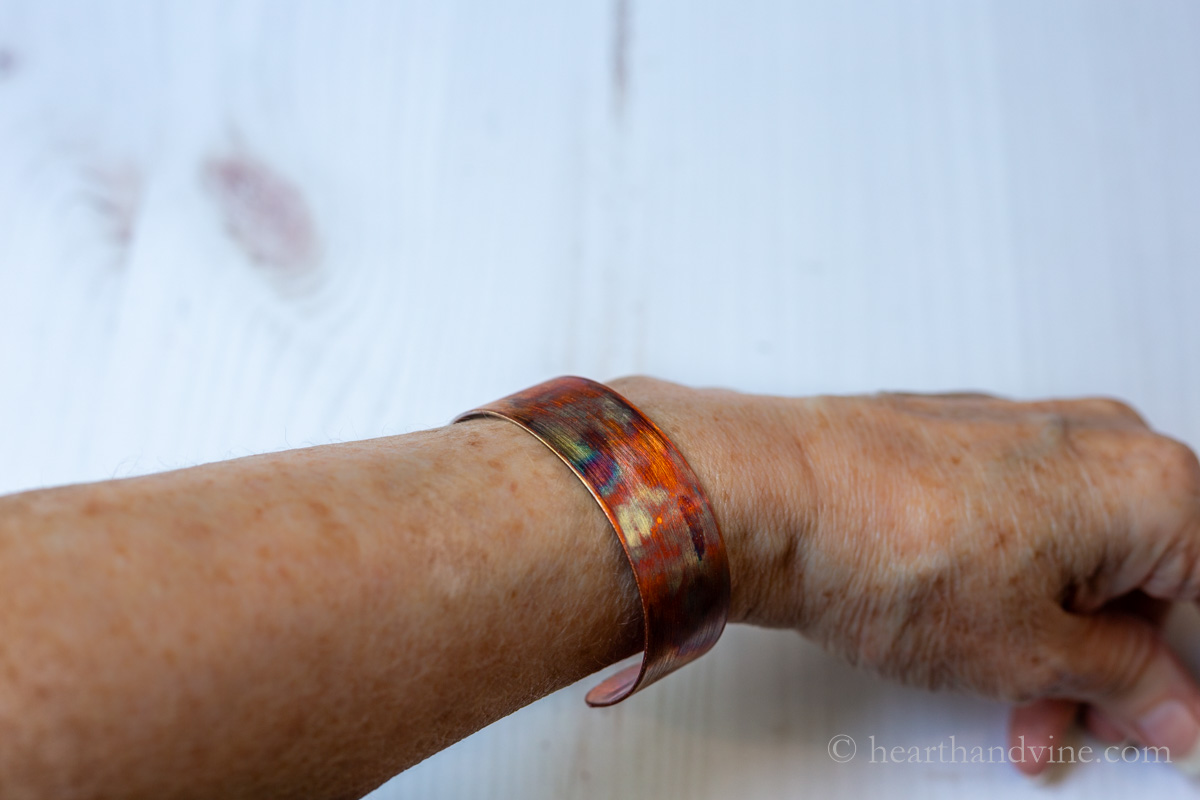
    Step 3. Once you are happy with your piece, let it dry completely before spraying it with a polyurethane or other clear sealer.

    Needle nose pliers holding the flame painted copper bracelet.

    As you practice, you will see different vibrant colors emerge. Pinks, oranges, and reds followed by blue, purple, and green.

    Newsletter Signup
    Join Our Newsletter List!

    Be the first to receive new posts and get access to our Subscribers Only Page.

    The flame painted copper cuff on a table.

    The beauty of this craft is that you can do it over and over again.

    Tip: Try letting the bracelet cool down between flames. Patience is a virtue, and I have very little. However, if you see the copper getting lighter, that may mean it's too hot. Either cool it off in water or gently wave it in the air to cool slightly, and try again.

    Where to Buy Copper Pieces

    I picked up this bracelet on Etsy. More copper pieces on Etsy. You can also find pieces for earrings and bangle bracelets on Amazon.

    A flame painted copper cuff bracelet on a wrist.

    It turns out that this process is quite the art form. You can find all kinds of cool videos on YouTube showing you professional ways and tools to create gorgeous fine art pieces.

    But for now, I hope you enjoyed this little introduction from me.

    Patti signature

    More Jewelry Ideas

    • Washer Alcohol Ink Necklaces
    • Sea Glass Earrings
    • Beaded Memory Wire Bracelets
    • Upcycled Leather Wrist Cuffs
    Needle nose pliers holding a flame painted copper bracelet.
    Print
    5 from 1 vote

    Flame Painted Copper Bracelet Tutorial

    Learn how to make a flame painted copper bracelet in no time for a colorful, interesting look.
    Prep Time5 minutes mins
    Active Time30 minutes mins
    clear sealer application and drying time4 hours hrs
    Total Time4 hours hrs 35 minutes mins
    Yield: 1

    Equipment

    • Needle nose pliers
    • Kitchen Torch
    • Butane
    • Bowl of water

    Materials

    • Copper bracelet
    • Fine Sandpaper
    • Spray Polyurethane

    Instructions

    • Remove any grease or dirt from the copper cuff.
    • Lightly sand the cuff with fine grit sandpaper going in the same direction.
    • Fill the kitchen torch with butane.
    • Hold one end of the cuff with the pliers and use your other hand to run the flame over the copper.
    • Continue moving the torch around the entire bracelet watching as the colors change.
    • If the copper gets too light that probably means it got too hot so let it cool and try again.
    • You can set the cuff in the water to cool off, then dry and continue applying the torch until you get the desired effect you like.
    • Once the copper cuff bracelet cools, you can spray it with polyurethane as a protective sealer to keep it from tarnishing.

    Notes

    Some people use varnish or UV resin to seal their piece.
     
     
    Tried this project?Tag @hearthnvine on Instagram
    A flame painted copper cuff bracelet next to a kitchen torch.

    « How to Make a Herbarium
    Grilled Lime Shrimp »

    About Patti Estep

    Patti is the creator of Hearth and Vine, a home and garden blog filled with projects to inspire your creative side. She loves crafting, gardening, decorating and entertaining at her home in Pennsylvania. When she is not working on a project at home or searching for treasures at nurseries and thrift stores with her girlfriends, you’ll probably find her with family and friends, at a restaurant, or home party enjoying new and different food adventures.

    Reader Interactions

    Comments

    1. Denise

      June 18, 2025 at 8:53 am

      5 stars
      This is such a cool idea. I never even heard of this.

      Reply
      • Patti Estep

        June 18, 2025 at 9:08 am

        Thanks! It's fun to try and get's better with practice.

        Reply
    5 from 1 vote

    Leave a Reply Cancel reply

    Your email address will not be published. Required fields are marked *

    Recipe Rating


    Primary Sidebar

    Patti Estep Profile Picture

    Hi!

    I'm Patti

    Join me to create lots of fun DIY projects, including crafts, gardening, home decor, and tasty recipes

    More about me

    Popular Posts

    • Baked zucchini bite on a slated tray with a bowl of horseradish sauce.
      Make Tasty Zucchini Bites in Under an Hour
    • Three tin cans in descending sizes hanging from twine.
      DIY Wind Chimes with Tin Cans
    • Blue jean crossover bag
      DIY Crossbody Bag from Jeans
    • Ham barbecue sandwich on plate
      Chipped Ham Barbecue Sandwiches - A Pittsburgh Favorite
    • Echievera planter
      What to do With a Stretched Succulent
    • Make a Mason Jar Oil Candle Lamp with botanicals and essential oils. ~ gardenmatter.com
      DIY Oil Candle - Gifts for the Holidays

    Footer

    ^ back to top

    About
    Contact
    Privacy Policy
    Disclosure Policy

    Sign Up Here!
    for our
    newsletter &
    special offers

    Follow Me

    facebook
    Pinterest
    instagram

    As an Amazon Associate, I earn from qualifying purchases. i.e. as an Amazon Associate, I earn from qualifying purchases.

    Copyright © 2025 Hearth and Vine

    Rate This Recipe

    Your vote:


    A rating is required
    A name is required
    An email is required

    Recipe Ratings without Comment

    Something went wrong. Please try again.