
This simple tutorial shows you how to make beautifully scented beeswax ornaments. A great natural way to decorate your holiday tree.

Here's another throwback from my herbal gift shop days. In addition to the many items we sold as a retailer, we also made some of our own products, such as wreaths, and aromatherapy products.
Be the first to receive new posts and get access to our Subscribers Only Page.
One that I remember making, were these sweet angel beeswax ornaments, with cinnamon essential oil, for a nice scent.
Actually, beeswax smells really lovely on its own, so you could leave the oil out of this recipe, but cinnamon is also a really nice homey scent.
This post contains some affiliate links (that means if you make a purchase after clicking a link, there’s no additional cost to you, but I will earn a very small commission. ) i.e. as an Amazon Associate, I earn from qualifying purchases. Click here to read my full disclosure policy.
Scented Beeswax Ornaments
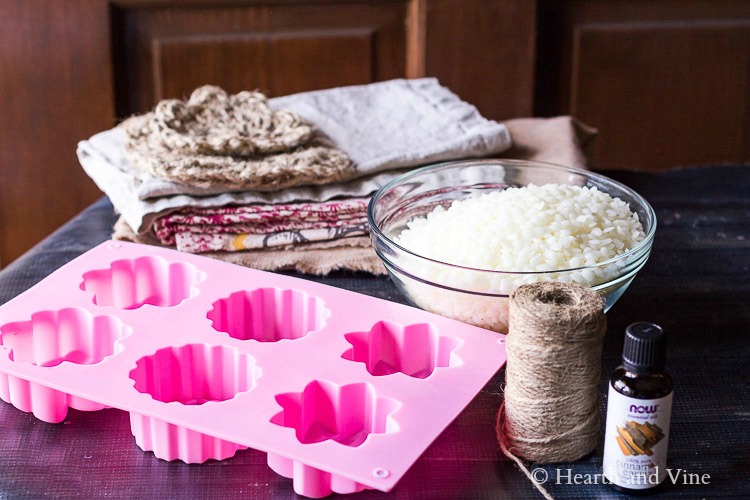
Supplies
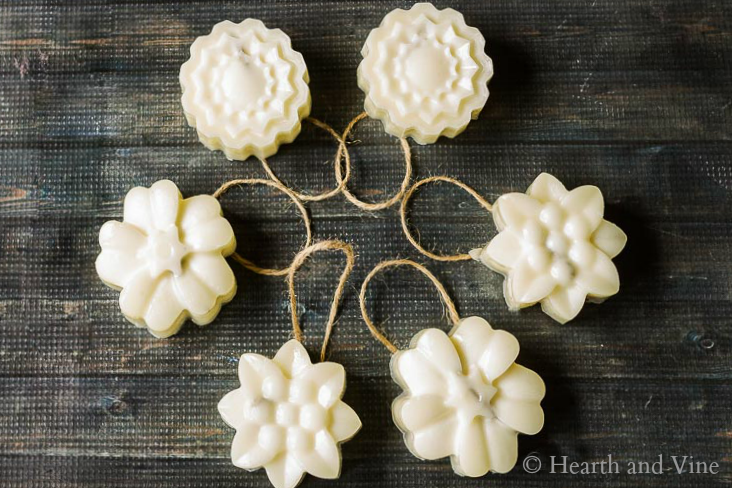
Flower Cake Molds
1 Pound Beeswax Pellets
Cinnamon Essential Oil - 1-3 tablespoons
Natural Jute Twine
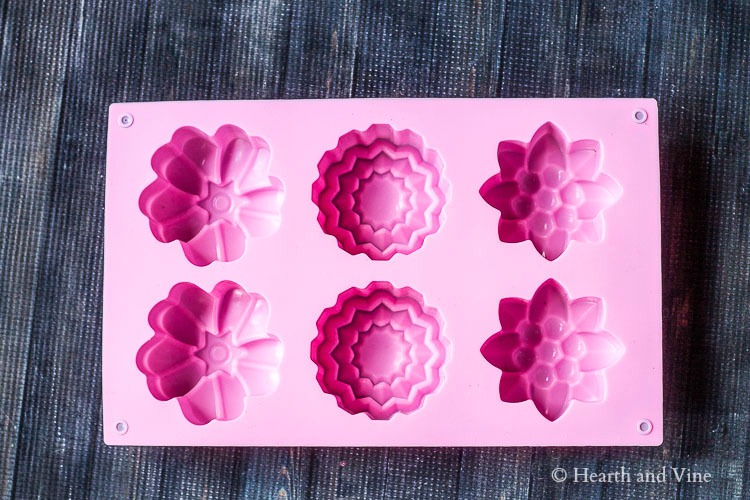
I don't know what happened to the pretty angel molds we had. They were originally sold to make soap. I looked around and found this cute cake molds in the shape of flowers, that ended up working great.
How to Make Beeswax Ornaments
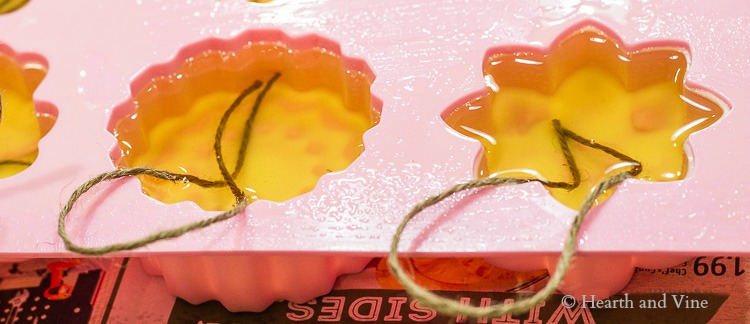
- Start by spraying the mold with vegetable spray.
- Then place a piece of nature jute twine in the molds, to act as a hanger.
- Melt the beeswax on the stove or in the microwave.
- Once it is melted, wait a minute and then add in fragrance or essential oils.
- Pour the scented wax into the molds.
- Keep an eye on the twine, as it may rise up. Simply put it back into place with a wooden skewer or some plastic ware.
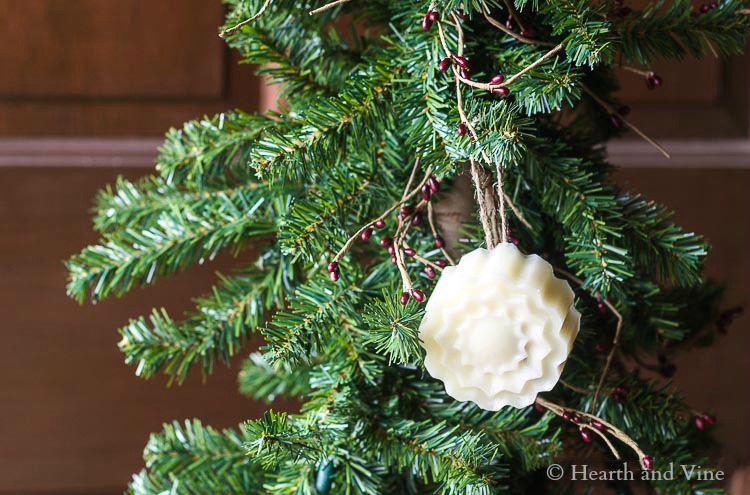
Once they have set up within an hour or so, depending on the heat and humidity of your workspace, you can remove them from the mold.
Although I do like the look of the natural jute twine, it did show through a little. You can avoid this by using natural cotton twine, or even a bit of candle wicking.
Beeswax Candle Ornament Options
You can adapt this beeswax candle ornament project in several ways.
- Choose a different shape, like this snowflake mold.
- Use a different essential oil such as pine, peppermint, frankincense or myrrh. Also, there are many wonderful holiday blends of fragrance oils to choose from.
- Finally, you could use any type of wax, including natural beeswax, that is more yellow in color.
I think they turned out beautiful and they smell wonderful too.

P.S. You may also love these Handmade Dried Fruit Ornaments or these Dried Flower Ornaments. Find them and many more on my DIY Projects Page.

Scented Beeswax Ornaments to Brighten Your Tree
Equipment
- Scissors
Materials
- Flower Cake Molds
- 1 Pound Beeswax Pellets
- Cinnamon Essential Oil - 1-3 tablespoons
- Natural Jute Twine
Instructions
- Start by spraying the mold with vegetable spray.
- Place a piece of natural jute twine in the molds, to act as a hanger.
- Melt the beeswax on the stove or in the microwave.
- Once it is melted, wait a minute and then add in fragrance or essential oils.
- Pour the scented wax into the molds.
- Let them set for about an hour.
- Remove them from the mold and enjoy!
Robbin
So precious! Just curious how long the scent typically lasts so I know how close to Christmas to make.
Patti Estep
Robbin, the cinnamon is pretty strong. I was still smelling it a year later after packing them away in plastic bins.
Linda Krenz
Patti,
These ornaments are so adorable and I love how they suit a rustic country themed tree. I will be making these for sure! Thank you for sharing!
Patti Estep
Thanks Linda. They are so fun and hold up well for several years.
Pam
And now I know what to make for the neighbors! Thanks!
Beverly
What a wonderful idea for ornaments. They look beautiful! Thanks for sharing at Snickerdoodle. Pinned to my Christmas Board.
Alicia
Neat idea! I like unique, handmade ornaments. Thanks for sharing on This is How We Roll Thursdays. 🙂
Charlene Asay
These are very cute. A great touch for a Christmas tree ornament. Thanks for sharing with us at Family Joy Blog Link Up Party!
JennMc
Does the one pound of beeswax make just the six ornaments? I am looking for something to make for a staff of 34. I love this idea! Maybe I could find a mold with smaller shapes...
Patti Estep
Hi JennMC,
Yes it did take a whole pound to fill these molds, however they were pretty thick. I'm sure you can find smaller ones.
Thanks for stopping by,
Patti
Helen
Very cute for a boutique item! Thanks for sharing!
Susan M.
These look much easier than I expected! I also love how you can choose your own scent. Thanks for sharing this.
Patti Estep
Hi Susan,
They really were easy. This mold made six and they are a nice size so I didn't need to make a second batch.
Happy Thanksgiving and have a great week.
Patti
Karen
Patti, I can't tell you how much I love this! These are simply fabulous and I always have a supply of beeswax and bottles of essential oils pellets around. I just need to get some cute molds and I'll be all set. My daughter will love helping me and they'll make precious gifts for friends and teachers.
And...this is just so good - I'm sharing it everywhere I can. 🙂
Patti Estep
Hi Karen,
I think your daughter will love this project. I just wanted to say how great the silicone mold worked. They are pretty thick as you can see, but because the mold is flexible they were easy to pop out. Other materials might work fine too, I just haven't tried them.
Thanks for stopping by,
Patti
DoddeyMae
Wow ~ these are much easier to make than I would have expected! I have a tray of apple molds that has never been used, but I think my husband and I would more than like to make apple shaped ornaments. Thank you for posting! I'm excited to try this!
- Kristin
Patti Estep
They are so easy and really look nice on the tree. I think your apple molds would be perfect for this project.
Thanks for stopping by,
Patti