• Skip to primary navigation
  • Skip to main content
  • Skip to primary sidebar
  • Home
  • DIY Projects
    • Homemade Bath and Body
    • Sewing - Fabric Crafts
    • Flower Crafts/Decor
    • Thrift Store/Vintage
  • Gardening
    • Flower Gardens
    • Container Gardening
    • Houseplants
    • Indoor Gardening
    • Landscaping
    • DIY Garden Art
  • Decorate
    • Spring Decor
    • Summer Decor
    • Fall Decor
    • Winter Decor
    • Home Decor Projects
  • Recipes
    • Breakfast Recipes
    • Lunch Recipes
    • Dinner Recipes
    • Dessert
    • Salad Recipes
    • Soups and Stews
    • Side Dish Recipes
    • Appetizers and Snacks
    • Healthy Recipes
  • Holidays
    • Valentine's Day
    • Easter
    • Mother's Day
    • Halloween
    • Thanksgiving
    • Christmas
Hearth and Vine
menu icon
go to homepage
  • About
  • DIY
    • ...Flower/Gardening Crafts
    • ... Bath and Body
    • ...Sewing/Fabric Crafts
    • ...Thrift Store/Upcycle
  • Gardening
    • ...Flower Gardens
    • ...Container Gardening
    • ...Indoor Gardening
    • ...DIY Garden Art
  • Decorate
    • ...Home Decor Projects
    • ...Spring Decor
    • ...Summer Decor
    • ...Fall Decor
    • ...Winter Decor
    • ...Room Makeovers
  • Recipes
    • ...Appetizers and Snacks
    • ...Dinner Recipes
    • ...Side Dish Recipes
    • ...Salad Recipes
    • ...Dessert
    • ...Drinks
  • Holidays
    • ...Valentine's Day
    • ...Easter
    • ...Mother's Day
    • ...Halloween
    • ...Thanksgiving
    • ...Christmas
  • Subscribe
  • Instagram
    • Facebook
    • Instagram
    • Pinterest
    • Twitter
  • subscribe
    search icon
    Homepage link
    • About
    • DIY
      • ...Flower/Gardening Crafts
      • ... Bath and Body
      • ...Sewing/Fabric Crafts
      • ...Thrift Store/Upcycle
    • Gardening
      • ...Flower Gardens
      • ...Container Gardening
      • ...Indoor Gardening
      • ...DIY Garden Art
    • Decorate
      • ...Home Decor Projects
      • ...Spring Decor
      • ...Summer Decor
      • ...Fall Decor
      • ...Winter Decor
      • ...Room Makeovers
    • Recipes
      • ...Appetizers and Snacks
      • ...Dinner Recipes
      • ...Side Dish Recipes
      • ...Salad Recipes
      • ...Dessert
      • ...Drinks
    • Holidays
      • ...Valentine's Day
      • ...Easter
      • ...Mother's Day
      • ...Halloween
      • ...Thanksgiving
      • ...Christmas
    • Subscribe
    • Instagram
    • Facebook
    • Instagram
    • Pinterest
    • Twitter
  • ×
    Home » Crafts

    Wire Hanger Boxwood Letters for a Joyful Holiday Mantel

    by Patti Estep · Oct 18, 2024

    Jump to How-to Card

    Learn how to make wire hanger boxwood letters that work great at Christmas or really any time of year, with simple materials and little time and effort.

    Wire hanger boxwood letters tutorial hung above the mantel

    This project, wire hanger boxwood letters, couldn't have been easier and it cost me nothing to make. I have this somewhat awkward wide space above my mantel that needs something, especially at Christmas. This year I thought I'd hang the word Joy, in big letters, to complement the space.

    Large wire hangers wrapped with boxwood spelling Joy.

    Wire Hanger Boxwood Letters

    I couldn't decide if I should pick up some paper mache letters from a craft store, or try to make some myself with fresh greens. Of course, fresh greens won out, and I used boxwood which lasts a long time. All I needed was a foundation to adhere the boxwood too, so I used good old wire hangers.

    Supplies

    Sprigs of Boxwood - pine and cedar work well too.
    Wire hangers
    Floral wire paddle

    Black wire hangers

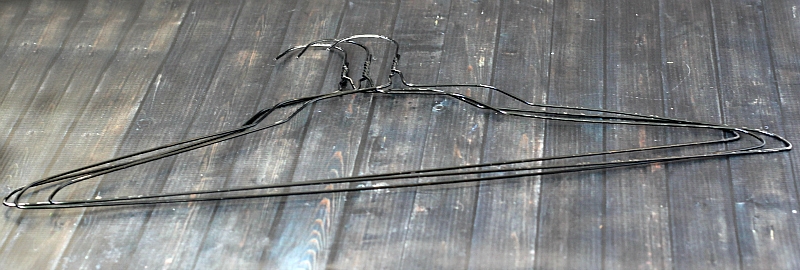
    Start with your hangers. I used black so that the wire wouldn't show as much with the boxwood.

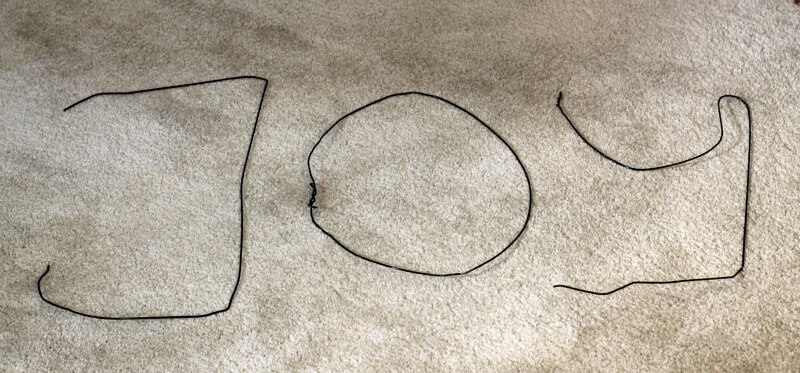
    Shape your letters by twisted the hangers open and using your hands to bend them into the letters you want. I knew I wanted mine to be very large so I used one hanger for each letter, but you could easily cut the wire to make smaller letters.

    Adding boxwood with floral wire to make wire hanger boxwood letters. ~ gardenmatter.com

    Next, gather sprigs of boxwood in 4-5 inch sprigs and starting with one use paddle of floral wire to attach the stem to the wire letter, wrapping several times to secure it.

    Newsletter Signup
    Join Our Newsletter List!

    Be the first to receive new posts and get access to our Subscribers Only Page.

    boxwood letters out of everyday wire hangers.

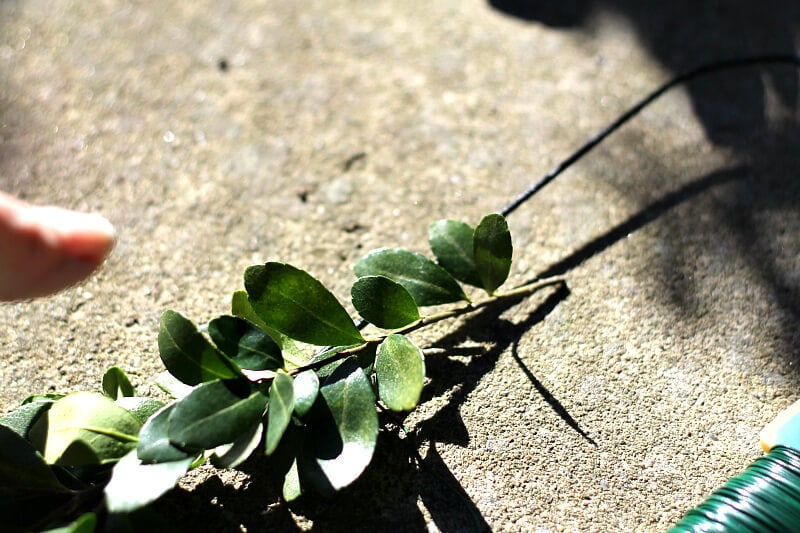
    Add a second sprig of boxwood slightly overlapping the first, and continuing to wrap the wire paddle around it and the hanger. Repeat until the entire hanger is covered with boxwood.

    The letter J complete in making wire hanger boxwood letters. ~ gardenmatter.com

    Within minutes the J is complete!

    The word Joy complete in making wire hanger boxwood letters. ~ gardenmatter.com

    Here's the finished project. I'm using this project on the brick above my mantel, but as you can see, the letters would look really pretty on a white wall.

    The word Joy complete in making wire hanger boxwood letters. ~ gardenmatter.com

    Still, I think it fills the empty space well and I couldn't love the message more.  

    Patti signature

    More Wire Hanger Craft Ideas:

    Square Hydrangea Wreath

    Scented Padded Hangers

    Garden Charms

    Boxwood Letters collage
    Print

    Boxwood Letters

    Wire hanger boxwood letters work great at Christmas or really any time of year, with simple materials and little time and effort.
    Prep Time10 minutes mins
    Active Time1 hour hr
    Total Time1 hour hr 10 minutes mins
    Yield: 1
    Author: Patti Estep

    Equipment

    • Scissors

    Materials

    • Wire clothes hangers
    • Fresh boxwood clippings
    • Floral wire paddle

    Instructions

    • Shape letters by twisted the wire hangers open and using your hands to bend them into the letters you want.
    • Gather cuttings of boxwood in 4-5 inch lengths.
    • Take one cutting of boxwood and use the paddle of floral wire to attach the stem to the end of the wire letter, wrapping several times to secure it.
    • Add a second sprig of boxwood slightly overlapping the first and wrap the wire paddle around it and the hanger.
    • Repeat until the entire hanger is covered with boxwood.
    Tried this project?Tag @hearthnvine on Instagram
    « Holiday Crate Decor - A Partridge in a Pear Tree
    Easy DIY Holiday Planter Basically for Free »

    About Patti Estep

    Patti is the creator of Hearth and Vine, a home and garden blog filled with projects to inspire your creative side. She loves crafting, gardening, decorating and entertaining at her home in Pennsylvania. When she is not working on a project at home or searching for treasures at nurseries and thrift stores with her girlfriends, you’ll probably find her with family and friends, at a restaurant, or home party enjoying new and different food adventures.

    Reader Interactions

    Comments

    1. Katie

      October 19, 2016 at 7:00 pm

      Hi Patti

      I'm just wondering how long do the boxwood leaves last before you have to pick new branches and attach them to the wire again?

      By the way it looks absolutely amazing.

      Reply
      • Patti Estep

        October 20, 2016 at 8:46 am

        Hi Katie,

        We keep our house pretty cool in the winter but as I recall the leaves stayed on their for many weeks. They did start to lose their color a little maybe after a couple of weeks, I'm not sure, but they didn't fall off.

        Glad you liked it and thanks for stopping by,

        Patti

        Reply
    2. Lindi

      March 06, 2016 at 9:26 pm

      I LOVE this use of wire hangers! Love it!! I'm asking readers to share their Coat Hanger projects at the Create with Me party tomorrow. I hope you'll come by my blog, Love Create Celebrate, and share this one!

      Reply
      • Patti Estep

        March 07, 2016 at 6:20 am

        Thanks Lindi!

        Reply
        • Lindi

          March 07, 2016 at 4:35 pm

          You're welcome! Party just opened 🙂

    3. Stephanie @ Casa Watkins

      December 15, 2015 at 1:49 am

      Patti,
      Your JOY boxwood letters are amazing! I love the ease of your project and how wonderfully, festive it is. I love anything thats boxwood, so I may also have a bias. 🙂 I'm including your project in my DIY Christmas Wall Art round up tomorrow! Also pinning and sharing your great idea.

      Reply
      • Patti

        December 15, 2015 at 1:26 pm

        Thanks Stephanie, fellow boxwood lover!

        Reply
    4. Katrin@KreativK.net

      December 09, 2015 at 2:45 pm

      Patty, this is such a unique and beautiful idea! I love it. Pinned!! And I love that it's so easy and can be done with anything you like all year too!

      Reply
      • Patti

        December 09, 2015 at 7:54 pm

        Thanks Katrin!

        Reply
    5. Lacey Haskell

      December 08, 2015 at 11:17 am

      These are great! Thank you for sharing your how to!... I think I'm going to have to whip some up!

      Reply
      • Patti

        December 08, 2015 at 6:24 pm

        It's pretty simple but I like the way it solved my issue. Thanks for stopping by!

        Reply
    6. Marie from The Interior Frugalista

      December 07, 2015 at 9:24 pm

      Thanks for the tutorial - very cute idea. Pinned to share 🙂

      Reply
      • Patti

        December 08, 2015 at 6:24 am

        Thanks Marie!

        Reply
    7. Funky Junk Interiors

      December 07, 2015 at 6:06 pm

      What a cool idea! Wire of all things... so clever and beautiful!

      Reply
      • Patti

        December 07, 2015 at 7:44 pm

        Thanks!

        Reply
    8. Vicki and Jennifer 2 Bees in a Pod

      December 06, 2015 at 11:08 pm

      Oh My Gosh...this is fantastic. we have always wanted to know how to make Boxwood letters and can't thank you enough for your tutorial! "JOY" looks beautiful hanging in your home! Thanks for sharing.

      Reply
      • Patti

        December 07, 2015 at 12:44 pm

        Thanks Vicki & Jennifer!

        Reply
    9. Angie @ Knick of Time

      December 06, 2015 at 10:55 pm

      Oh, I love this! So pretty - pinned it!

      ~Angie @ Knick of Time

      Reply
    10. Vanessa

      December 06, 2015 at 10:43 pm

      Hi, Patti

      These turned out lovely! I love using natural elements in my Christmas decor. Beautiful

      Reply
    11. Lindsay Eidahl

      December 06, 2015 at 9:12 pm

      What a great use for wire hangers! I love this idea! Can be used for so many things!

      Reply
      • Patti

        December 06, 2015 at 9:31 pm

        Hi Lindsay,
        Easy and affordable!
        Thanks!

        Reply

    Leave a Reply Cancel reply

    Your email address will not be published. Required fields are marked *

    Recipe Rating


    Primary Sidebar

    Patti Estep Profile Picture

    Hi!

    I'm Patti

    Join me to create lots of fun DIY projects, including crafts, gardening, home decor, and tasty recipes

    More about me

    Popular Posts

    • Baked zucchini bite on a slated tray with a bowl of horseradish sauce.
      Make Tasty Zucchini Bites in Under an Hour
    • Three tin cans in descending sizes hanging from twine.
      DIY Wind Chimes with Tin Cans
    • Blue jean crossover bag
      DIY Crossbody Bag from Jeans
    • Ham barbecue sandwich on plate
      Chipped Ham Barbecue Sandwiches - A Pittsburgh Favorite
    • Echievera planter
      What to do With a Stretched Succulent
    • Make a Mason Jar Oil Candle Lamp with botanicals and essential oils. ~ gardenmatter.com
      DIY Oil Candle - Gifts for the Holidays

    Footer

    ^ back to top

    About
    Contact
    Privacy Policy
    Disclosure Policy

    Sign Up Here!
    for our
    newsletter &
    special offers

    Follow Me

    facebook
    Pinterest
    instagram

    As an Amazon Associate, I earn from qualifying purchases. i.e. as an Amazon Associate, I earn from qualifying purchases.

    Copyright © 2025 Hearth and Vine

    Rate This Recipe

    Your vote:


    A rating is required
    A name is required
    An email is required