Learn how to easily create these fun wood slice ornaments perfect for Christmas tree decorations, gift tags, or coasters.

Do you just love the look of wood slices? They are so rustic and you know me, anything made from nature is something I love.

This past summer I attended a blogging conference called Haven for DIY Bloggers. One of the sponsors was Dremel and their booth was so fun. They let us try out different tools to etch glass and some that were used for wood burning.
I attended the same conference the year before and Dremel was there too. At that event we received a cool leather luggage tag that we were able to engrave during the conference. That inspired me to create engraved leather cuff bracelets. However, I ended up using the (I have no idea) many year old Dremel tool owned by my husband.
This post contains some affiliate links (that means if you make a purchase after clicking a link, there’s no additional cost to you, but I will earn a very small commission. ) Click here to read my full disclosure policy.
This year they gave us a nice deal on the price so I decided to go ahead and invest in the Dremel 2050-15 Stylo+ .
.
This was what I used to create these wood slice ornaments. They were easy to make and I think turned out great.

Making the Wood Slice Ornaments
Start with a coat of chalkboard paint leaving a little edge of the wood grain showing.
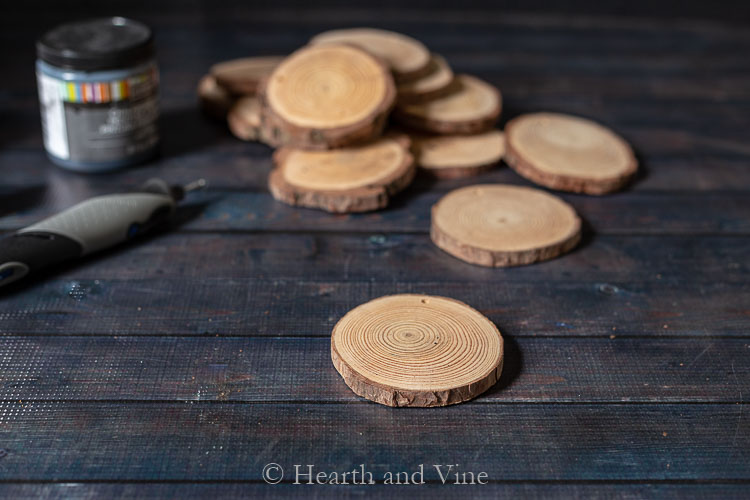
The wood slices I purchased were 3.5" in diameter. I like the larger size because it gives you more room to work with and then they can also be used as coasters.
They come in different sizes. This group already had pre-drilled holes in them.
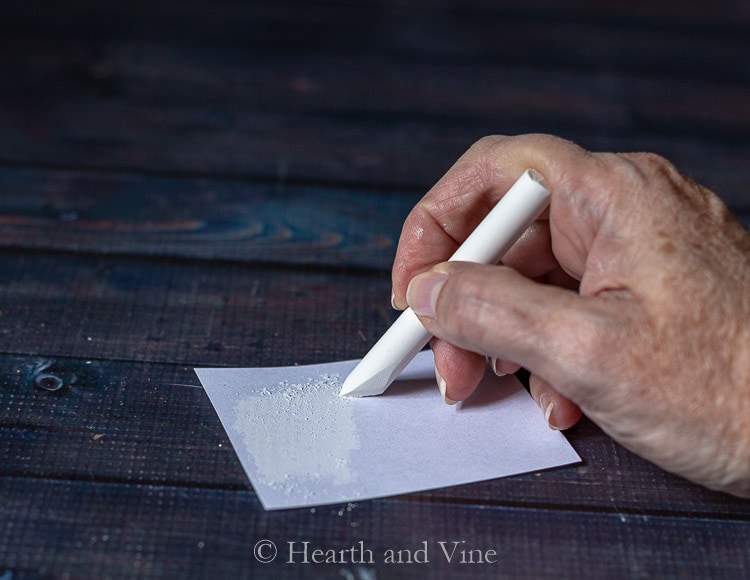
Next, you want to transfer an image or word onto the wood slice.
To do this print out your pattern and then rub white chalk on the back.

Tape the pattern to the wood and use a pencil or pen to trace the word or image onto the wood slice.
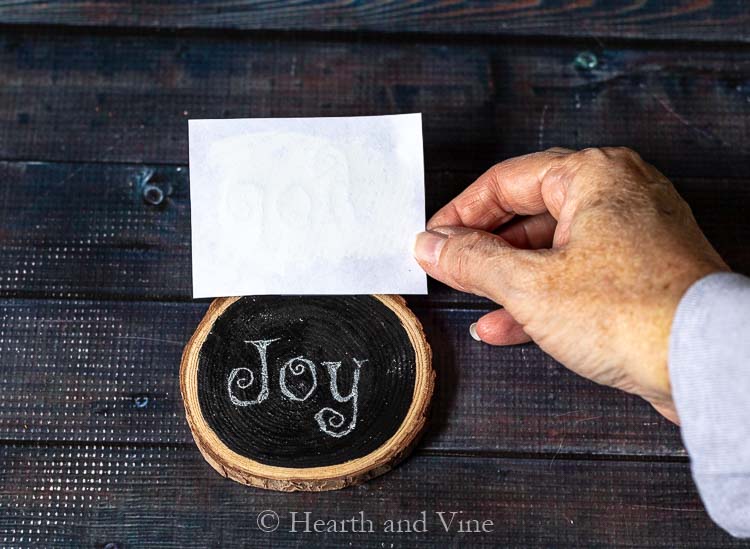
Voilá! So easy.
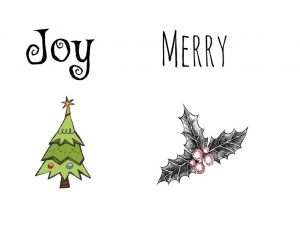
Here are some of the words and images I used.

If you right click on the image you can save it to your computer and print them out at home.
Once you have your image transferred onto the wood slice, use the Dremel tool to etch the chalkboard paint away leaving the beautiful wood design to shine through.
Dremel Tool Tips
- As with any tool please read and follow the manufacturer's safety instructions
- Always wear eye protection when working with this tool.
- A face mask is also a good idea, especially if you are creating many of these wooden Christmas decorations because it can create a ton of wood dust.
For this project, I used the no. 191 engraving cutter at a level 5 speed.
This worked very well for me and I was easily able to hold the tool like a pencil and carve away the design. Really, I could not believe how easy it was.

This image of a flower was from a large stencil and it was the first one I created. I also covered the entire surface with the chalkboard paint.

However, I decided I liked the look of a border so much more. So, to fix it all I had to do was use the Dremel tool and etch the edge away.
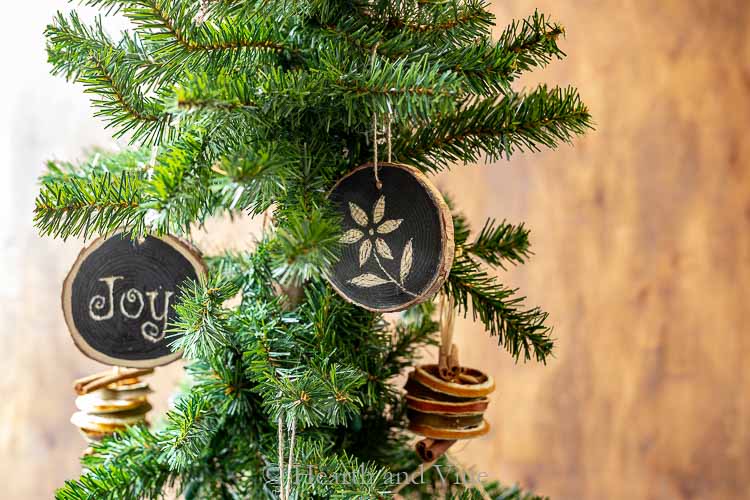
These wooden Christmas tree decorations look great with the dried fruit ornaments already on the tree. And like the fruit ornaments, would make great gift tags and adornments.
I also think, depending on the size you use, that they would make fun holiday coasters.
I had a lot of fun making these. Working with the Dremel tool was pretty satisfying and I can't wait to try using it again.
I think I'll try etching glass next. Of course, I'll let you know how it goes.


How to Make Wood Slice Ornaments - Christmas Tree Decorations
Equipment
- Dremel
- Paint Brush
Materials
- Wood Slices
- Chalkboard Paint
Instructions
- Paint the wood slices with a coat of chalkboard paint leaving a little edge of the wood grain showing.
- Print out your pattern and rub white chalk on the back.
- Tape the pattern to the wood and use a pencil or pen to trace the word or image onto the wood slice.
- Use the Dremel tool to etch the chalkboard paint and create your design.
- Add twine for hanging.
April
Hey there, i have fallen in love with so many of your ideas and crafts. I am so not great on the computer so i'm having a bit of a problem trying to print out the holiday images for the chalkboard tree ornaments. Either it comes out super small or too big? I don't know how to edit the size?...Please help me as i'm trying to make these today. Thank you
Patti Estep
I would start with your printer.
When I print from a pdf my printer gives me different size options as if I'm printing photos ie 8x10 5x7.
That often helps. Also there may be a shrink % option on the print options where you can print it at 50% or 75% etc..
You may also be able to Google your specific printer to find ways to scale the images
Karen
Oh, Patti...I love these, and I love it when a new product or tool inspires a fresh idea! I was thinking as I read your tutorial that these would be easy to make for those of us who have easy access to wood - we still have some cleanup to do from last month's hurricane and limbs are in abundance in our area! What a great way to "make lemonade from lemons".
Thanks for sharing. Now I'm going to have to check out my husband's Dremel and see if he has the right attachment for this one! 🙂
Patti Estep
That's a great idea Karen. The attachment is a basic one so even if you don't have it I think you could easily pick one up at the hardware store.
Carole West
These are so cute - love the simple details and mixed with your garland ornaments they sparkle. Great tool and looking forward to see what you come up with the glass etching. As for me, I'll be outside finishing up a chicken coop run. My timing seems to be off on everything lately and discovered yesterday next week is Thanksgiving. Life is moving too fast...
Patti Estep
I so hear you Carole. I can't believe next week is Thanksgiving. It's early this year and I"m really feeling it. Thanks as always for your kind comment.