Learn how to make dried citrus ornaments to embellish your wreaths and to hang on your Christmas tree. Easy to make and their natural beauty really shines.

So many people loved the dried orange slice garland project, so I thought I'd make some whole dried citrus ornaments to decorate the house this Christmas.
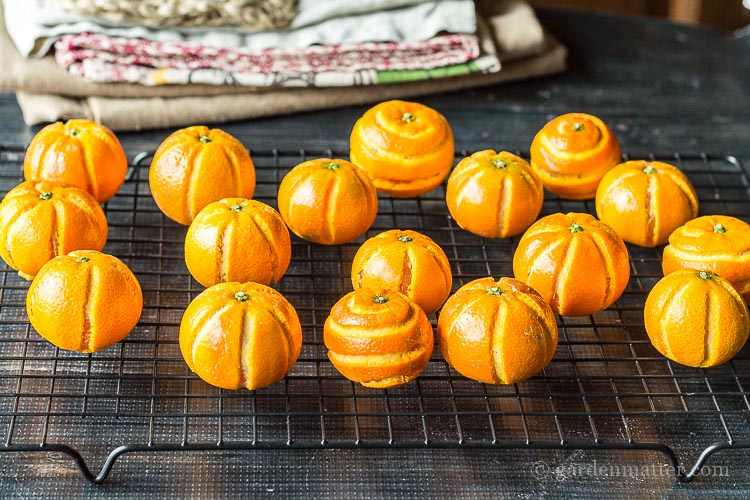
This took a little trial and error, but in the end, they turned out really nice. I tried lemons, limes, oranges, and clementines. The orange and clementines worked out the best, so I made several clementines to dress up an old berry garland in the kitchen.
This post contains some affiliate links (that means if you make a purchase after clicking a link, there’s no additional cost to you, but I will earn a very small commission. ) i.e. as an Amazon Associate, I earn from qualifying purchases. Click here to read my full disclosure policy.
Making Dried Citrus Ornaments
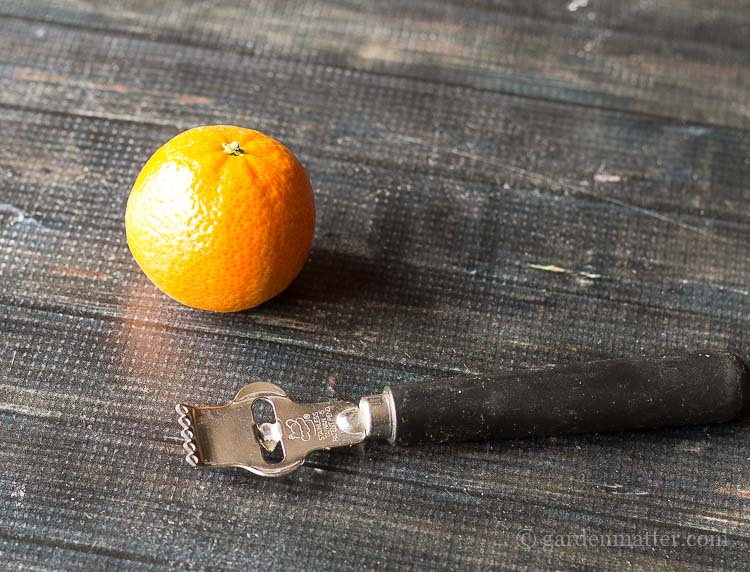
For this project, you will need a garnishing tool to carve sections of peel from the fruit. You can easily pick one up at any major grocery or retailer for less than $10.
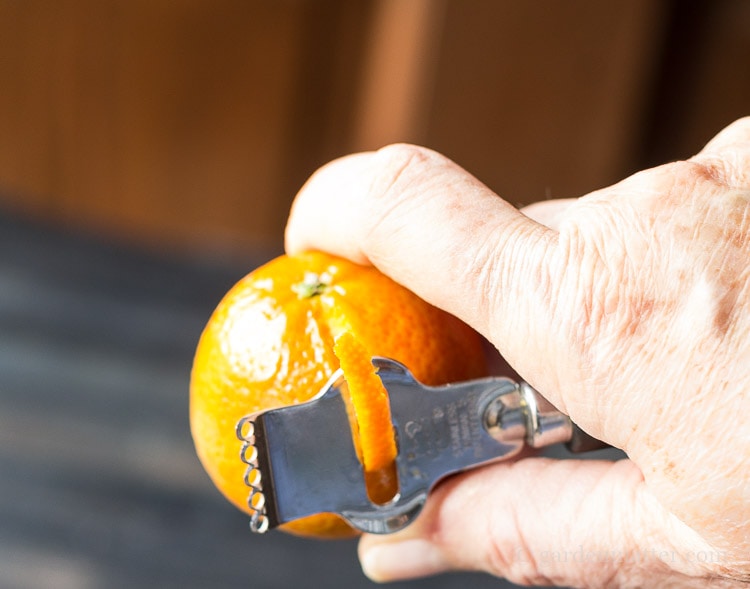
Simply peel away the rind, starting at the top, and move to the bottom. You can also make a spiral shape.
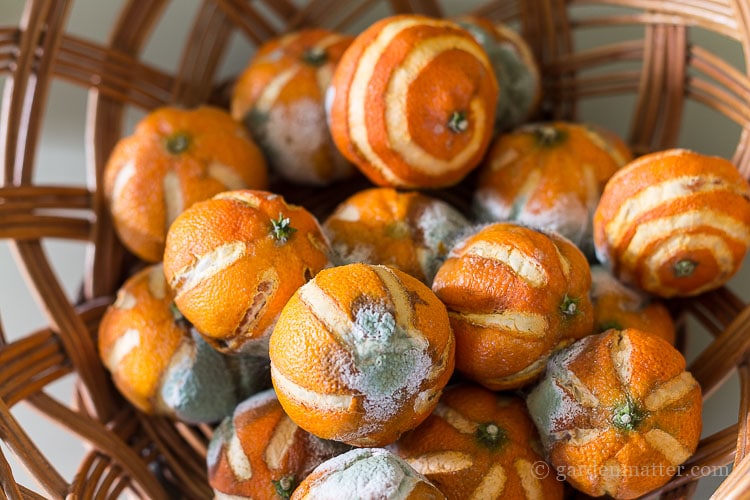
When you are done you need to let them air dry for about two weeks, depending on the humidity in your home. The first time I made them, I placed some in a wicker basket, (above) and they got all moldy. Yuck.
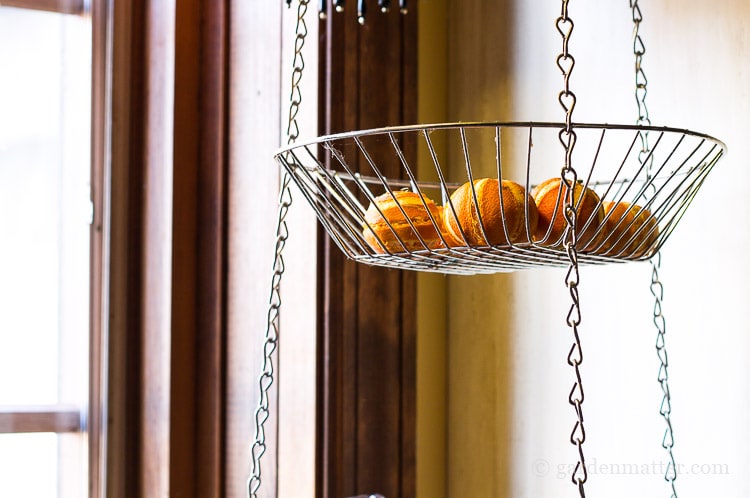
However, these hanging in a wire basket worked great.
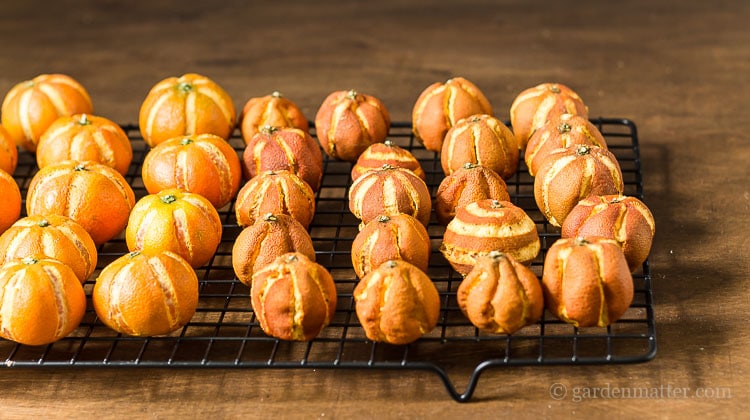
I also tried sticking them in the oven. See the group on the right. Not a good look.
Finally, I just used a wire rack and made sure they were in a nice dry area of the house.
How to Hang the Dried Clementines
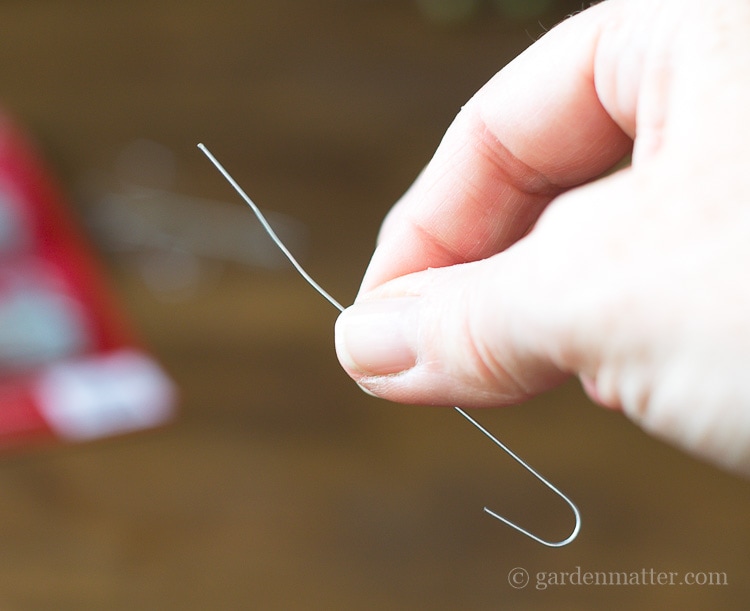
To hang or attach the dried clementines, take an ordinary wire hanger, leave one end hooked, and straighten out the other end.
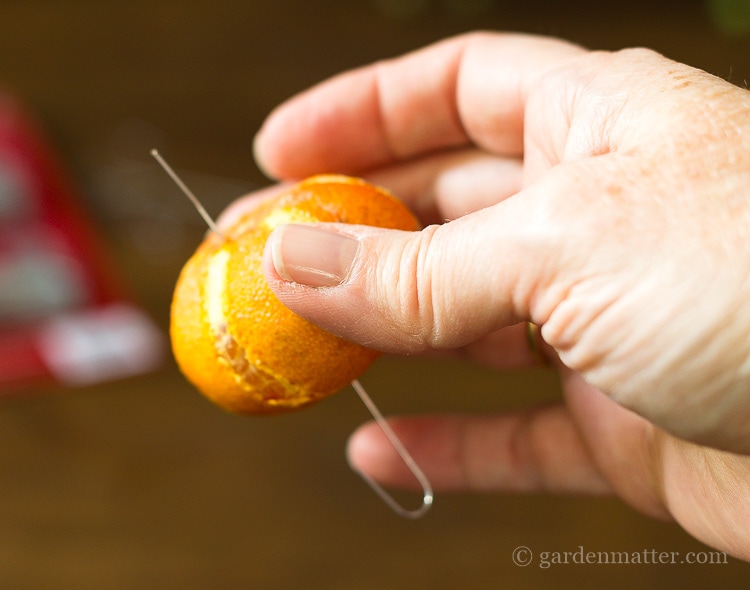
Pierce the clementine with the straight end, and let the hooked end slide into the bottom and act as an anchor.
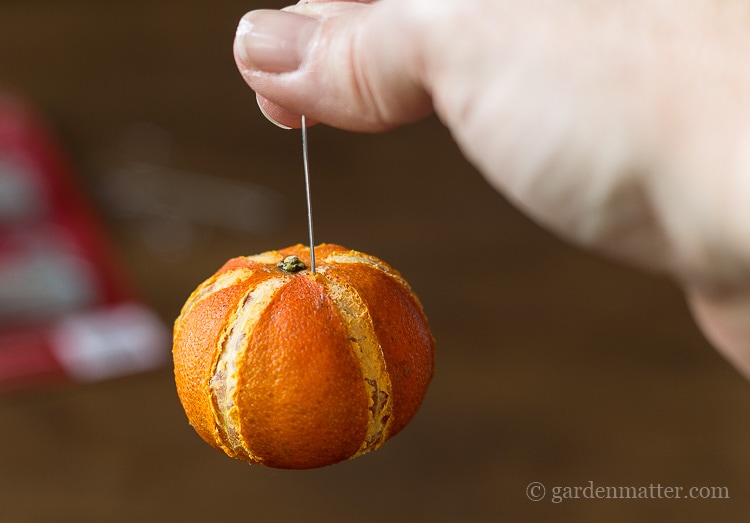
Now you can attach the fruit to your tree, or any other spots such as wreaths or garlands.
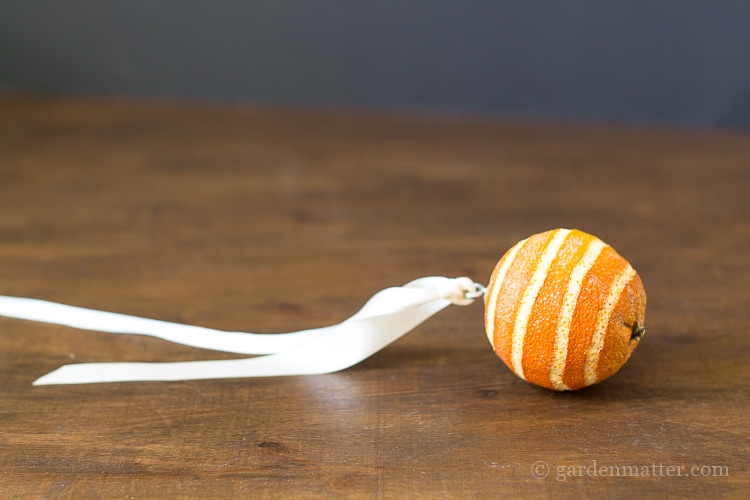
Here's an orange I dried too. I used an eye screw and some ribbon for this larger ornament.

For the clementines, I took an old artificial berry garland and wrapped it around the light in my kitchen.
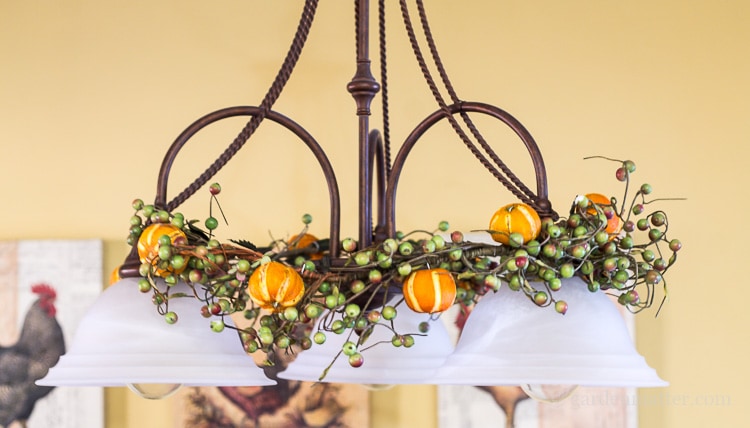
The clementines can easily be attached to the garland with their wire hangers.
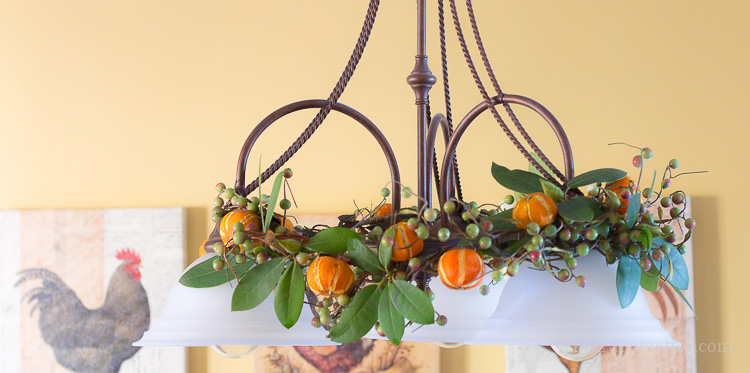
A few sprigs of rhododendron leaves add a little extra fresh look.

It turned out great, and I think this idea would work well for all kinds of special occasions.
For now, it will be part of our Christmas decor.

P.S. You may also love this stacked Dried Fruit Ornament idea or this Homemade Dried Apple & Orange Potpourri. You can find them and much more on my DIY Projects Page.


Dried Citrus Ornaments: Natural Holiday Decorations
Equipment
- Garnishing tool
Materials
- Citrus fruit
- Clementines
- Oranges
- Lemons
- Limes
Instructions
- Use the garnishing tool to peel away the rind, starting at the top, and move to the bottom.
- Let them air dry on a wire rack for about two weeks.
- Take an ordinary wire hanger, leave one end hooked, and straighten out the other end.
- Pierce the clementine with the straight end, and let the hooked end slide into the bottom.
- Attach the fruit to your tree, or any other spots such as wreaths or garlands.
Jenny Young
I love these! I usually dry fruit slices for my garlands. The only question I have is how long did it take them to dry out?
Patti Estep
Jenny, they took a good two weeks. It probably depends on the temperature and humidity of your home, so maybe a little more or less. Make sure they have good airflow. Hope that helps.
Jan
If you wanted to add some whole cloves, would you do it before or after drying the citris?
Patti Estep
I'm really not sure. After I read your comment I tried a couple in one that was already dried. I poked a hole first with a pin and the cloves went in easily. Here's a pic.
Kimm
What a great look. I have the perfect spot for this (as long as I can keep my family from eating the oranges:))
Thanks for sharing on Funtastic Friday!
Cristina at Ava's Alphabet
Another gorgeous project, Patti! I even have one of those garish tools somewhere in the depths of my kitchen drawer! Pinned and sharing! Thank you for joining us at Family Joy Blog Link-Up Party.
Christine
Love this idea!
Mary-the boondocks blog
Patti that is so beautiful and such a cool idea. i have a whole bunch of orange trees, I can easily do this if I don't mold them. And this can be up the whole winter. It is such a pretty idea.
Patti Estep
Hi Mary,
So glad you like it. Once I made sure they received plenty of air all around I had no problems with molding. Enjoy.
Thanks for stopping by,
Patti
Victoria @DazzleWhileFrazzled
This is so pretty, moldy oranges aside! 😉 I'm sure it smelled very good. Visiting from Pretty Pintastic Party.
Rhonda
I love this idea. It would be a nice addition to my dried orange slices. Thanks for sharing on Sunday's Best linkup.
Krystal Sadler
Just beautiful!! You make it look so easy. Thanks for linking up with us at Share the Wealth Sunday!
Kim~madeinaday
They cam out so pretty!! I love them! Thanks for linking up to Merry Monday! Sharing on G+! Have a great week!
Kim
Heidi
Great job on the instructions and photos. One of the better ideas I have seen with drying oranges.
Thanks so much!
Heidi
Dina
I'm saving this post until I move into a larger apartment! Currently in a studio!
This project is doable and will come in handy for future decorating adventures!
How long can these citrus fruits be saved? I'm thinking just one season.
Many thanks
Patti Estep
Hi Dina,
I'm not sure how long they will last certainly through the Christmas season. However, I still have my dried orange slices from last year and they look a little darker but otherwise are doing well.
Thanks for stopping by,
Patti
Penny at Enjoying The Simple Things
I love this idea! I have done cloved oranges before, but this takes it over the top.
Patti Estep
Hi Penny,
Cloved oranges are so pretty too. I've been thinking about them for a centerpiece but now I'll probably just add in some of these guys.
Thanks for stopping by,
Patti
Donna Harvey
Patti, that looks so pretty,añd I bet it smells great to.
Patti Estep
Hi Donna,
They do smell nice but the scent is not very strong.
Thanks for stopping by,
Patti
jemma
I love this project! What a beauty this is, my California daughter needs to be doing this.
Thanks for sharing!
Jemma
Carole @ Garden Up Green
I love this and citrus is a favorite here especially this time of year. For me decorating for Christmas is all about the natural elements. I love your creativity, gorgeous!
Patti Estep
Hi Carole,
I bet you have a lot of citrus in the south and I agree with you that natural is a preferred element in my decor. Although I will say that the artificial products seems to be getting better and better everyday.
Thanks for stopping by,
Patti
Karen
I love this look, Patti. Growing up so near Florida, citrus was always a part of our Christmas and winter traditions, so this really brings back holiday memories for me. This is so gorgeous and creative. Thank you for sharing.
Patti Estep
Thanks Karen. It was a fun project to experiment and I am loving how great the clementines are looking in my holiday decor. It did take a good 2 weeks for me to be able to use them so I wanted to get this post out asap in case anyone wanted to try it for themselves.
Thanks for stopping by,
Patti