• Skip to primary navigation
  • Skip to main content
  • Skip to primary sidebar
  • Home
  • DIY Projects
    • Homemade Bath and Body
    • Sewing
    • Flower Crafts/Decor
    • Thrift Store/Vintage
  • Gardening
    • Flower Gardens
    • Container Gardening
    • Houseplants
    • Indoor Gardening
    • Landscaping
    • DIY Garden Art
  • Decorate
    • Room Makeovers
    • Spring Decor
    • Summer Decor
    • Fall Decor
    • Winter Decor
    • Home Decor Projects
  • Recipes
    • Breakfast Recipes
    • Lunch Recipes
    • Dinner Recipes
    • Dessert
    • Salad Recipes
    • Soups and Stews
    • Side Dish Recipes
    • Appetizers and Snacks
    • Healthy Recipes
  • Holidays
    • Valentine's Day
    • Easter
    • Mother's Day
    • Halloween
    • Thanksgiving
    • Christmas
Hearth and Vine
menu icon
go to homepage
subscribe
search icon
Homepage link
  • Home
  • About Hearth and Vine
  • DIY Projects
    • ...Flower/Gardening Crafts
    • ... Bath and Body
    • ...Sewing/Fabric Crafts
    • ...Thrift Store/Upcycle
  • Gardening
    • ...Flower Gardens
    • ...Container Gardening
    • ...Indoor Gardening
    • ...DIY Garden Art
  • Decorate
    • ...Home Decor Projects
    • ...Spring Decor
    • ...Summer Decor
    • ...Fall Decor
    • ...Winter Decor
    • ...Room Makeovers
  • Recipes
    • ...Appetizers and Snacks
    • ...Dinner Recipes
    • ...Side Dish Recipes
    • ...Salad Recipes
    • ...Dessert
    • ...Drinks
  • Holidays
    • ...Valentine's Day
    • ...Easter
    • ...Mother's Day
    • ...Halloween
    • ...Thanksgiving
    • ...Christmas
  • Subscribe
  • Instagram
    • Email
    • Facebook
    • Instagram
    • Pinterest
    • Twitter
  • ×

    Home » Crafts

    Handmade Pressed Flower Jewelry Dish

    June 23, 2020 by Patti Estep 20 Comments

    Jump to How-to Card
    Geranium flower pressed into clay to make a small decorative jewelry dish.

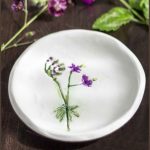
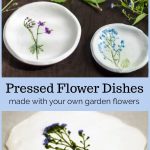
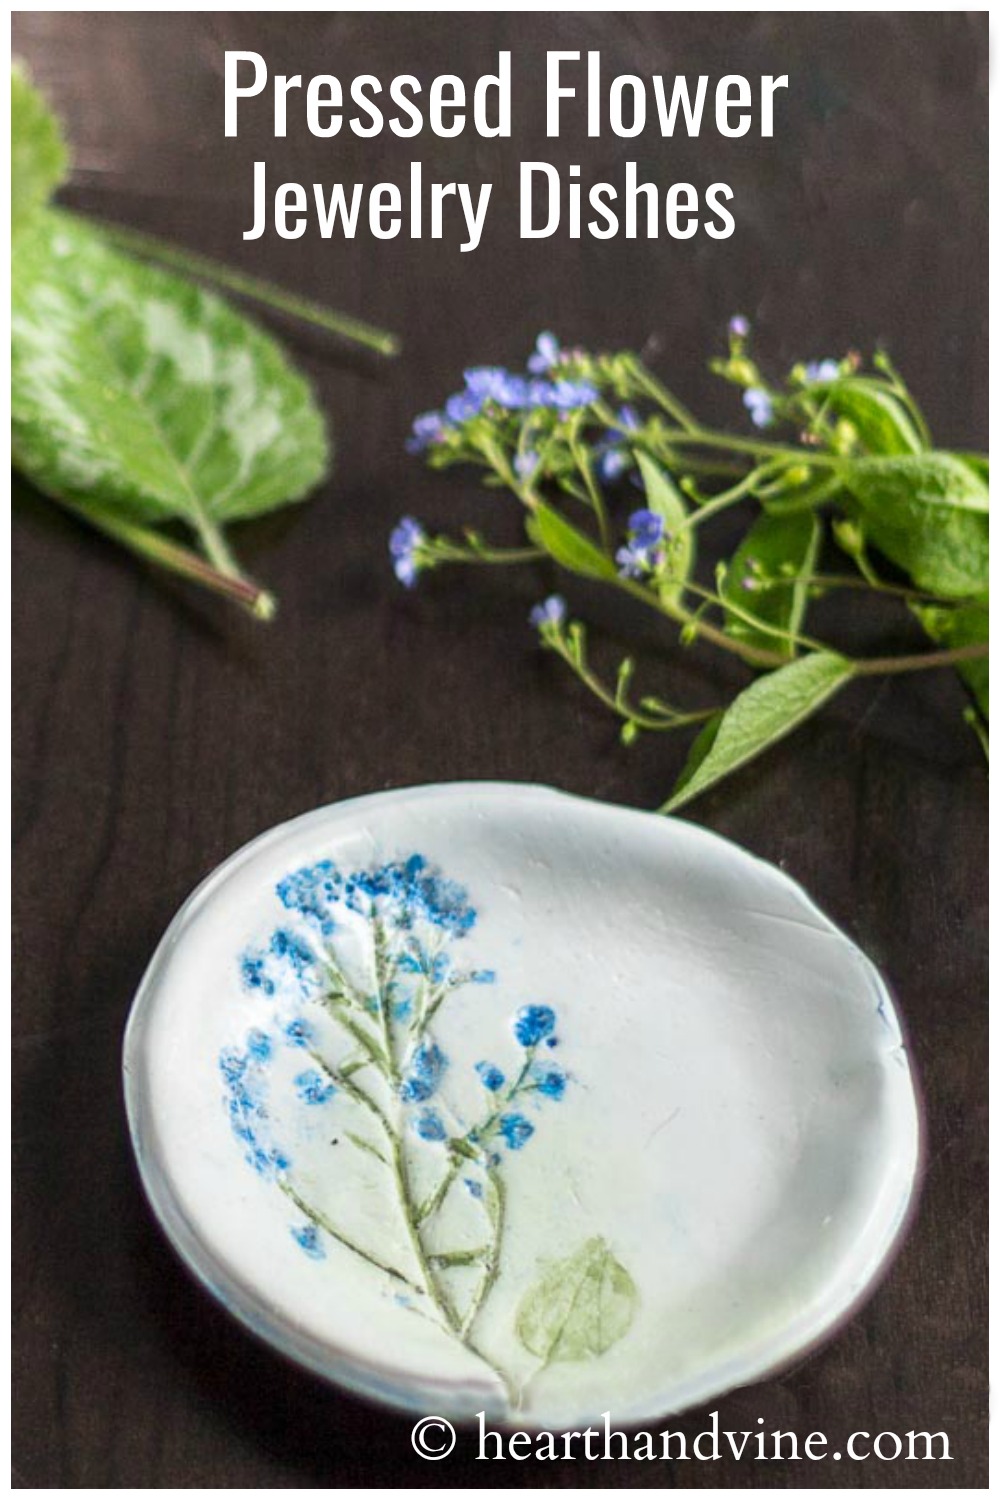
    Learn how to make your own pressed flower jewelry dish from polymer clay, a few flowers from your yard, and craft paint. 

    Pressed fjower jewelry dishes

    Recently I came across a pretty ceramic soap dish made by Salt Marsh Pottery.  It was one of the items we used to sell at the herbal gift shop.

    Newsletter Signup
    Join Our Newsletter List!

    Be the first to receive new posts and get access to our Subscribers Only Page.

    As I was looking at it I wondered if I could make a little pressed flower jewelry dish from polymer clay. So I went out to Hobby Lobby and purchased some polymer clay and a plastic clay kit with a roller and cutter.

    This post contains some affiliate links (that means if you make a purchase after clicking a link, there’s no additional cost to you, but I will earn a very small commission.) i.e. as an Amazon Associate, I earn from qualifying purchases.  Click here to read my full disclosure policy.

    Supplies for pressed flower jewelry dish


    How to Make a Pressed Flower Jewelry Dish
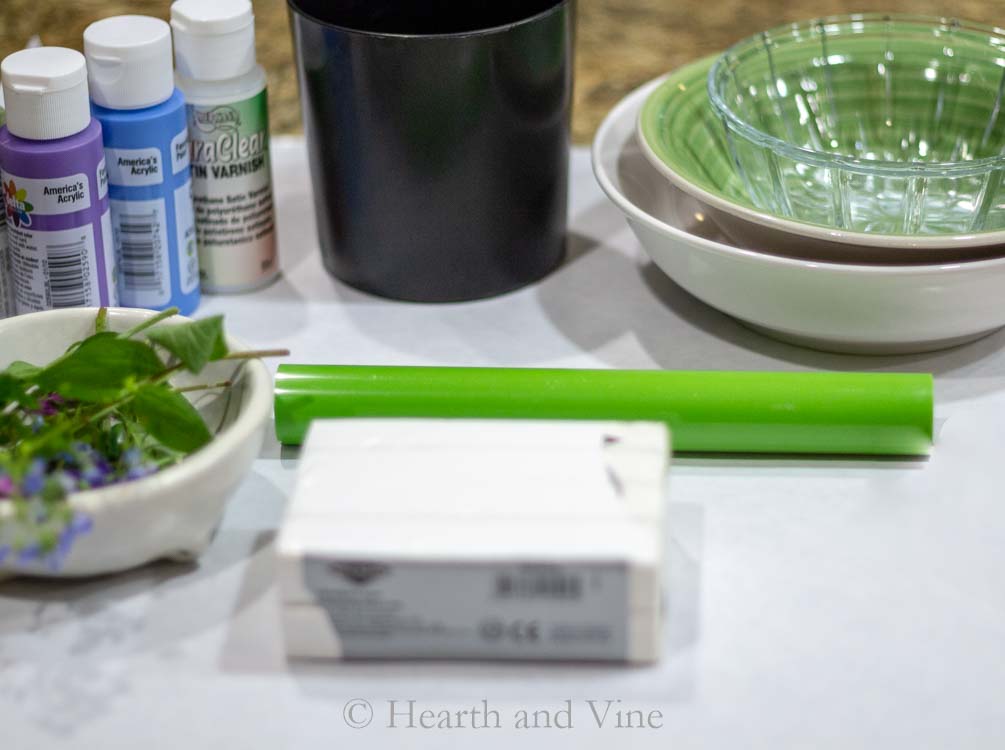
    Supplies

    • Polymer clay
    • Flowers and leaves from the garden
    • Oven safe bowl - (dollar store)
    • Rolling pin for clay (anything round, not your baking tools)
    • Craft Paints
    • Varnish


    Start by picking a few flowers. Rinse them well and let them air dry.

    In the meantime work on softening the clay. I don't have a special tool to condition the clay for rolling so I sat in front of the TV and used my hands to knead it until it was soft and pliable.

    This was the hardest part and took me about 20 minutes.

    Flowers pressed into clay

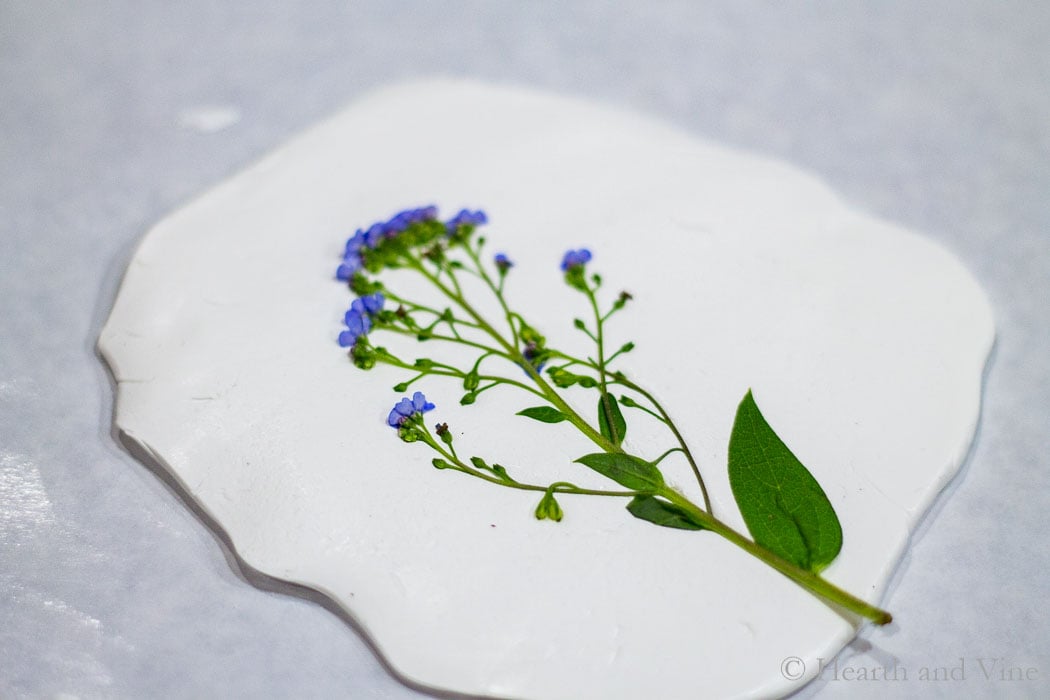
    Next, roll out the clay on some parchment paper until it was about 1/4 inch thick.

    Place some of the flowers on and roll it gently into the clay to make an impression.

    Gently remove the plant material and used a pin to lift out any stragglers.

    Use something like a plastic round container to trace a circle and cut it out. 

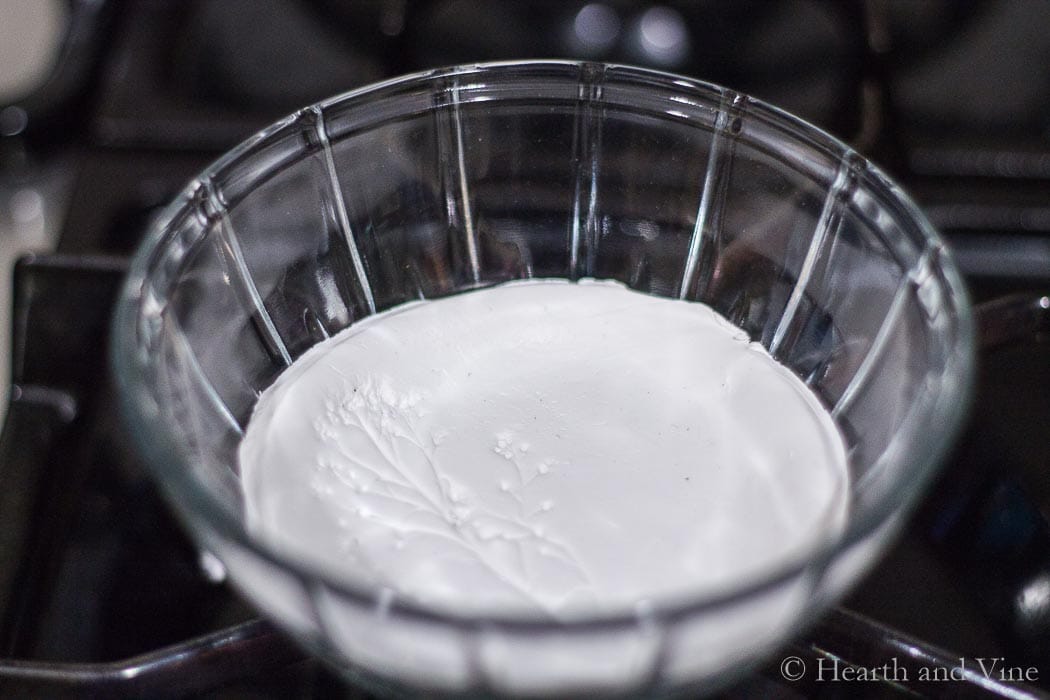
    Place the clay into a small ovenproof bowl. I had read somewhere that you shouldn't use your regular utensils or dinnerware when working with polymer clay. I used one that I bought from the dollar store.

    The directions on the particular clay said you bake at 300 degrees for 20-30 minutes. 

    Pressed flowers in clay inside glass bowl

    Once the clay is done baking let it cool, and then turned it upside down on some paper towels and tap on the bottom until it comes out.

    Use some heavy sandpaper to sand off any rough edges. 

    Jewelry dish with magenta flower

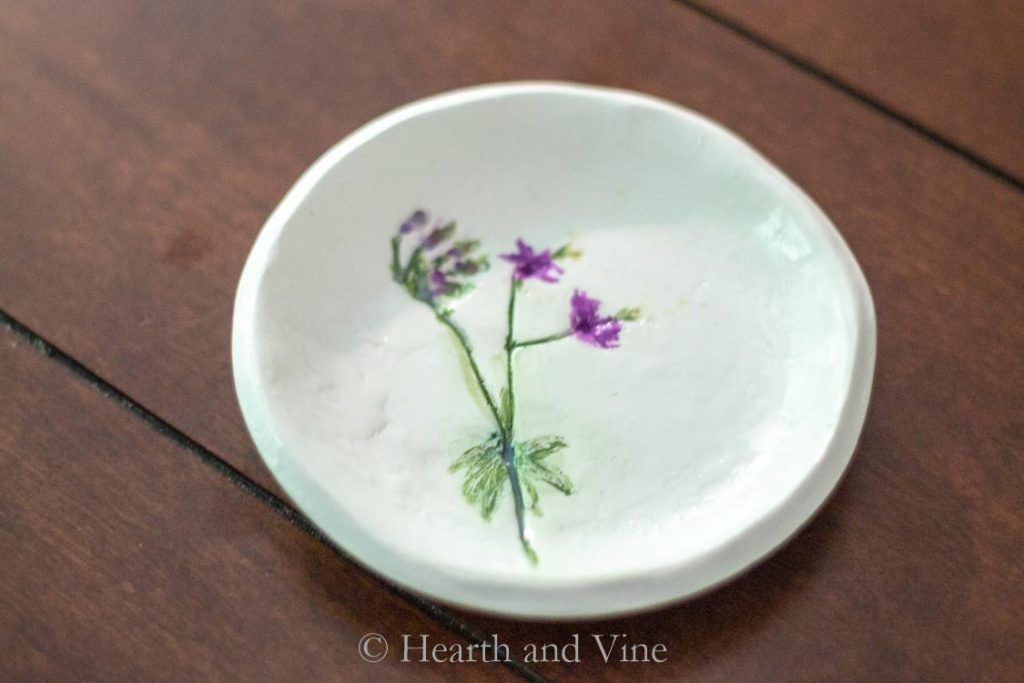
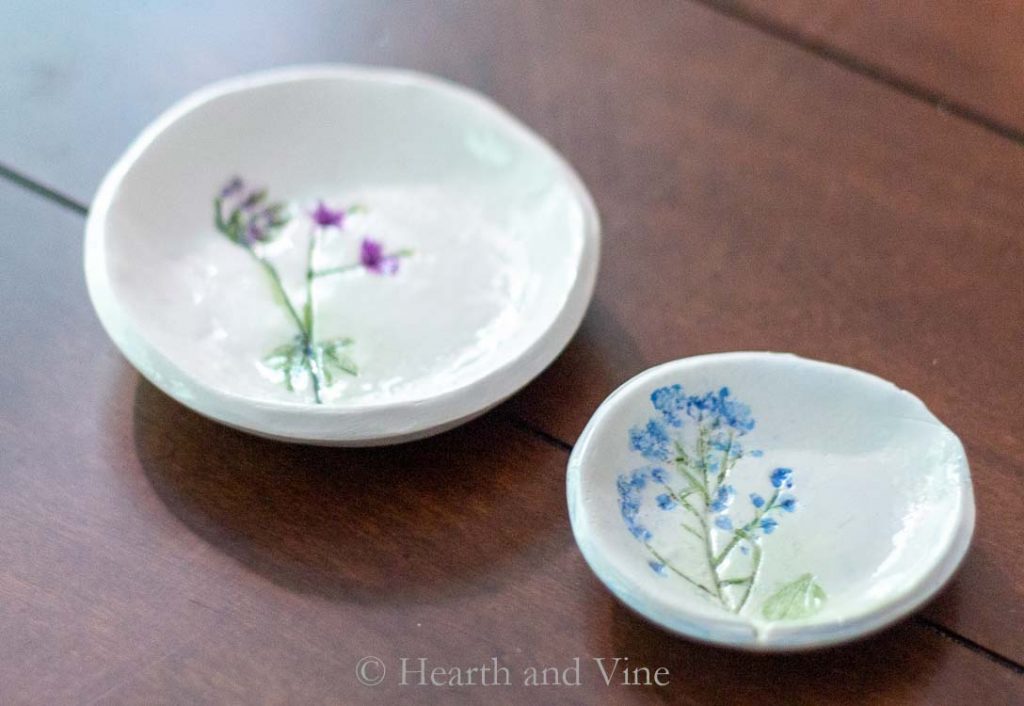
    Next, use craft paints to color and fill in the impressions to match the real flower.

    Once the paint dries add a nice clear varnish to give the entire piece some shine and protection.

    jewelry-dish-blue-flower

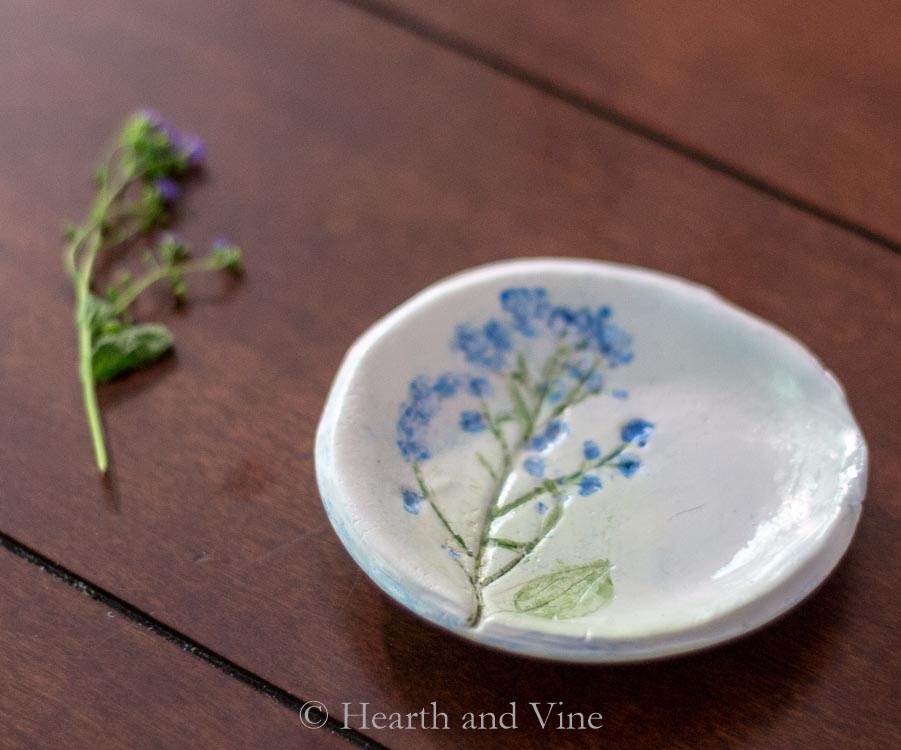
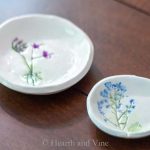
    I think they turned out great.

    I'll admit they are a far cry from the fine craftsmanship at Salt Marsh, but sometimes it's just fun to do it yourself. And, I think with some planning and practice, this project could only get better and better.

    Do you ever go to bed with earrings on? I hate getting out of bed but worry about losing studs if I place them on the nightstand so this jewelry dish is the perfect solution.

    It would also make a great gift, don't you think?

    Patti signature


    P.S. You may also like these Alcohol Ink Jewelry Dishes. They are less work and a bit messy but really fun and easy to make. Or you may want to try this Floral Handmade Clay Tray using pressed stems of lavender flowers.


    Click Here to Save to Pinterest!

    Flowers and pressed flower jewelry dish

    Pressed fjower jewelry dishes
    Print
    5 from 1 vote

    Handmade Pressed Flower Jewelry Dish

    Gather a few flowers from your yard, and some craft paint to make your own pressed flower jewelry dish from polymer clay. 
    Prep Time30 mins
    Active Time30 mins
    Total Time1 hr
    Course: Crafts
    Yield: 1 Jewelry Dish
    Author: Patti Estep
    Cost: $10-$15

    Equipment

    • DecoArt DS19-3 Americana DuraClear Varnishes, 2-Ounce, Gloss
    • Polyform Sculpey III Polymer Clay 8 Oz: White

    Materials

    • Polymer clay
    • Flowers and leaves from the garden
    • Oven safe bowl
    • Rolling pin for clay
    • Craft Paints
    • Varnish

    Instructions

    • Gather a few flowers.
    • Rinse them well and let them air dry.
    • Use your hands to knead the clay until it is soft and pliable.
    • Roll out the clay on parchment paper until it is about 1/4 inch thick.
    • Place some of the flowers on and roll it gently into the clay to make an impression.
    • Gently remove the plant material, with a pin if necessary.
    • Trace a circle and cut it out. 
    • Place the clay into a small ovenproof bowl.
    • Bake at 300 degrees for 20-30 minutes. 
    • Once the clay is done baking let it cool.
    • Turn it upside down on some paper towels and tap on the bottom until it comes out.
    • Use some heavy sandpaper to sand off any rough edges. 
    • Use craft paints to color and fill in the impressions to match the real flower.
    • Let dry.
    • Cover with a clear varnish to give the entire piece some shine and protection.


    « How to Make a Succulent Log Planter
    Focaccia Bread Art - Easy Recipe for Getting Creative »

    About Patti Estep

    Patti is the creator of Hearth and Vine, a home and garden blog filled with projects to inspire your creative side. She loves crafting, gardening, decorating and entertaining at her home in Pennsylvania. When she is not working on a project at home or searching for treasures at nurseries and thrift stores with her girlfriends, you’ll probably find her with family and friends, at a restaurant, or home party enjoying new and different food adventures.

    Reader Interactions

    Comments

    1. Melissa S

      May 16, 2016 at 1:47 pm

      They look fantastic. My mom will be visiting i June., I think this would be fun, grown up craft to do. Thank you for the instructions.

      Reply
      • Patti Estep

        May 17, 2016 at 10:20 am

        You are very welcome. I love the idea of sharing it with your mother!

        Reply
    2. Ann

      May 16, 2016 at 10:36 am

      adorable!

      Reply
    3. michelle doolittle

      May 25, 2015 at 7:51 am

      I just made one! I trimmed around the circle with scissors, which turned out nice and clean edges. Also, I used small "fake" flowers and it worked out great! love yours!!

      Reply
      • Patti

        May 25, 2015 at 7:59 am

        Both great ideas Michelle. Thanks for sharing.

        Reply
    4. Ashley

      May 21, 2015 at 3:37 pm

      Are these safe to wash or eat from? Also, what type of varnish/sealant did you use/recommend?

      Thanks!

      Reply
      • Patti

        May 21, 2015 at 3:43 pm

        Hi Ashley,

        I don't believe that polymer clay is suitable for eating off of. These were meant to hold earrings and rings etc.. Also, I used a varnish that was sold with the craft paints. I simply painted it on the dishes once the colored paint dried. You could probably also use spray varnish.
        Thanks for stopping by,
        Patti

        Reply
    5. Laura / Pet Scribbles

      May 19, 2015 at 7:18 pm

      These little dishes are perfect! Love these!

      Reply
      • Patti

        May 20, 2015 at 7:07 am

        Thanks Laura.

        Reply
    6. [email protected]

      May 18, 2015 at 10:23 am

      I think these turned out beautiful! I've been wanting to make some little bowls like these to hold my earrings. I like how you used flowers to imprint a design. Thanks for sharing your tutorial.

      Reply
      • Patti

        May 18, 2015 at 10:42 am

        Thanks Linda. They were fun to make and I definitely want to try them again when I have more time now that I've made a couple.

        Reply
    7. Betty

      May 17, 2015 at 5:33 pm

      I love this project! I'm not artistic in the least when it comes to painting art, but maybe I can do this. Thanks for the tutorial!!

      Reply
      • Patti

        May 17, 2015 at 7:09 pm

        Hi Betty,
        You certainly can. As I mentioned the hardest part was conditioning the clay. Thanks for the lovely comment.
        Patti

        Reply
        • Betty

          May 17, 2015 at 7:46 pm

          My husband had a grand idea: using my pasta machine as a conditioner since I never make pasta. 🙂 I don't know if it will work, but it's a thought.

        • Patti

          May 17, 2015 at 8:07 pm

          Great idea.

        • Pat Schwab

          April 02, 2016 at 11:57 pm

          A pasta machine works great with clay. Do not use for food after using clay in it.

        • Patti Estep

          April 03, 2016 at 7:12 am

          Great idea Pat.
          Thanks for sharing!

        • Pat Schwab

          May 16, 2016 at 6:45 am

          Clay artists use pasta machines all the time. Once it has been used with clay it is no longer food safe.

        • Patti Estep

          May 17, 2016 at 10:22 am

          Hi Pat,
          Yes I have heard of using a pasta maker. It would certainly help a lot with the conditioning. I will have to keep my I out for one at the Goodwill or garage sale.
          Thanks for this helpful comment,
          Patti

    Trackbacks

    1. Tutorial: Pressed Flower Trinket Dish – Polymer Clay says:
      May 21, 2015 at 10:33 pm

      […] making small dishes and bowls from polymer clay. You could do the same from air dry clay but this tutorial uses oven bake clay, flowers to create an impression and craft paint to highlight the […]

      Reply

    Leave a Reply Cancel reply

    Your email address will not be published. Required fields are marked *

    Recipe Rating


    Primary Sidebar

    Follow Me

    • Email
    • Facebook
    • Instagram
    • Pinterest
    • Twitter

    Patti profile pic

    Hi! I'm Patti

    Join me to create lots of fun DIY projects including crafts, gardening, home decor and tasty recipes.

    more about me

    Popular Posts

    Blue jean crossover bag

    DIY Crossbody Bag from Jeans

    tabletop water gardens

    How to Make an Indoor Water Garden

    Echievera planter

    What to do With a Stretched Succulent

    Fabric bowl covers in 3 prints

    How to Make Fabric Bowl Covers

    Collage of flowers including russian sage, pink hydrangeas, coneflower and yarrow.

    10+ Long Blooming Plants

    Chicken black bean tortilla casserole

    Chicken Black Bean Casserole Recipe

    Footer

    ^ back to top

    About
    Privacy Policy
    Disclosure Policy

    Sign Up Here!
    for our
    newsletter &
    special offers

    • Shop
    • Web Stories

    As an Amazon Associate, I earn from qualifying purchases. i.e. as an Amazon Associate, I earn from qualifying purchases.

    Copyright © 2021 Hearth and Vine