• Skip to primary navigation
  • Skip to main content
  • Skip to primary sidebar
  • Home
  • DIY Projects
    • Homemade Bath and Body
    • Sewing - Fabric Crafts
    • Flower Crafts/Decor
    • Thrift Store/Vintage
  • Gardening
    • Flower Gardens
    • Container Gardening
    • Houseplants
    • Indoor Gardening
    • Landscaping
    • DIY Garden Art
  • Decorate
    • Spring Decor
    • Summer Decor
    • Fall Decor
    • Winter Decor
    • Home Decor Projects
  • Recipes
    • Breakfast Recipes
    • Lunch Recipes
    • Dinner Recipes
    • Dessert
    • Salad Recipes
    • Soups and Stews
    • Side Dish Recipes
    • Appetizers and Snacks
    • Healthy Recipes
  • Holidays
    • Valentine's Day
    • Easter
    • Mother's Day
    • Halloween
    • Thanksgiving
    • Christmas
Hearth and Vine
menu icon
go to homepage
  • About
  • DIY
    • ...Flower/Gardening Crafts
    • ... Bath and Body
    • ...Sewing/Fabric Crafts
    • ...Thrift Store/Upcycle
  • Gardening
    • ...Flower Gardens
    • ...Container Gardening
    • ...Indoor Gardening
    • ...DIY Garden Art
  • Decorate
    • ...Home Decor Projects
    • ...Spring Decor
    • ...Summer Decor
    • ...Fall Decor
    • ...Winter Decor
    • ...Room Makeovers
  • Recipes
    • ...Appetizers and Snacks
    • ...Dinner Recipes
    • ...Side Dish Recipes
    • ...Salad Recipes
    • ...Dessert
    • ...Drinks
  • Holidays
    • ...Valentine's Day
    • ...Easter
    • ...Mother's Day
    • ...Halloween
    • ...Thanksgiving
    • ...Christmas
  • Subscribe
  • Instagram
    • Facebook
    • Instagram
    • Pinterest
    • Twitter
  • subscribe
    search icon
    Homepage link
    • About
    • DIY
      • ...Flower/Gardening Crafts
      • ... Bath and Body
      • ...Sewing/Fabric Crafts
      • ...Thrift Store/Upcycle
    • Gardening
      • ...Flower Gardens
      • ...Container Gardening
      • ...Indoor Gardening
      • ...DIY Garden Art
    • Decorate
      • ...Home Decor Projects
      • ...Spring Decor
      • ...Summer Decor
      • ...Fall Decor
      • ...Winter Decor
      • ...Room Makeovers
    • Recipes
      • ...Appetizers and Snacks
      • ...Dinner Recipes
      • ...Side Dish Recipes
      • ...Salad Recipes
      • ...Dessert
      • ...Drinks
    • Holidays
      • ...Valentine's Day
      • ...Easter
      • ...Mother's Day
      • ...Halloween
      • ...Thanksgiving
      • ...Christmas
    • Subscribe
    • Instagram
    • Facebook
    • Instagram
    • Pinterest
    • Twitter
  • ×
    Home » DIY Projects

    How to Make a 3 Wick Candle

    by Patti Estep · Aug 28, 2024

    Jump to How-to Card
    A stack of black jar candles with wood lids and a fall label saying Warm & Cozy.
    Six black jar candles with labels lids for fall with Warm and Cozy written on them over three jars prepared for wax.

    Making a 3 wick candle is probably easier than you think and this post will show you how to create a beautiful fall scented candle complete with a wick template and a printable label.

    Group of black 3 wick candles with fall warm and cozy labels.

    It's warm and cozy time with a nice 3 wick candle for fall. I love to burn candles during the fall and winter months. However, you can use this tutorial to make any scented 3 wick candle you want. Why 3 wick? Well, a 3-wick candle has the advantage over a single wick candle because it will burn all the way to the edge. Also, it typically is a larger candle overall and who doesn't like that?

    This post contains some affiliate links (that means if you make a purchase after clicking a link, there’s no additional cost to you, but I will earn a very small commission. ) i.e. as an Amazon Associate, I earn from qualifying purchases.  Click here to read my full disclosure policy.

    Six fall black candle jars with wood tops and a label that says Warm and Cozy. One is open.

    How to Make 3 Wick Candles

    Supplies

    • 6 - 16 oz Candle Jars
    • 4 pounds Soy Wax
    • 6 - Pre-tabbed Wicks
    • 5 oz - Fragrance Oil
    • Old Pot
    • Candle Pitcher
    • Wooden spoon or skewer
    • Hot glue gun and glue sticks or glue dots
    • Scale
    • Candle thermometer
    • Plastic cup
    • Template for wicks (see below)
    • White paint pen or marker
    • Heat gun
    • Printable labels - optional

    Preparing the Jars for Wax

    Step 1 - The biggest issue with a 3 wick candle is centering the wicks correctly. You need to space wicks about 1.5 inches from each other in a triangle placement in the center of the jar. You could use a ruler but the easiest way is using a template. You can buy templates online or print out the one below.

    Template for marking wicks and holding wicks in place.
    Click here for a pdf file of the wick placement template

    The pdf file has two circle templates. Cut one around the circle to place in the bottom of your jar where you will glue the wicks. The other will be used to hold the wicks straight when you pour the wax.

    Template with center circles punched out for marking wick placement.

    Step 2 - Use a hole punch to make a hole in the center of the three circles. If you don't have a hole punch you can use scissors to cut an opening in each circle.

    Inside bottom of candle jar with template and white dots in the center of the holes.

    Step 3 - Set the template into the bottom of the candle jar. Use a white paint marker to make a dot in each circle. Note: Anything you have to create a mark on the black surface will do. Maybe a white crayon or a sewer's marking pencil.

    Newsletter Signup
    Join Our Newsletter List!

    Be the first to receive new posts and get access to our Subscribers Only Page.

    Three wicks glued to the dots in the bottom of the black candle jar.

    Step 4 - Put a drop of hot glue on the bottom of each wick tab and set them on the white dots you have marked. You could also use glue dots instead of hot glue.

    Cutting slits in the center holes of a template.

    Step 5 - Use the second template next. However, this time do not cut around the circle. Only cut about 1.5 inches square around it. This way you can set it on top of the jar without sinking in. Cut a small X into each center circle. Then cut a V between two of the circles to leave an opening for pouring the wax. (see below)

    Three candle jars with wicks and a template holding them in place with a cut out section for pouring wax.

    Step 6 - Thread the templates onto wicks and center the large circle over the top of each candle jar.

    Soy wax pieces melting in a wax pitcher.

    Preparing the Wax

    Step 1 - Pour the wax into a candle pitcher set in a couple of inches of water in a pot. Heat the water to a simmer and stir with a wooden skewer or spoon.

    Note: I use an old pot for this purpose as you may get wax into it. Also, you may have an old coffee can that you could use instead of a wax pitcher. However, if you think you will want to make candles or other wax based crafts in the future the pitcher is worth the investment.

    Measuring fragrance oil in a cup on a kitchen scale.

    Step 2 - Weigh the fragrance oil into a plastic cup. You want approximately 8% of the amount of wax for your fragrance oil. Since I have 32 ounces of wax (2 lbs), 8% equals 2.56 ounces which I rounded down to 2.5.

    Note: Since this project used 6 jars, I could have bought one 4 ounce bottle and a 1 ounce bottle. Then combined them and used half for each set of three, eliminating the need for a scale.

    For this project, I chose the scent Pomegranate and Cider for fall from Candle Science. They have great quality scents for all occasions and seasons.

    Candle thermometer in hot wax to 185 degrees.

    Step 3 - Add the fragrance oil to the melted soy wax and heat until it reaches 185 degrees. This is said to help the fragrance bind with the wax and work better.

    Finished candle with cracks and holes.

    Pouring Wax Into Candle Jars

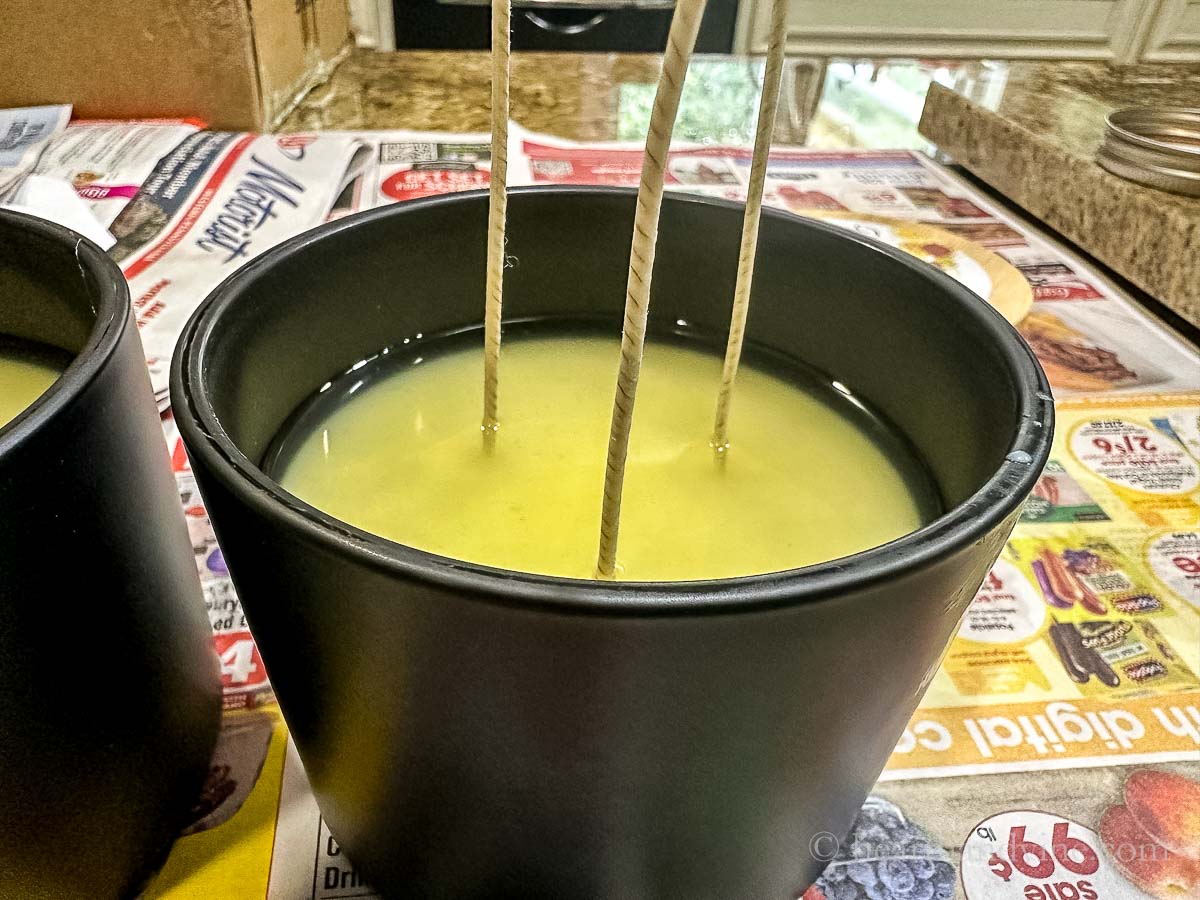
    For the first set of 3 candles, I poured the wax all the way to about 3/4 inch from the top. (you need room for the wicks and the lid to fit). As you can see from the image above there is some cracking, sinkholes, and unevenness going on.

    Candle with a second top pour.

    For the second group, I left about 1 inch or a little more from the top. Then I waited a couple of hours before reheating the leftover wax and finishing pouring the wax into the jars.

    Second pour candle with a fairly even finish.

    As you can see this had a much better outcome.

    Heat gun melting to of candle for a smooth finish.

    However, even with the second pour the top was not totally smooth and I had three from the first batch that looked pretty bad. So the next day I trimmed the wicks and used a heat gun on low to melt the entire top of each candle. This made the tops look nice and smooth.

    Warm and cozy round label.
    Click for pdf file

    Here is the label I used for my candles. Feel free to print some out for yourself. However, the candles don't necessarily need a label.

    Warning label from candle jar manufacturer.

    Here's the warning label that came with the candle jars. If you don't buy this particular candle jar set the information is a good idea for any candle gift.

    Pyramid set up of six candle jars. The bottom center one has the lid off.

    Making 3-wick candles is a great project to tackle on a weekend and will leave your home smelling incredible.

    Patti signature

    More Candle Projects

    • Hand Dipped Candles with Beeswax
    • DIY Orange Peel Candles
    • Wine Bottle Candles
    • DIY Teacup Candles
    • Mason Jar Oil Candle
    • Acorn Cap Candles
    • DIY Rolled Beeswax Candles
    Group of black 3 wick candles with fall warm and cozy labels.
    Print

    Three Wick Candle Tutorial

    Learn how to make a 3 wick candle with fragrance oil for fall or any time of year.
    Prep Time30 minutes mins
    Active Time20 minutes mins
    Hardening1 day d
    Total Time1 day d 50 minutes mins
    Yield: 3

    Equipment

    • Old pot
    • Candle Pitcher
    • Candle Thermometer
    • Kitchen Scale
    • Wooden Skewer or Spoon
    • Hot glue gun and glue sticks or glue dots
    • Computer and printer
    • Heat Gun
    • Hole Punch

    Materials

    • 3 16 oz Candle Jars
    • 2 pounds Soy Wax
    • 9 Wicks - Pretabbed
    • 2.5 ounces Fragrance Oil
    • 1 White Paint Pen or Marker
    • 1 Plastic Cup
    • Printable Labels

    Instructions

    • Print out the two templates and cut around only one.
    • Use a hole punch to punch out the center of the three inner circles.
    • Place the template in the bottom of a jar and mark the center of the holes with a white paint pen, marker, or other light colored pencil. Repeat this on the other 2 jars.
    • Place a dot of hot glue on each of the wick tab bottoms and set them on the marked dots in the bottom of the candle jar.
    • Cut out the other template larger than the circle so that it can sit on top of the candle jar.
    • Cut an X in the center of each inner circle.
    • Then cut a V between two of the circles from the outer edge.
    • Set the template over the candle jar and thread the wicks into the cut circles and center it over the top.
    • Print out another set of two templates and repeat for the other two candles.
    • Melt 2 pounds of soy wax in a candle pitcher sitting in a couple of inches of water in an old pot on the stove.
    • Use a wooden skewer or spoons to stir occasionally.
    • Meanwhile, measure 2.5 ounces of fragrance oil in a cup on a kitchen scale.
    • Once all the wax has melted make sure it reaches 185 degrees with a candle thermometer.
    • Remove the candle pitcher, add the fragrance oil, and stir well.
    • Pour the wax and fragrance mixture into the candle jars through the cut out opening leaving an inch from the top.
    • Allow the wax to set up for about 2 hours. Reheat the leftover wax in the candle pitcher before pouring it over the three candles to top them off.
    • After a couple of hours, you can remove the template and trim the wick to about 1/4 inch.
    • After 24 hours if you have any cracks or uneven issues use a heat gun to melt the entire surface and let it harden to a smooth finish.
    • Finish the candles by printing out labels and applying them to the top.
    • Add the caution labels to the bottoms and enjoy!

    Notes

    For reference, these 16 oz matte black jars hold 14 ounces of wax with the lid on, are about 4 inches in diameter, the burn time is approximately 30 hours.
    Tips and Substitutions
    You don't necessarily need a white paint pen.  A white or yellow crayon may work.
    If you are using a clear container you can set the template underneath of the jar to set the wicks in place.
    If you don't have a heat gun you could try a hairdryer on low but be careful.
    If you don't have a scale you could try to eyeball a little more than half of a 4 ounce bottle of fragrance oil.
     
    Tried this project?Tag @hearthnvine on Instagram
    An open 3 wick candle in front of a stack of the same candles.
    « Growing Ruby Cascade
    Easy Spinach Enchiladas »

    About Patti Estep

    Patti is the creator of Hearth and Vine, a home and garden blog filled with projects to inspire your creative side. She loves crafting, gardening, decorating and entertaining at her home in Pennsylvania. When she is not working on a project at home or searching for treasures at nurseries and thrift stores with her girlfriends, you’ll probably find her with family and friends, at a restaurant, or home party enjoying new and different food adventures.

    Reader Interactions

    Leave a Reply Cancel reply

    Your email address will not be published. Required fields are marked *

    Recipe Rating


    Primary Sidebar

    A stack of black jar candles with wood lids and a fall label saying Warm & Cozy.
    Six black jar candles with labels lids for fall with Warm and Cozy written on them over three jars prepared for wax.
    Patti Estep Profile Picture

    Hi!

    I'm Patti

    Join me to create lots of fun DIY projects, including crafts, gardening, home decor, and tasty recipes

    More about me

    Popular Posts

    • Baked zucchini bite on a slated tray with a bowl of horseradish sauce.
      Make Tasty Zucchini Bites in Under an Hour
    • Three tin cans in descending sizes hanging from twine.
      DIY Wind Chimes with Tin Cans
    • Blue jean crossover bag
      DIY Crossbody Bag from Jeans
    • Ham barbecue sandwich on plate
      Chipped Ham Barbecue Sandwiches - A Pittsburgh Favorite
    • Echievera planter
      What to do With a Stretched Succulent
    • Make a Mason Jar Oil Candle Lamp with botanicals and essential oils. ~ gardenmatter.com
      DIY Oil Candle - Gifts for the Holidays

    Footer

    A stack of black jar candles with wood lids and a fall label saying Warm & Cozy.
    Six black jar candles with labels lids for fall with Warm and Cozy written on them over three jars prepared for wax.

    ^ back to top

    About
    Contact
    Privacy Policy
    Disclosure Policy

    Sign Up Here!
    for our
    newsletter &
    special offers

    Follow Me

    facebook
    Pinterest
    instagram

    As an Amazon Associate, I earn from qualifying purchases. i.e. as an Amazon Associate, I earn from qualifying purchases.

    Copyright © 2025 Hearth and Vine

    Rate This Recipe

    Your vote:


    A rating is required
    A name is required
    An email is required