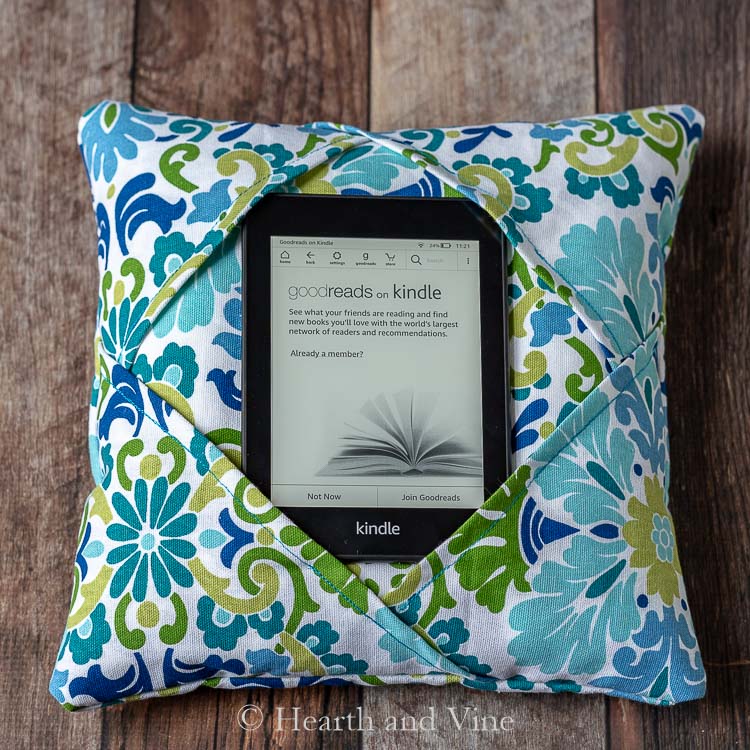
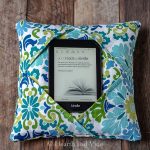
Learn how to make this fun and easy simple kindle holder so you can read your paperwhite on your lap or in bed.
I'm a big reader. There's nothing I like better than to read a good book at night or on the weekend.
Paperbacks and hardback books were all we had for years and then came the readers. The first one I received as a gift was B&N's Nook. More recently I switched to the lighter and convenient Kindle Paperwhite.
This post contains some affiliate links (that means if you make a purchase after clicking a link, there's no additional cost to you, but I will earn a very small commission. ) i.e. as an Amazon Associate, I earn from qualifying purchases. Click here to read my full disclosure policy.
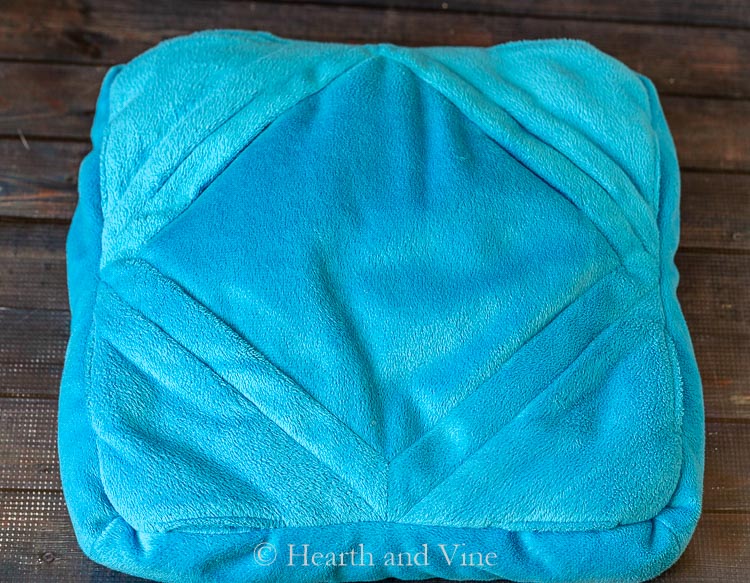
A few years ago for Christmas my brother-in-law bought me this handy-dandy Gogo Pillow that fits an Ipad and my Nook.
I loved it for my Nook but unfortunately, my paperwhite reader did not fit on this pillow holder.
So I thought, why not make one?
How to Make a Kindle Holder
Here's how I made a lap pillow for my Kindle Paperwhite Reader.
Supplies
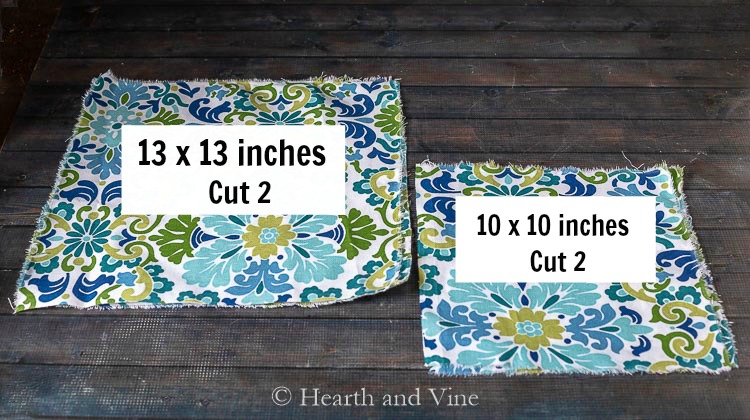
- Fabric - You can see from the pic above that you need 2 13-inch squares and 2 10-inch squares. If you sew, you probably have this in your stash. I used a sturdy mid-weight fabric
 because it's easy to work with, but you don't have to. In fact, you could use different fabrics for the top and the back.
 - Filler - I also used Mini micro beads because they seemed similar to the filler in the Gogo pillow. You could probably try something else.
 because it's easy to work with, but you don't have to. In fact, you could use different fabrics for the top and the back.
  because they seemed similar to the filler in the Gogo pillow. You could probably try something else.
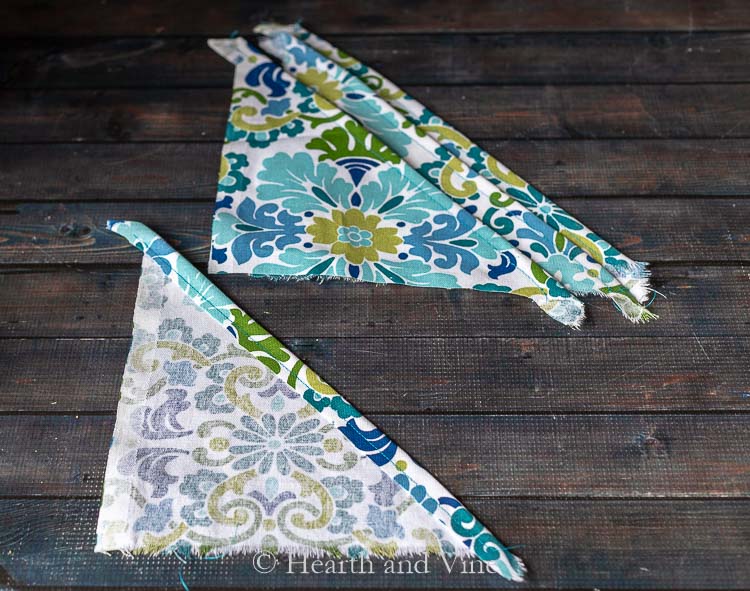
Start by cutting the two smaller squares in half on the diagonal.
Then fold and press over the long edge.
Sew the fold about 1/4 from the edge.
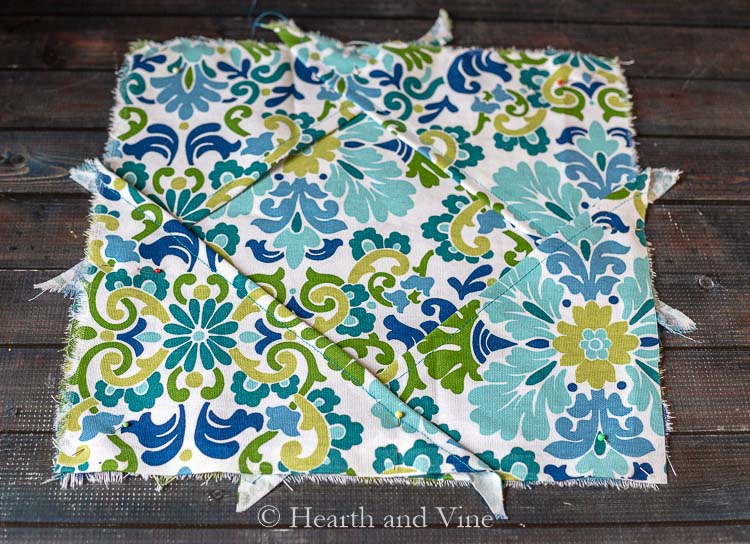
Next, place the four triangles on top of one of the larger squares.
Matches the edges as shown. Pin in place.
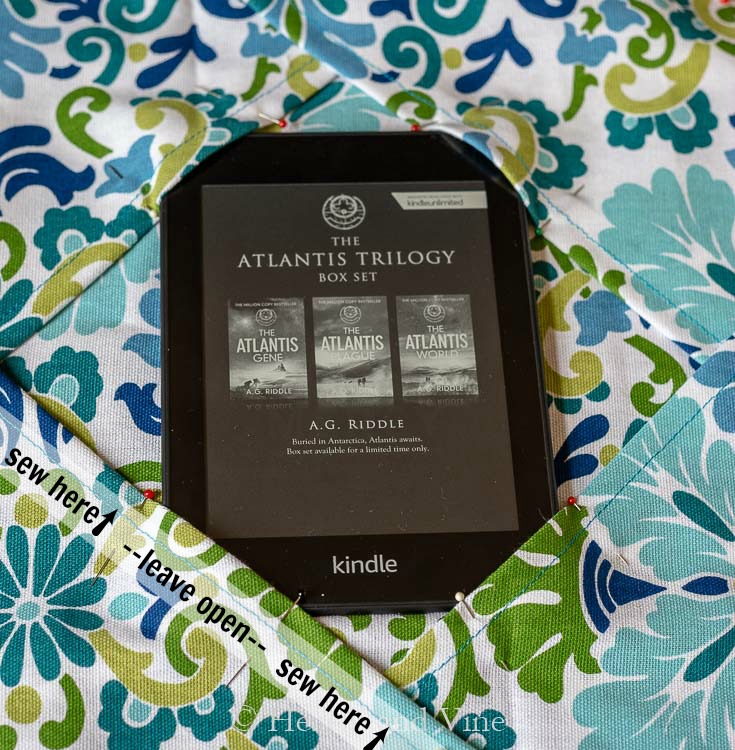
Then set your paperwhite in place and mark alongside the corners of the reader with more pins.
Sew the triangles onto the larger square along the same stitched lines as before leaving the area between the two pins marking the kindle corners open.
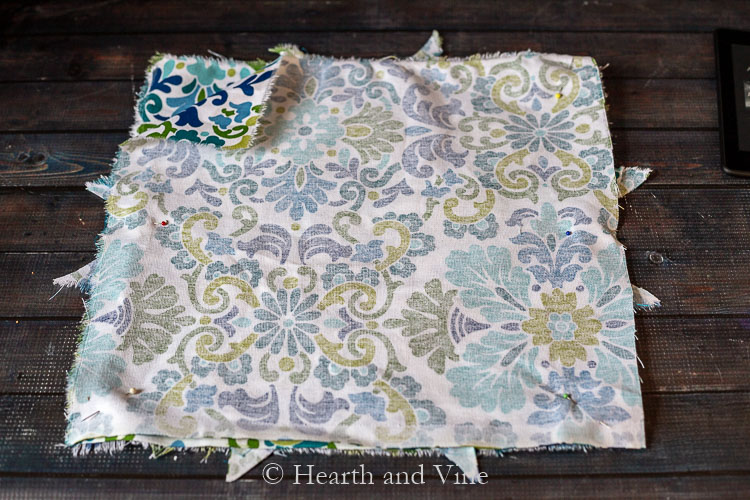
Then with the right sides together place the 2nd large square fabric piece on top of the triangles.
Stitch around the entire edge leaving a 3 inch opening for turning.
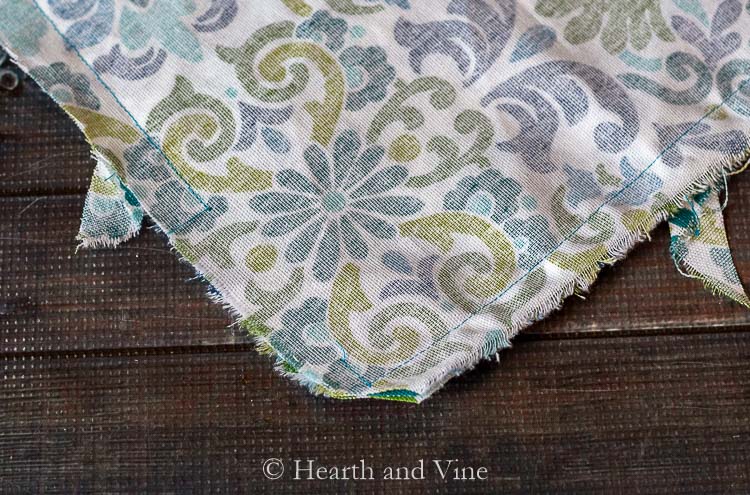
Trim the excess fabric, and cut the corners.
Turn right side out and press if needed.
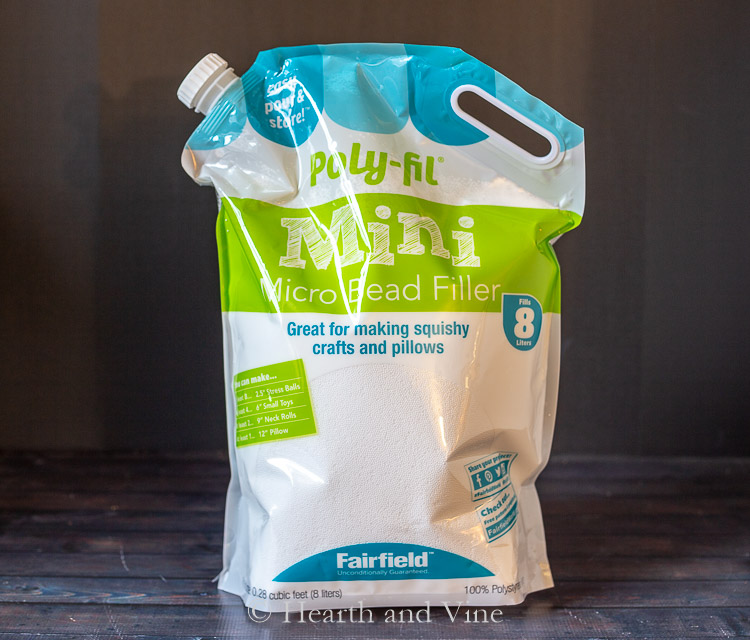
Here's the filling I used. This bag was super convenient and I wasn't sure how much I would need. I can now tell you that I only used about half the beads of this bag so you can order a smaller one but it may not have the handy spout. (not that you really need it)
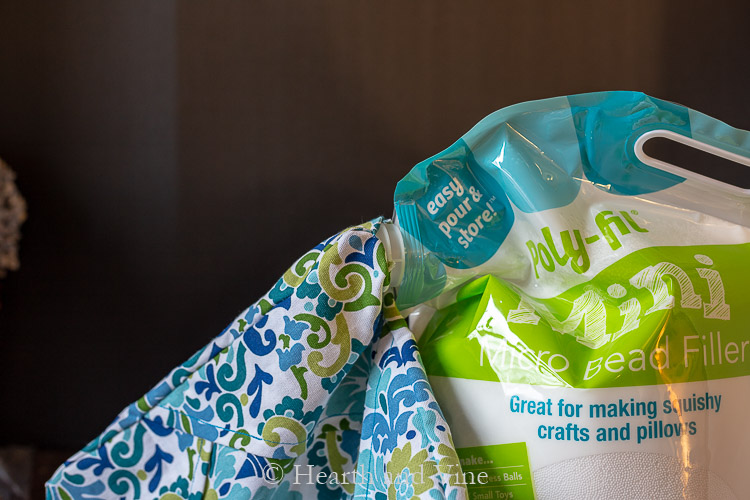
The spout fit right in my opening. That was nice because the beads are quite messy but you could use a funnel. You can even make a funnel out of a sheet of paper.
Note: You don't want to fill the entire pillow with the microbeads. Just enough to give it body but also enough give for it to sit nicely on your lap. Try pinning it shut first and testing it to see if you want more or less filling.
Then hand sew up the opening.
Other Kindle Holder Pillow Ideas
You could probably use an empty pillow cover
 if you don't have access to a sewing machine. Here you could add the triangles on top and hand sew or use fabric glue or stitch witchery
 to hold it in place.
Alternatively, you can try adding a strong ribbon to an existing pillow. Again, hand sewing or gluing it in place somewhat like a bulletin board.
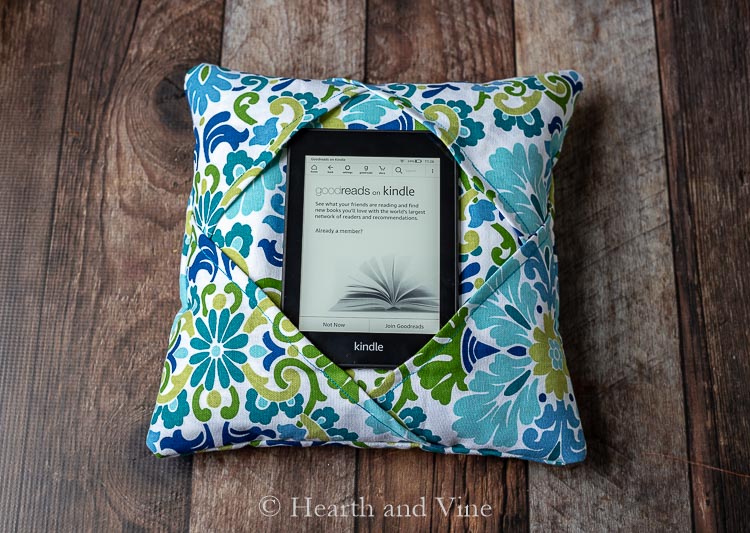
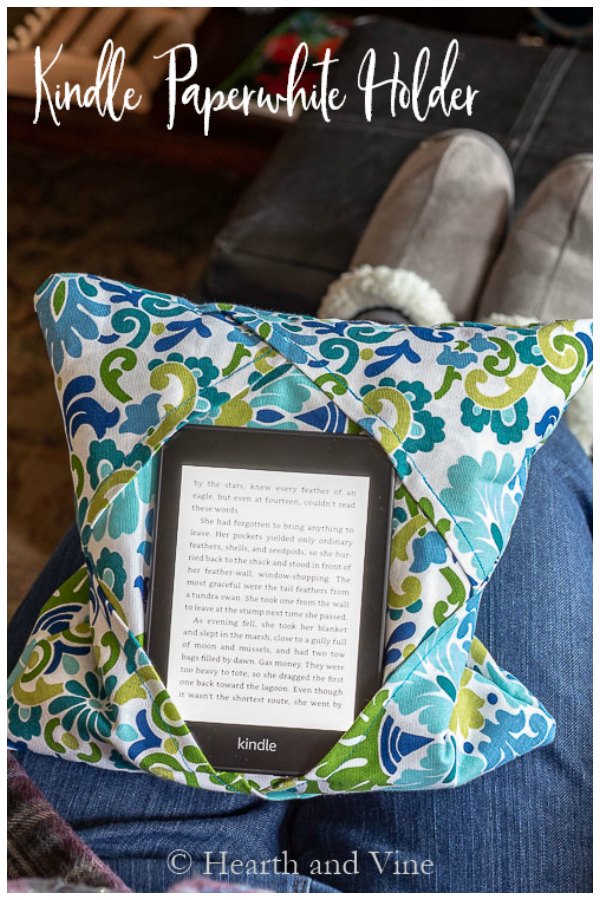
It works well and I'm so glad I now have the right size kindle holder for reading in bed.

Here's a pic of me reading in the family room with my new pretty kindle paperwhite pillow.
I'm sure there are other ways to go about this project. I've suggested a couple of ideas above, however, this one worked just fine for me.

P.S. Other sewing projects you may also enjoy are:
Bedside Pocket Caddy
Hanging Cell Phone Charger
How to Make a Kindle Holder for Your Paperwhite
Equipment
- Fabric scissors
- Sewing Machine
Materials
- Fabric - 2 13-inch squares and 2 10-inch squares
- Filler
Instructions
- Cut the two smaller squares in half on the diagonal.
- Fold and press over the long edge.
- Sew the fold about 1/4 from the edge.
- Place the four triangles on top of one of the larger squares. Pin in place.
- Set your paperwhite in place and mark the corners with more pins.
- Sew the triangles onto the larger square along the stitched lines.
- Leave the area between the two pins marking the kindle corners open.
- With the right sides together, place the 2nd large square fabric piece on top of the triangles.
- Stitch around the entire edge leaving a 3 inch opening for turning.
- Trim the excess fabric, and cut the corners.
- Turn right side out and press if needed.
- Add the filling.
- Hand sew up the opening.
Athena
Hi Patti, you may remember that the GoGo Pillow has a zipper that reveals a nifty pouch that can be used for storing chargers etc. Is there a way to incorporate that feature into your design?
Patti Estep
Athena, lol I never noticed that pouch. However, I still have the pillow and upon looking I've found it. I would be a great addition but it would that a little extra sewing effort. You would need to use extra fabric to make a pouch and a zipper. I suppose it could be placed on any seam of the pillow similar to the go-go pillow. Thanks for sharing the idea.
Connie
I made the pillow to hold my Kindle Oasis today. Did you use typical pillow poly fill in addition to the glass micro beads? Thank you for the pattern.
Patti Estep
Connie, I used about 1/2 the bag (shown in the post) of the micro beads. However, You could try polyfill. The worst that could happen is you don't like it, and then you could just rip out the opening and try something new.
Connie
Thank you. I may need more beads. I purchased a smaller sized bag.
Patti Estep
Connie, it was hard to know how much to buy. I ended up only using about 1/2 of the bag I purchased but I also think there is a certain amount of preference involved. You may want it to be more solid or more squishy. I'd try it out and see if it works for you. You can always but more beads.
Carol
Patti
What a wonderful idea, I can never get comfortable with my Kindle. Thanks, another one for the list of things to do.
Clever
Patti Estep
Thank you Carol, for letting me know you like it. Glad to see I'm not the only one who can't get comfortable.
Heather
Oh my goodness....I SO need to make this! Thank you for the inspiration!
Patti Estep
Thanks Heather. So glad you like it.
Paula Harris
Love this idea Patti. A person could even use it for a tablet since they are doing their own sizing. Thanks for sharing.
Patti Estep
Yes, thank you Paula. I'm so glad that came across. The go-go pillow works well for an Ipad but if you have a different kind of tablet or just want to make your own you can easily adapt the idea.
Paula Harris
I will be making this for my tablet soon. Scrap materials to used and good size. Thanks again.
Patti Estep
Great to hear. Let me know how it turns out.
Carole West
Great project idea and I love that fabric, think I've seen you use it before? I saved it to my workshop board for later. We haven't dived into the kindle reading thing. We got one as a gift years ago and one of the kids lost it and so we just kept with books. Something about holding a book but sometimes it can also be a pain with paperbacks. You've given me something to think about because a kindle would fit our lifestyle pretty perfectly.
Patti Estep
Carole, I still like to read a good paperback or hardback but this little paperwhite is so small and handy for the bedstand and traveling. Something to keep in mind.
Mary Jo D
Patty I’d love to make this but you don’t give the measurements for rectangle to make the kindle book pillow. Luv the idea. Where would I find it on diy to watch the video
Patti Estep
Mary Jo, I don't know of any videos but check out the "How to" card at the end of my post. It gives more details on the measurements --- two 13-inch squares for the large rectangles and two 10 inch squares for the smaller rectangles.