
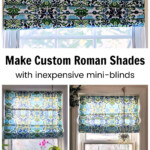
Learn how to make easy and affordable fabric Roman shades from inexpensive mini-blinds in this step by step tutorial.
I've always loved the look of roman shades. Many times I've considered making my own, but every time I look at the directions, I felt too intimidated to try.
However, recently I've noticed a bunch of great bloggers showing you how to create a roman shade out of a mini blind. Here's my take on this awesome DIY Roman Shade project.
This post contains some affiliate links (that means if you make a purchase after clicking a link, there's no additional cost to you, but I will earn a very small commission.) i.e. as an Amazon Associate, I earn from qualifying purchases. Click here to read my full disclosure policy.
Making Romans Shade from Mini Blinds
Supplies
- Heavier-weight fabric - Measure your window. Add four inches to the width and 6 inches to the length. I bought duck fabric from Hobby Lobby and it worked great.
- Cheap mini-blinds - to fit the window of the window. I purchased mine at home depot for around $3.50. That's it! They were a little wider than I wanted so my husband cut them to size using his table saw, but many stores will cut them for you.
- Fabric Glue


UPDATE: You may want to test the glue on your fabric first. Several people have tried using lighter fabric and the glue came through and ruined it. See the comments for details.
The Process
Find a nice large surface to work. I used our dining room table.
Prepare the fabric
- Cut your fabric to size adding 4 inches to the width and 6 inches to the length for hems.
- Lay flat and fold over 2 inches on each side and press.
- Then fold over 2 inches on the top and bottom and press.
- Set aside.
Preparing the Mini Blinds
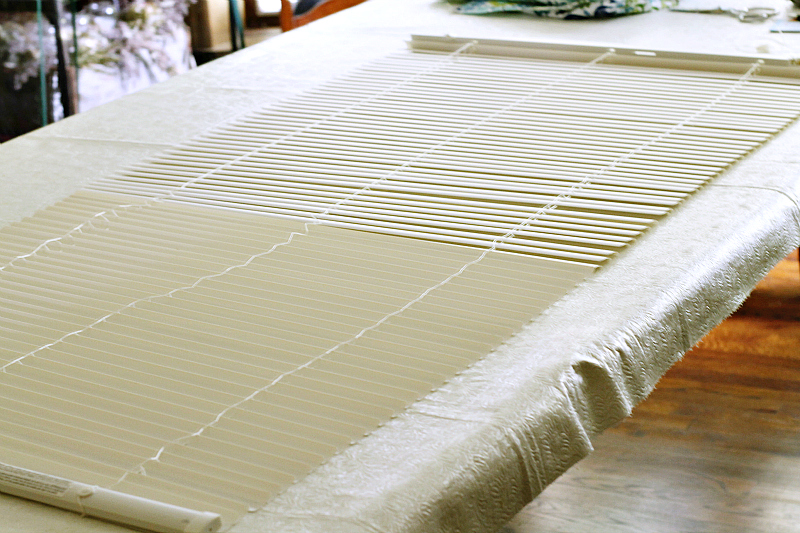
Next lay the mini blind fully open on the surface.
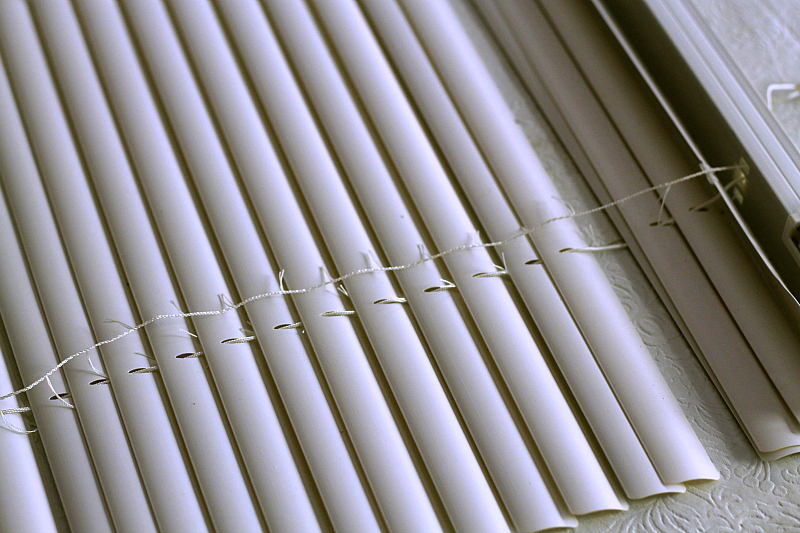
Carefully cut the ladder strings. These are on top and thinner than the pull cords. Do not cut the pull cords which are a little thicker than the ladder strings. You will need them to raise and lower the shade.
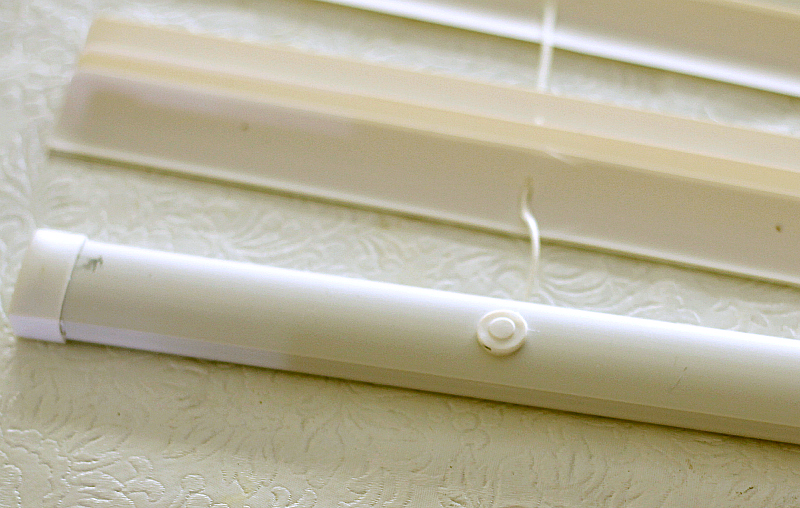
Next pop off the plugs located on the bottom rod and set them aside.
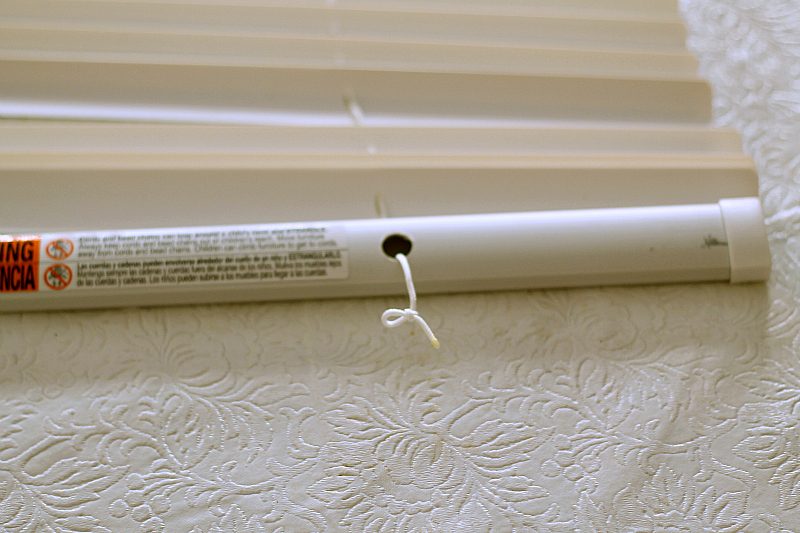
Pull out the pull cord and cut off or untie the knot.
Then cut the cords to the length you desire, typically the length of the window plus a few extra inches for the knot. Tie a knot back in the cord and replace the plugs.
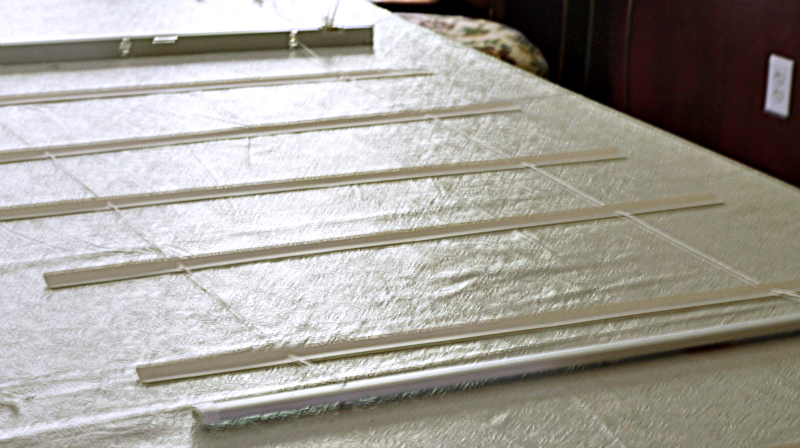
Determine the Number of Folds
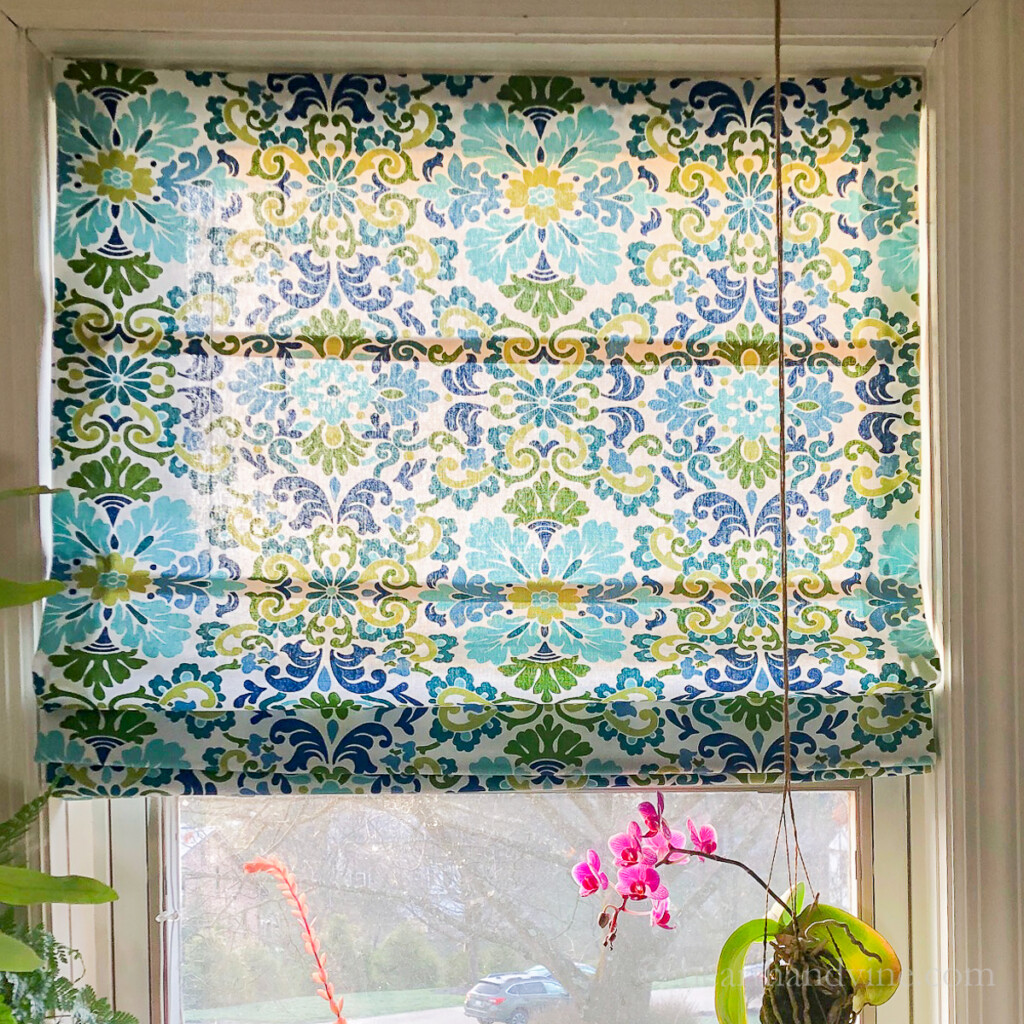
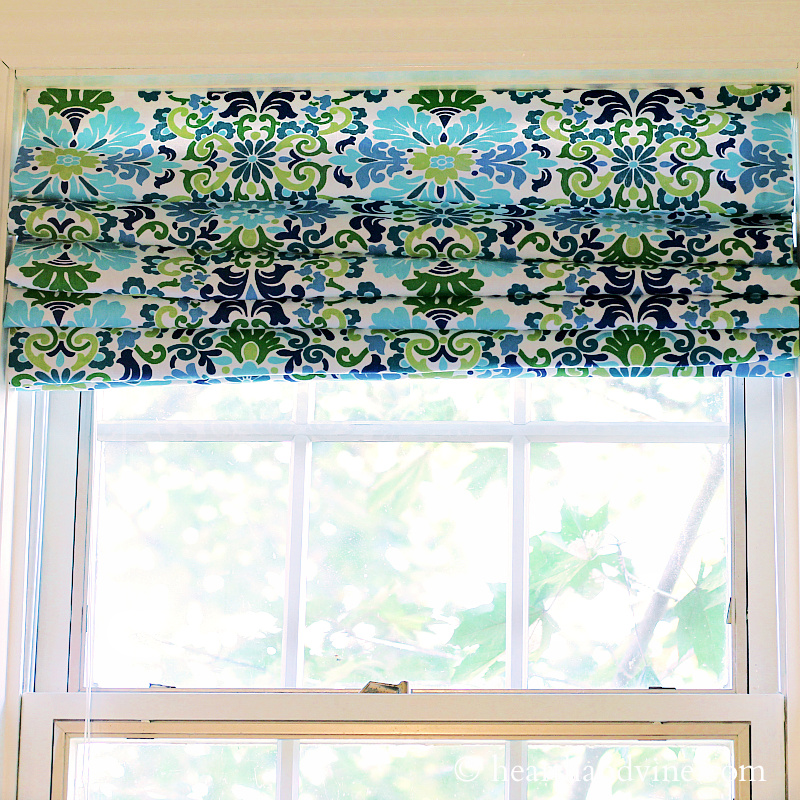
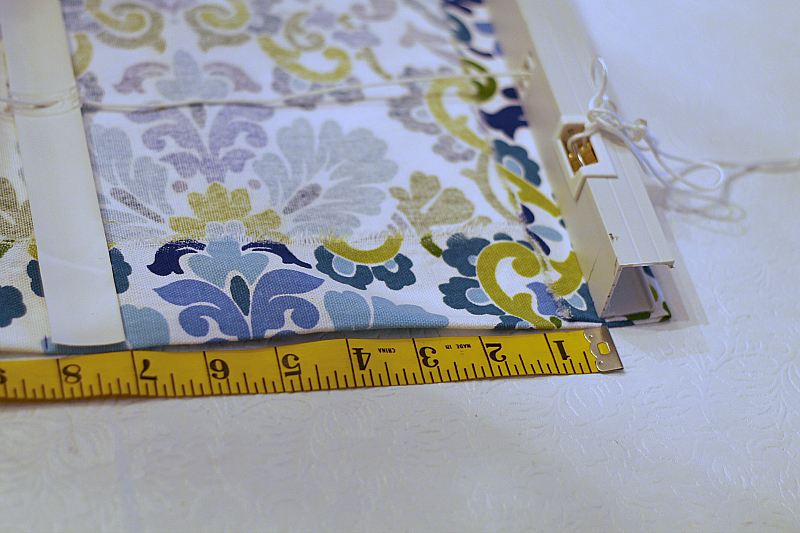
Then you will need to determine how many folds you want. Most articles suggested between 7-10 inches between folds. My window was 45 inches long. I decided to make the folds 8 inches apart.
If you divide 45 by 8 you get 5.63, so I needed five slats for my shade. The rest can be cut off and thrown away. You can also do this step when you are determining the length of the cords and simply pull off all unwanted slats.
Adding the Fabric to the Mini Blinds
Place the bind on the wrong side of the fabric and measure the distance between the slats.
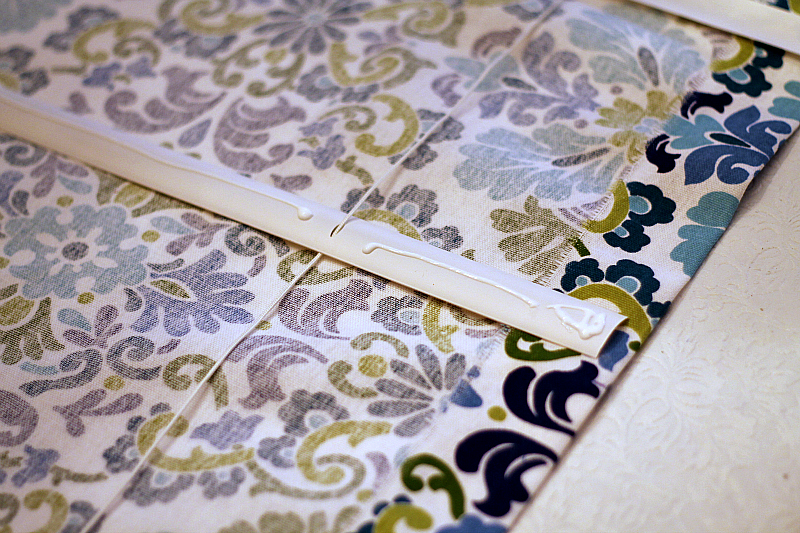
Turn each slat over and run a line of fabric glue on the convex, or rounded side. Flip over and set into place.
Then glue hems to top and bottom rods.
Let dry overnight.

Hang and admire.
Note: These roman shades are not lined. I hardly ever let them down since they are in my office and I want the light. For me, they are more decorative. I can put them down if I need to but the backside is not pretty and a couple of my readers suggest that you may want to add a piece of fabric to the back to cover the slats. One clever reader actually spray-painted her slats to match the fabric.
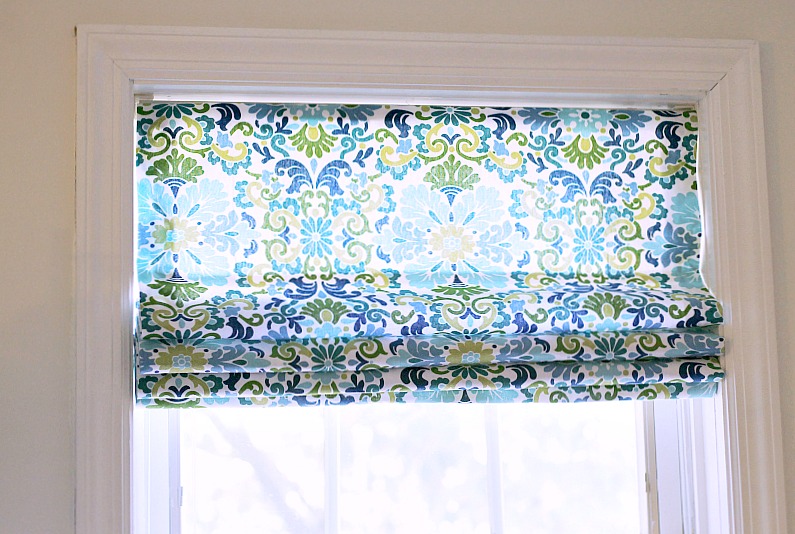
I couldn't be happier at how well they turned out. My office keeps getting better and better.
Pretty soon I won't ever want to leave. 😉

P.S. I've been sewing for a long time. My skills are still very basic but I have come to love all the beautiful fabrics for the home that you can now easily find at the store or online. This beautiful fabric has led me to create several projects on this blog with beautiful fabric. All are easy to create such as Garden Bucket Toolbelt, Bedside Caddy, and Fabric Gift Card Holders.

Roman Shade Tutorial - Made from Cheap Mini Blinds
Equipment
- Scissors
Materials
- Mid-weight Fabric
- Cheap Mini Blinds
- Fabric Glue
Instructions
- Cut your fabric to size adding 4 inches to the width and 6 inches to the length for hems.
- Lay flat and fold over 2 inches on each side and press.
- Then fold over 2 inches on the top and bottom and press. Set aside.
- Lay the mini blind fully open on a large, flat surface.
- Carefully cut the ladder strings.
- Pop off the plugs located on the bottom rod and set aside.
- Pull out the pull cord and cut off or untie the knot.
- Cut the cords to the length you desire.
- Tie a knot back in the cord and replace the plugs.
- Decide how many folds you want, usually between 7-10 folds.
- Pull off unwanted slats.
- Place the bind on the wrong side of the fabric and measure the distance between the slats.
- Turn each slat over and run a line of fabric glue on the rounded side.
- Flip over and set into place.
- Glue hems to top and bottom rods.
- Let dry overnight.
- Hand and enjoy!
LJ
I did this with a pair of draperies. A friend had bought them for French doors and realized she couldn’t use them. I was delighted to get them because they go perfectly with my room and the rug I had found. They are what I consider an average weight. I used Fabric Fusion, left them to dry overnight, and the Fabric Fusion went right through the fabric. I had spent hours and hours measuring, remeasuring, planning, doing the math, etc., because it had to be right. So I wasted all that time and that drapery is ruined. I guess the takeaway is to use heavy fabric and be sure you have a scrap that you can test before you start on the actual project.
Patti Estep
LJ, I'm sorry you had problems. That's so disappointing. I probably should change the post to say heavier weight. I made these blinds seven years ago with duck fabric and they are still looking good.
Alison
I made a shade last night and left it to dry. This morning I noticed some staining on my fabric from the fabric glue seeping through. Do you know if a way to remove the stain?
Patti Estep
Alison, I'm sorry to hear that you are having issues. Do you think it's just the glue showing through? Is the fabric thin? I haven't had this problem but I used heavier fabric. I wouldn't think that the glue would stain the fabric. You could try contacting the glue manufacturer to see if they have any advice.
Brad
I stumbled upon this diy today and quickly wipped this up!!! So easy and I'm super happy how it came out!
Patti Estep
That's great to hear Brad. Thanks for letting me know.
Colleen
Hi, I cannot find corded mini blinds, even Amazon doesn't have the right size which is 35" x 64" and the ones they do have are very expensive. Any suggestions as to where I can buy the mini blinds??? Thank you.
Patti Estep
Colleen, I think a lot of places are doing away with the corded ones for safety reasons. My best idea is to buy one that is standard in size but close to the width you want, probably 36 inches in your case. You can cut a little down on each side. The length can be anything longer than you need because you will be removing most of the slats anyway. That should keep the cost low.
Connie Davis
Hi. This idea is exactly what I was looking for as we have several Venetian blinds that got damaged from grandsons 2 and 3 year olds..i didn't want to throw them away... I try to repurpose everything I can. The plastic slats that are no longer needed.. I use when starting seeds.. I use a pencil write what I'm planting etc on them cut to size and make one end pointed to go into soil. Can reuse for years and can go out in the garden as well.
Patti Estep
That's a great idea Connie. I still have some and now I have use for them. Thanks for sharing!
Suzanne Prendamano
Ian trying to make the Roman shade with cordless blind. I have looked high and low for a corded blind because the cordless blind does not work the cord keeps retracting.I have tried three blinds so far and it does not work.
Please help me I really want to make this shade.
Patti Estep
I had no idea that corded blinds are now hard to find. However, there were a couple that I find on Amazon. Just search mini blinds with cord.
Stephanie
The easiest way I've found in my long internet search. Can't wait to try this out.
Question for you - my cordless blinds from Walmart have a little plastic end with a metal hook sticking out of the front of the top part of the blind for the dowel that turns the blind slats from open to closed. It doesn't look like it can be removed. What did you do with yours? Is is possible to install it backwards so this part is not seen?
Patti Estep
Stephanie, on mine the hook is on the same side as the cords for raising and lowering the blinds but at the other end. I made the binds so that they are both at the back, and the fabric is glued to the front so you don't see it.
Susan Porcher
A great tutorial and the comments were so incredibly helpful. I enjoyed them all. I have two french doors I want to cover only half way down (for privacy) and am uncertain as to where I exactly measure the width of the cheap vinyl shade. Do I measure to place the guts of the header on the outside of the wooden windows casing and measure the width of the vinyl shade from there and will this idea work for these doors? Your input and any advice of from fellow home crafter would be greatly appreciated as I am a beginner.
Susan Porcher 😁
Patti Estep
Susan, I have never made them for french doors but for windows, the answer is yes. The width measurement includes the header and the fabric part covers that header as well. Hope that helps.
DLC
Would you try this for long window? My windows are 63” long and would need a fairly thick fabric in order to keep hot sun out during the daywindows total and do not want to try if you think the one inch blind would not hold up. Thanks in advance.
Patti Estep
I think you are right to be concerned. I feel like these are more for decorative purposes rather than practical. Some people have made them with fabric on the back which would help block light but I have never tried that approach.
M.J.
Such a fabulous idea - and your method and description show it the best.I looked at another project like this but it involved keeping the slats and enclosing the in the front and back fabric and hand stitch it all, etc., etc. Just too much for me - your technique is more my speed, esp if the results are the same. I live in a rental and I could take the old shades down, store them and buy matching cheap blinds that will fit the brackets already installed. Then I can switch them back, take all my pretty parts with me to my next place! My biggest challenge? To be sure to keep/save the brackets that come with the new blinds so I can hang up "my shades", haha! I could even see switching out the fabric if one uses a glue that can be peeled off... See? you've got all my inspiration flowing!
Patti Estep
Hi M.J.,
I'm so glad you like the project. Mine are still up and I've had no problems with them.
I love hearing about all your inspiring ideas!
Thanks for stopping by,
Patti
Christine
Patti,
Love this idea! I'm not very creative or a seamstress by any stretch of the imagination, so could you give me an idea of how many folds you would do for a 36" long window? Thanks so much!
Patti Estep
Hi Christine,
Everything I read says you want between 7 and 10 inches. My window was 45 inches and I used 8 inch intervals so that meant 5 slats/folds. You may want to make yours slightly smaller at 7 inch intervals and still go with 5 slats. 35/7 = 5.
Hope that helps,
Patt
Gerri
I have wide blinds (2"). Would this work with them? Also, how can I print out the instructions?
Patti Estep
Hi Gerri,
I don't know if it would work with 2 inch blinds but it might? On my computer I can right click and print it.
Good luck and thanks for stopping by,
Patti
Debbi
I have a question about the end of the blinds. If you want to shorten the blinds since I plan to make shorter roman shades, do you remove the end piece or is it necessary that it stay in tact? That is a lot of fabric!. I have 12 sunroom windows that currently have old Venetian blinds. Any ideas?
Patti Estep
Hi Debbi,
I would say do not remove the end but you can make the shorter and remove as many of the middle pieces as necessary. 12 windows is quite a lot. I'm sure it will be gorgeous. One suggestion I have is if you buy from one bolt of fabric many of the stores have an ongoing coupon for 40% off which will save you a lot on fabric. Try making one first so you know what you will need and good luck! I bet your sunroom will look fabulous when it's done!!
Patti
Linda
I was so happy to try this project for 2 windows in my room. I found all of the supplies, with a really pretty cream fabric. I did fold my edges on all four sides, doubling each fold. The edges glued nicely and I had a very professional edge. I followed your directions for measuring, and that was right on.
I was really excited to finish and hang my new shade. I glued the fabric to the blind slats and waited for it to dry...The result was not what I hoped for. The glue line shows through to the front fabric.
I am very disappointed and it looks terrible. I now have to find another option. Have you had anyone else tell you this?
Patti Estep
Hi Linda,
I'm sorry they did not turn out they way you wanted. I can only guess that the fabric was not as heavy as the one I used. I have not had anyone mention this as an issue, but if it was a thin or see through fabric I can see how it would show the glue and the slats. That is disappointing.
Elen Ribolla
Hi Linda,
Perhaps if you find a complimentary trim, like grosgrain ribbon or a lace, you could cover the glue stains, and further customize your blind?
Good luck!
Ellen
Patti Estep
Hi Ellen,
That's a great idea. I'll see if I can forward it to the person who had the problem.
Thanks for the suggestion,
Patti
Karen
Maybe add some lace or some kind of trim with the beads that hang down across the glue line.
Gwen
What do you do with the wand mechanism that kind of protrudes?
Patti
Hi Gwen,
I glued the fabric on the other side the was flat so that the wand mechanism is in the back and you don't see it.
Bradley
Thanks so much for this submission. I was about to go by blinds for three rooms and at 23.00 dollars a peice for a rent house I opted for theSe . I HAD the fabric a shiny brown silk that is great cause it gives color to both sides. However I did spray paint the cords and slates along with top and bottom to disappear from site. Again I had some black spray paint and just lightly coated them and bazinga! $70 bucks saved , looks great inside and out and landlord loved it so much I did hers for the holidays. ...$200 discount on rent for 30 minutes of work...Again thank you, you saved me almost $300 this month. Your amazing.
Patti
Hi Bradley,
That is fantastic news and how clever you are for painting the slats. Many people are concerned about the outside appearance. As I have large trees that block the view this is not a problem for me. I'm so glad that you enjoyed the post. I certainly cannot take credit for the original concept. You will find many projects like this on the web and I used several as guides when I created mine. Thanks for letting my know that you liked the project and how you adjusted it to suit your needs. I'm sure it will be of help to someone else. Have a great weekend, Patti
Gabby
Hey Patti!
This is such a neat idea! I have some old drabby looking mini blinds that need some restoration! Thank you for linking up at the Tips & Tricks Link Party! 😉
Jeane
Did I miss you explaining/showing how the top of the fabric is attached to the very top of the shade unit?
Patti
Hi Jean,
I'm sorry if that wasn't clear. All I did was glue the top of the hemmed fabric to the face of the top blind rod. The cord side should be underneath, so when you hang them they just slid into the casing. Hope that helps.
Patti
Teresa
Your shade is beautiful. Where can I find that fabric? Can you tell us the brand and design? Thank you
Patti
Hi Teresa,
So glad you like the project. I bought the fabric from Hobby Lobby. Unfortunately the receipt does not give any more details. I also went online to see if I could find the pattern for you but it doesn't seem to be there. They have a ton of pretty duck cloth patterns, several that you can purchase online. One called Neda Frost is similar. This one at Hancock Fabric is similar too. http://hancockfabrics.com/45-in.-londyn-atlantic-flat-black-and-green-duck-cotton-fabric-3996055.html Good luck and thanks for stopping by.
Patti
Marilyn
WOW, what a great idea! I recently purchased some fabric shower curtains for 75% off from our local Dollar General. I couldn't find any fabric that was inexpensive and the patterns match my daughters room decor. You've just given me a great project to use these curtains in her room...love it, thanks a bunch for the idea!
Patti
Thanks Marilyn,
So glad you like it. Good luck with the girls room.
Patti
NINA BELTRAN
There is another possible option other than just the glue. If you added another layer of fabric to the back of the decorative layer you could pierce a few tiny holes throughout the length of the pieces blind themselves and sew through just the first layer of fabric on top of using the glue which sold make for a stronger hold. I have done this and it works pretty well. You need to do 2 holes side by side to sew through, I suggest spacing the support holes 5-6 inches apart so doing 4 sets of 2 throughout the blind. This is just my recommendation
Patti
That a great idea Nina. Thanks for sharing. This would also give people the option of covering the back which many are concerned about. My windows in this room face large trees but they may not be durable. Only time will tell and if I decided to do other rooms I will certainly give your method a try.
Thanks again for stopping by and leaving such a helpful comment.
Patti
Wadna Jackson
I did something similar when I was working overnights and needed to darken my room for daytime sleeping. I made basically a pillowcase to fit the blinds and hand stitched the top closed so that the pull cord and rod remained useable. I then tacked the bottom above the bottom rail so that the cloth moved with the blind. They are completely functional and by adjusting the blinds I can control the amount of light that comes through down to completely dark for sleeping.
Patti
Hi Wadna,
What a clever idea. You had a problem and can up with an easy solution. Love it!
Thanks for stopping by,
Patti
Sheila
This looks super simple and it's beautiful. I'm curious how long it's been in use as I have concerns about the durability of the glue holding the slat to the fabric. It seems like the cord would put a lot of stress on it when pulling it open. What do you think?
Patti
Hi Sheila,
I have had them up for a few weeks and they are fine. However, I will say that I don't really use them as blinds, more for decor. I have them in the office which is a 2nd floor bedroom. There are large trees outside protecting the view. On a rare occasion the room doubles as a guest room so I did want something that works but I can't tell if frequent use will be a problem. As I mentioned there are a ton of other bloggers who have made these. Perhaps you can ask another who posted a while ago how theirs is holding up.