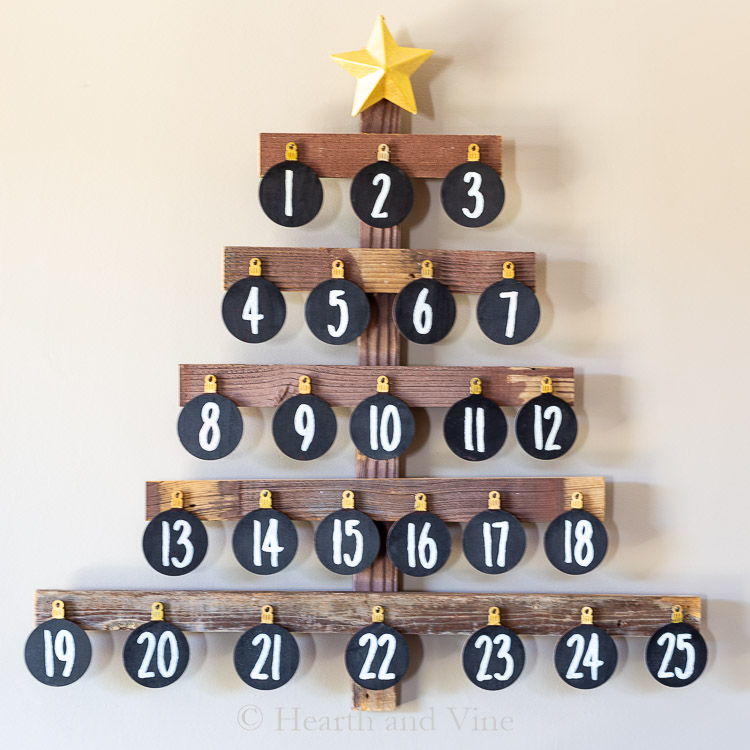
This DIY wooden advent calendar is easy to create and has a vintage feel with barn wood slats and colorful wooden ornaments.
Today I'm sharing this fun and colorful rustic looking advent tree calendar. The funny thing is that I came up with this idea after coming across another fun paint medium.
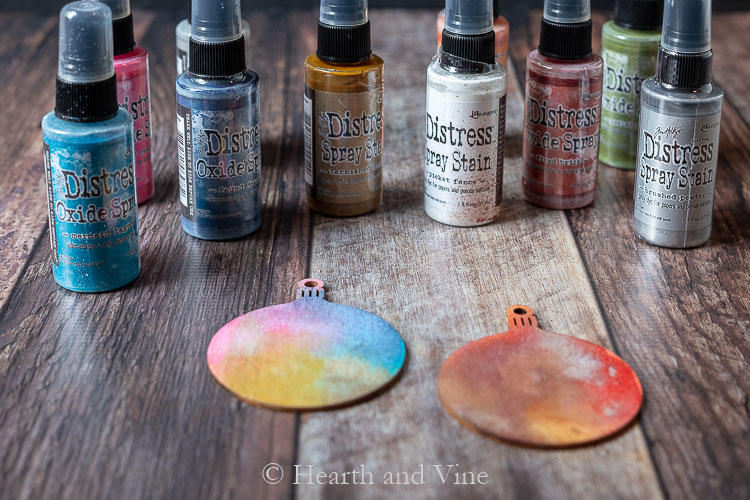
If you have been following me you know how much I love playing with alcohol inks. Recently I found distress oxide spray inks that many people use for card making and I had to find a project to use them on.
I learned that the inks work on porous surfaces so I decided to make a wooden advent calendar and use the inks to create colorful vintage looking ornaments.
This post contains some affiliate links (that means if you make a purchase after clicking a link, there's no additional cost to you, but I will earn a very small commission. ) i.e. as an Amazon Associate, I earn from qualifying purchases. Click here to read my full disclosure policy.

How to Make a Wooden Tree Advent Calendar
Supplies
- Barn wood slats bundle
- Wood Round Ornaments

- Paper Mache Star Ornament
- Distress Oxide Sprays
- Black chalkboard paint
- White Chalk Marker
- 1-inch nails to create the tree
- Small decorative nails to hang ornaments approx. .5 inch
- Sawtooth hanger for back approx. 1.5 inches


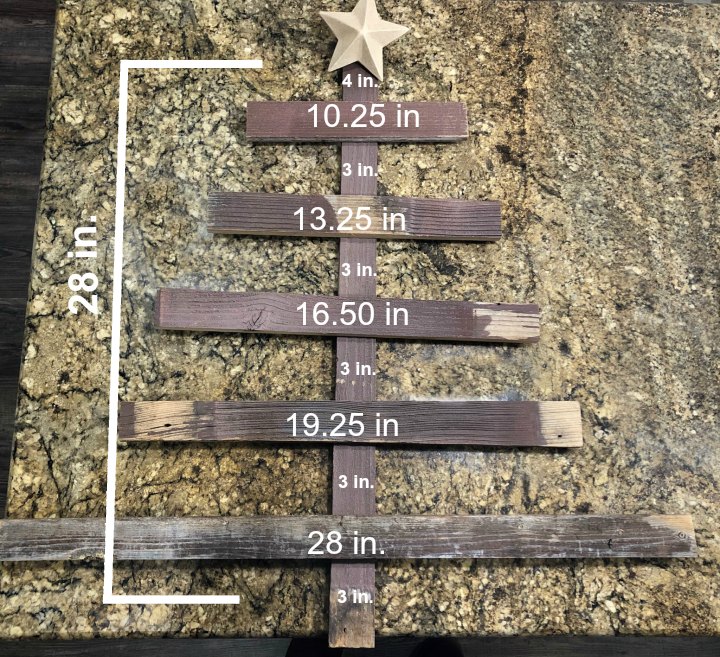
Here's an example of the measurements I used to create the wood tree base. It all started with a bundle of barn wood I purchased at Hobby Lobby. My husband helped me cut them down to size.
We used two 1-inch nails to attach the slats to the base wood in the middle creating a tree frame.
Then I used smaller decorative .5 inch nails to hang each ornament. This tree was a 3, 4, 5, 6, and 7 ornament setup. For the odd rows, I found the middle and placed the first nail there, and moved out on each side. On the even rows, I started on the ends, about 1.25 inches from each edge, and worked my way in using the ornaments as a guide. Not very scientific but it worked for me.
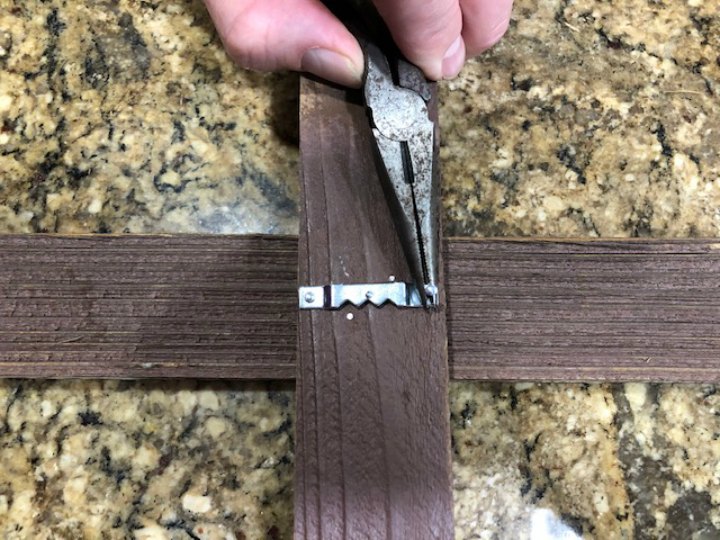
We used a simple sawtooth hanger nailed center of the tree trunk on the back.
Painting the Wooden Ornaments
You can any use kind of paint to create your ornaments. However, as I mentioned earlier, I created this wooden advent calendar because the ornaments gave me an opportunity to use distress oxide spray inks.
See this Tim Holtz video using distress oxide spray on card stock for ideas on how to use this fun product.
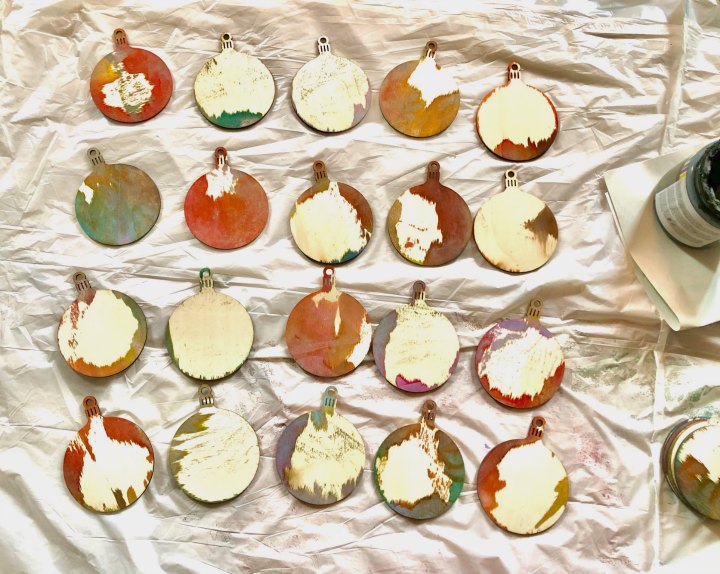
Okay, it's another messy one. If you choose to try the distress ink spray make sure you cover your work surface. This is a picture I took with my phone. It's the backside of the ornaments after I sprayed them. You can see that the ink worked it's way onto the back.
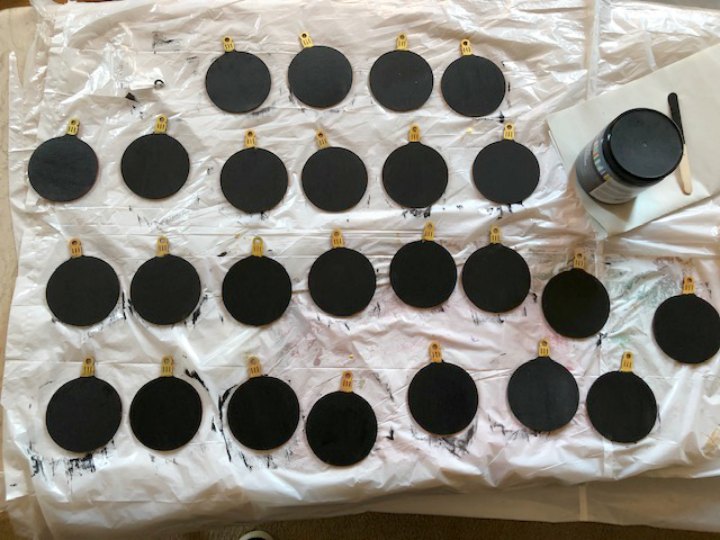
Once the color side is dry flip them over and paint the back with black chalkboard paint.
I also added a little bit of gold metallic paint for the top.
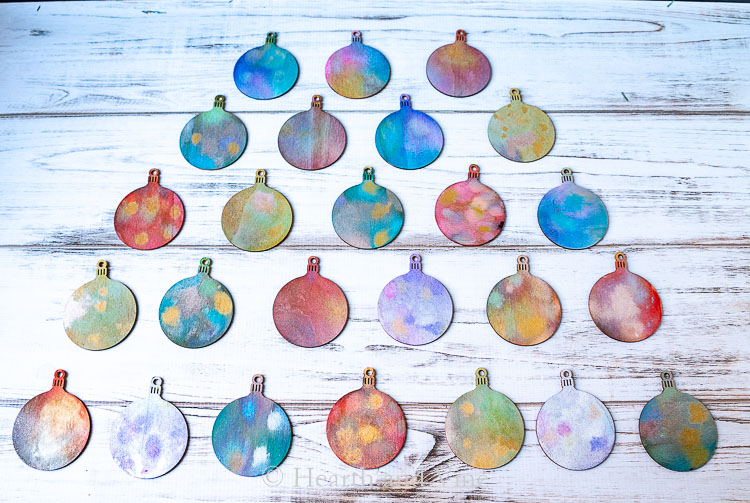
Here are the distressed spray ink ornaments laid out on the table. Aren't they festive looking? I think they look a little like vintage glass ornaments.
You don't have to do this next step but I wanted to arrange the colored sides in the same placement they would be on the tree. Then I stacked them in order before painting the numbers on the back.

For the number side, I printed out a set of basic numbers from the computer. Feel free to use this same set if you like. Just click on the image and you will get a PDF of the same numbers.

Trace the numbers onto the wood ornament. To do this cover the back of the paper with a piece of white chalk. Place the number onto the ornament and then use a pencil to trace the number onto the wood. Finish by filling in the number with a paint marker.
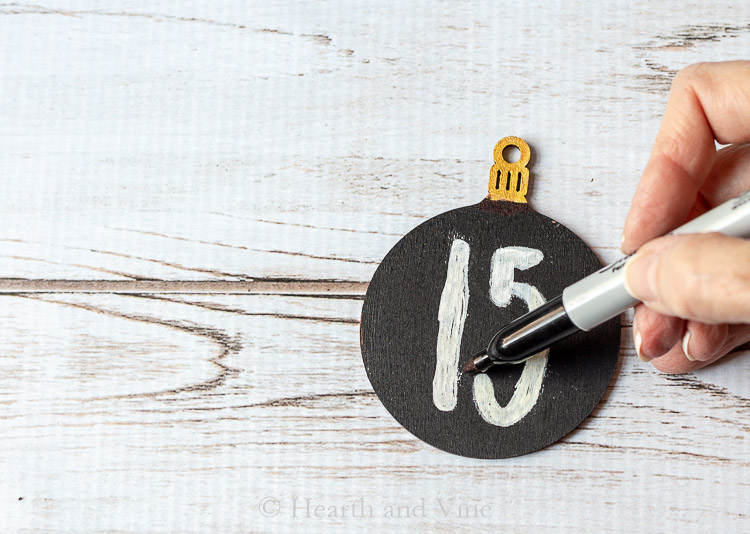
You can use a black sharpie to clean up any messy edges.
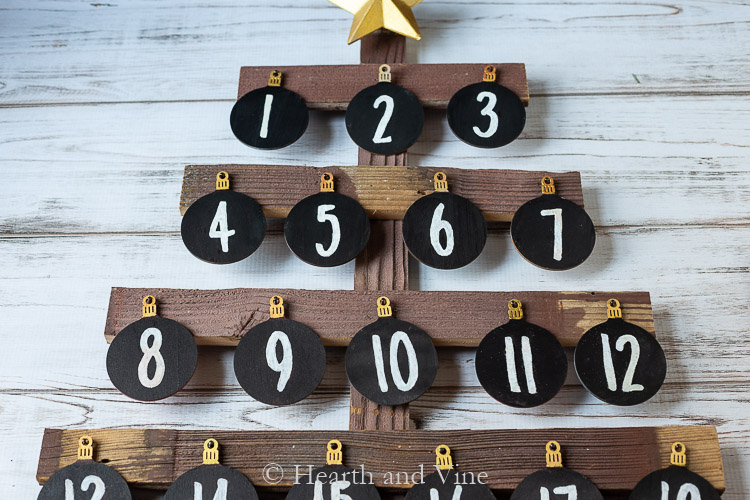
Hang the ornaments on the display nails to complete the look.
For a finishing touch, I painted a paper mache star with more metallic gold paint and glued it to the top of the tree.
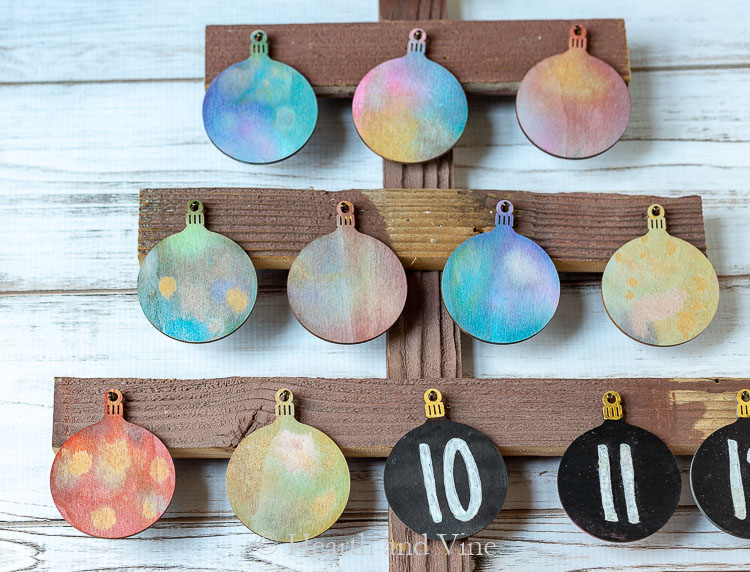
Starting on December 1st and every day going forward turn an ornament to the colored side.
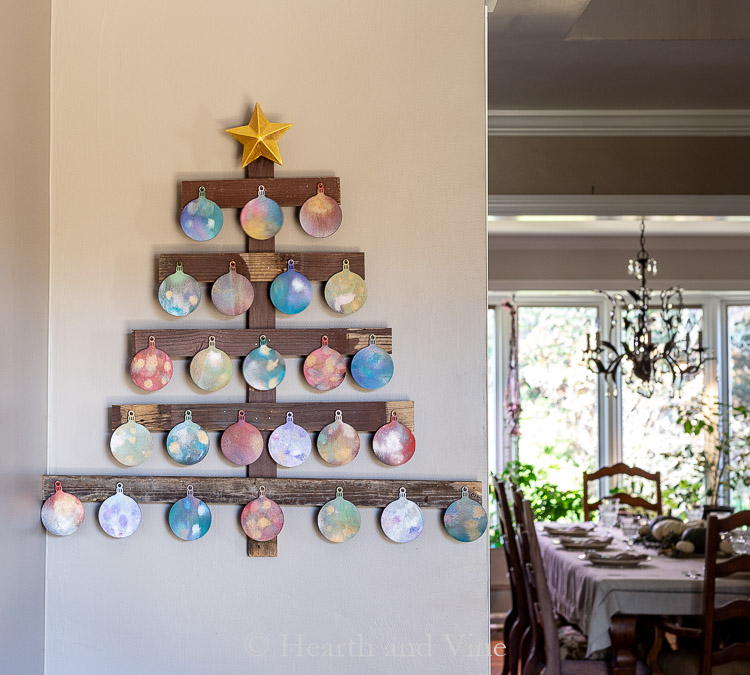
By Christmas Day you will have a beautiful Christmas tree full of colorful ornaments.


DIY Wooden Advent Calendar with a Vintage Look
Equipment
Materials
- Barn wood slats bundle
- Wood Round Ornaments
- Paper Mache Star Ornament
- Distress Oxide Sprays
- Black chalkboard paint
- White Chalk Marker
- 1- inch nails to create the tree
- Small decorative nails to hang ornaments approx. .5 inch
- Sawtooth hanger for back approx. 1.5 inches
Instructions
Create the wood tree base using the barn wood cut into the following lengths:
- 10.25, 13.25, 16.5, 19.25, 28"
- Use two 1-inch nails to attach the slats to the base wood in the middle creating a tree frame.
- Use smaller decorative .5 inch nails to hang each ornament.
- This tree was a 3, 4, 5, 6, and 7 ornament setup.
- For the odd rows, find the middle and place the first nail there and move out on each side.
- On the even rows, start on the ends, about 1.25 inches from each edge.
- Work your way in using the ornaments as a guide.
- Add a sawtooth hanger to the center of the tree trunk on the back.
- Use any kind of paint to create your ornaments. I used distress oxide spray inks.
- Let dry.
- Paint the back with black chalkboard paint.
- Add a little bit of gold metallic paint to the top. Print out a set of basic numbers from the computer.
- Trace the numbers onto the wood ornament by covering the back of the paper with a piece of white chalk.
- Place the number onto the ornament.
- Use a pencil to trace the number onto the wood.
- Finish by filling in the number with a paint marker.
Carole West
That is great and working with ink is your thing. I noticed you already have your table set for next week. Looks awesome in the background.
Patti Estep
Thanks Carole. Lol my family is getting a mix of Thanksgiving and Christmas this year. Life of a blogger.
Christine
Love this! It would be very helpful to me to see a video of you actually creating the colorful side of one ornament. Thank you!
Patti Estep
Thanks Christine. I'm terrible at videos. However, spraying the ornaments is like finger-painting as a kid. Just play. You can save a couple to practice with if you are unsure but I felt like they all turned out great. One thing I didn't mention is on some I unscrewed the top and used drops of ink on top of the sprayed area. Also, here's a video from the ink creator that may help too. https://www.youtube.com/watch?v=UZfjHASIyd4 I'll add this link to the post to help everyone. Thanks for your input.
Denise
You are so talented! This is really cool.
Patti Estep
You are so kind Denise. Thanks!