• Skip to primary navigation
  • Skip to main content
  • Skip to primary sidebar
  • Home
  • DIY Projects
    • Homemade Bath and Body
    • Sewing - Fabric Crafts
    • Flower Crafts/Decor
    • Thrift Store/Vintage
  • Gardening
    • Flower Gardens
    • Container Gardening
    • Houseplants
    • Indoor Gardening
    • Landscaping
    • DIY Garden Art
  • Decorate
    • Spring Decor
    • Summer Decor
    • Fall Decor
    • Winter Decor
    • Home Decor Projects
  • Recipes
    • Breakfast Recipes
    • Lunch Recipes
    • Dinner Recipes
    • Dessert
    • Salad Recipes
    • Soups and Stews
    • Side Dish Recipes
    • Appetizers and Snacks
    • Healthy Recipes
  • Holidays
    • Valentine's Day
    • Easter
    • Mother's Day
    • Halloween
    • Thanksgiving
    • Christmas
Hearth and Vine
menu icon
go to homepage
  • About
  • DIY
    • ...Flower/Gardening Crafts
    • ... Bath and Body
    • ...Sewing/Fabric Crafts
    • ...Thrift Store/Upcycle
  • Gardening
    • ...Flower Gardens
    • ...Container Gardening
    • ...Indoor Gardening
    • ...DIY Garden Art
  • Decorate
    • ...Home Decor Projects
    • ...Spring Decor
    • ...Summer Decor
    • ...Fall Decor
    • ...Winter Decor
    • ...Room Makeovers
  • Recipes
    • ...Appetizers and Snacks
    • ...Dinner Recipes
    • ...Side Dish Recipes
    • ...Salad Recipes
    • ...Dessert
    • ...Drinks
  • Holidays
    • ...Valentine's Day
    • ...Easter
    • ...Mother's Day
    • ...Halloween
    • ...Thanksgiving
    • ...Christmas
  • Subscribe
  • Instagram
    • Facebook
    • Instagram
    • Pinterest
    • Twitter
  • subscribe
    search icon
    Homepage link
    • About
    • DIY
      • ...Flower/Gardening Crafts
      • ... Bath and Body
      • ...Sewing/Fabric Crafts
      • ...Thrift Store/Upcycle
    • Gardening
      • ...Flower Gardens
      • ...Container Gardening
      • ...Indoor Gardening
      • ...DIY Garden Art
    • Decorate
      • ...Home Decor Projects
      • ...Spring Decor
      • ...Summer Decor
      • ...Fall Decor
      • ...Winter Decor
      • ...Room Makeovers
    • Recipes
      • ...Appetizers and Snacks
      • ...Dinner Recipes
      • ...Side Dish Recipes
      • ...Salad Recipes
      • ...Dessert
      • ...Drinks
    • Holidays
      • ...Valentine's Day
      • ...Easter
      • ...Mother's Day
      • ...Halloween
      • ...Thanksgiving
      • ...Christmas
    • Subscribe
    • Instagram
    • Facebook
    • Instagram
    • Pinterest
    • Twitter
  • ×
    Home » DIY Projects

    Fabric Caddy/Bin Tutorial

    by Patti Estep · Jul 6, 2021

    Jump to How-to Card
    Two fabric boxes holding utensils
    Two fabric bins holding plastic ware over one of the bins showing the liner fabric.
    Fabric caddy holding plastic utensils

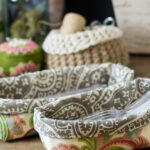
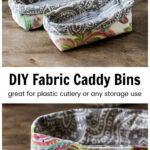
    This tutorial shows you how to make a fabric caddy or bin with two coordinating fabrics. Perfect for use at a party or picnic to hold utensils or really so many things.

    Two fabric bins to hold utensils in two different fabrics.

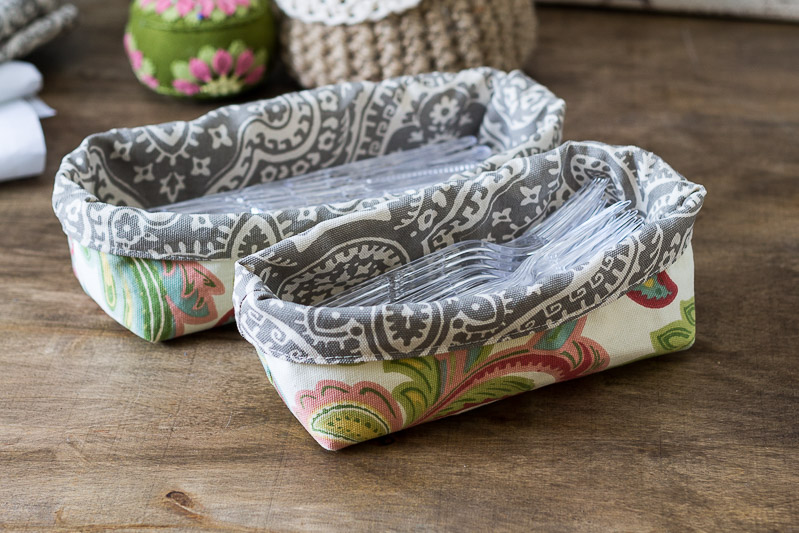
    Today I have a fabric caddy tutorial and the hardest part (but maybe the most fun), is choosing the fabric. I plan on using them for parties to hold plastic forks and knives.

    When we entertain there are usually more than 12 people attending, so my regular silverware is never enough. In the past, I have taken the time to wrap them up in a paper napkin, tied with a little ribbon. However, that takes a lot of time, and you end up finding little pieces of ribbon all over the place the day after.

    Supplies

    Makes one bin -  approx. 3 in. width x 9 in. length x 3 in. height

    1/2 yd - each two coordinating fabrics
    1/2 yd of mid-weight fusible interfacing
    coordinating thread


    Tip: To make a different size:

    Decide on the height, length, and width of the base
    Cut fabric pieces by using these equations:
    Height = Desired height + 2x width + 2 (seams & fold over)
    Length = Desired length + desired width + 1 (seams)


    How to Make a Fabric Bin Organizer

    Cut one 11 inch by 13 inch rectangle from each fabric and one from the fusible interfacing.

    Newsletter Signup
    Join Our Newsletter List!

    Be the first to receive new posts and get access to our Subscribers Only Page.

    Add interfacing to outside fabric piece.

    Iron the interfacing onto the outside fabric.

    Folded fabric step with right sides together.

    With right sides together, fold the fabric in half and sew the sides.

    Folding side seam to bottom to make a a seat.

    Open and place one of the side seams against the bottom line to create a point, or corner.

    Measure and mark corners for sewing.

    Mark a dot from the tip  of the corner to 1/2 the total width desired. In this case 1.5 inches.

    Draw line with a ruler on the corner.

    Draw a line at the dot with a ruler making sure that the distance equals your desired width. In this case 3 inches.

    Cut off corner after sewing.

    Sew along the line and then cut off the corner.

    Finished liner for inside fabric caddy.

    Turn right side out and you can start to see the bin taking shape. Complete the same steps for the outside fabric.

    Nesting liner and outer fabric bins right sides together.

    Next set the outside fabric with the interfacing inside the lining fabric bin, making sure the right sides are facing, the wrong side of the liner is on the outside, and the interfacing is on the inside. Match side seams and edges and pin together.

    Leaving a 2-3 inch opening, sew the top edges together.

    Pinned top of liner to main fabric.

    Turn the fabrics right side out and pin the opening closed. Top stitch along the edge.

    Finish fabric caddy bins for holding plastic ware.

    Fold over edge about one inch and your fabric caddy is complete. Fill with your utensils or whatever you'd like.

    These would be a nice gift for someone moving into a new home, don't you think? Change the dimensions as shown above, and make a deeper one for holding makeup or nail polish. I think they would be great for a dorm room too.

    The possibilities are many, and as I said, if you are like me, the biggest problem will be choosing the fabric.

    Patti signature

    More Easy Sewing Projects

    • Fabric Card Holders
    • DIY Potholders
    • DIY Makeup Brush Organizer Roll
    • Easy Snap Bag
    • Phone Charger Holder
    Fabric Utensil bins ~ fabric bin tutorial ~ gardenmatter.com
    Print

    Fabric Caddy/Bin Tutorial

    Learn how to make a pretty fabric caddy using fabric of your choice. These little bins can be used for so many things!
    Prep Time30 minutes mins
    Active Time1 hour hr
    Total Time1 hour hr 30 minutes mins
    Course: Crafts
    Yield: 1 Fabric Caddy
    Author: Patti Estep
    Cost: $10

    Equipment

    • Iron

    Materials

    • 1/2 yd - each two coordinating fabrics
    • 1/2 yd of mid-weight fusible interfacing
    • Coordinating thread

    Instructions

    • Cut one 11 inch by 13 inch rectangle from each fabric and one from the fusible interfacing.
    • Iron the interfacing onto the outside fabric.
    • With right sides together, fold the fabric in half and sew the sides.
    • Open and place one of the side seams against the bottom line to create a point.
    • Mark a dot from the tip  of the corner to 1/2 the total width desired.
    • Draw a line at the dot with a ruler to make sure the distance equals your desired width.
    • Sew along the line and then cut off the corner.
    • Turn right side out.
    • Complete the same steps for the outside fabric.
    • Set the outside fabric with the interfacing inside the lining fabric bin.
    • Make sure the right sides are facing, the wrong side of the liner is on the outside, and the interfacing is on the inside.
    • Match side seams and edges and pin together.
    • Leaving a 2-3 inch opening, sew the top edges together.
    • Turn the fabrics right side out and pin the opening closed.
    • Top stitch along the edge.
    • Fold over edge about one inch and your fabric caddy is complete. 
    Tried this project?Tag @hearthnvine on Instagram
    « Fresh Strawberry Cookie Recipe
    Baked Peach Fritters Recipe »

    About Patti Estep

    Patti is the creator of Hearth and Vine, a home and garden blog filled with projects to inspire your creative side. She loves crafting, gardening, decorating and entertaining at her home in Pennsylvania. When she is not working on a project at home or searching for treasures at nurseries and thrift stores with her girlfriends, you’ll probably find her with family and friends, at a restaurant, or home party enjoying new and different food adventures.

    Reader Interactions

    Comments

    1. Barb

      February 10, 2020 at 12:40 pm

      Do you have to use interfacing or can I use thin batting? Will the interfacing stay after washings?

      Can't wait to tackle these for our PSU tailgating!

      Reply
      • Patti Estep

        February 10, 2020 at 2:57 pm

        Barb, to be honest, I haven't washed mine. However, the interfacing I bought says it can be washed. Thin batting might work but it may not be as stiff as the interfacing. I don't see why you couldn't try it. Let me know how it turns out.

        Reply
    2. Helen

      June 27, 2019 at 10:45 am

      Love the pattern. Made some in horse fabric for the Triple Crown Races that I host. The problem with printing the pattern and instructions is all the commercials. I ended up with 18 pages to print so just read and sewed each step as I made them.

      Reply
      • Patti Estep

        June 27, 2019 at 11:59 am

        Helen, first of all, how great. I bet your horse inspired caddies were a big hit at the party. Secondly, I apologize for the ad interference. As you might have guessed this is how I make my living. However, I can see how big of a pain it must be to print out all of those pages. That being said I have a newer recipe card that also allows for tutorials now. I'm going to look into using it for my crafts. I hope that it will make a big difference for those of you who want to print. Thanks for bringing this to my attention and I'm so glad you liked the project overall.

        Reply
    3. Jessica

      July 03, 2017 at 8:17 pm

      Thanks for the fun tutorial! I whipped up a couple today for our 4th of July gathering tomorrow. Here's a pic:

      https://drive.google.com/file/d/0B2-NuFbHXJRiQ2xLS3pfeDhmR2c/view?usp=drivesdk

      Thanks again! First time visiting your site and I love it!

      Reply
      • Patti Estep

        July 03, 2017 at 8:39 pm

        Hi Jessica,

        Those are adorable and perfect for a 4th picnic.
        Thank you so much for sharing them.

        Have a great gathering and Happy Fourth of July!
        Patti

        Reply
    4. Julie

      January 18, 2017 at 2:18 pm

      Great tutorial thanks. I tried something similar a while back but used a thick foam type lining and it was just awful, way too bulky. Luckily I was able to take it apart and peel the foam lining off so the pieces of fabric were saved for another day. I'm inspired to try again now!

      Reply
      • Patti Estep

        January 18, 2017 at 3:28 pm

        Hi Julie,

        I hope you like it. They are firm but not super sturdy. I guess it's all a personal preference.
        I hope you are able to make them just to your liking.

        Thanks for stopping by,
        Patti

        Reply

    Leave a Reply Cancel reply

    Your email address will not be published. Required fields are marked *

    Recipe Rating


    Primary Sidebar

    Two fabric boxes holding utensils
    Two fabric bins holding plastic ware over one of the bins showing the liner fabric.
    Fabric caddy holding plastic utensils
    Patti Estep Profile Picture

    Hi!

    I'm Patti

    Join me to create lots of fun DIY projects, including crafts, gardening, home decor, and tasty recipes

    More about me

    Popular Posts

    • Baked zucchini bite on a slated tray with a bowl of horseradish sauce.
      Make Tasty Zucchini Bites in Under an Hour
    • Three tin cans in descending sizes hanging from twine.
      DIY Wind Chimes with Tin Cans
    • Blue jean crossover bag
      DIY Crossbody Bag from Jeans
    • Ham barbecue sandwich on plate
      Chipped Ham Barbecue Sandwiches - A Pittsburgh Favorite
    • Echievera planter
      What to do With a Stretched Succulent
    • Make a Mason Jar Oil Candle Lamp with botanicals and essential oils. ~ gardenmatter.com
      DIY Oil Candle - Gifts for the Holidays

    Footer

    Two fabric boxes holding utensils
    Two fabric bins holding plastic ware over one of the bins showing the liner fabric.
    Fabric caddy holding plastic utensils

    ^ back to top

    About
    Contact
    Privacy Policy
    Disclosure Policy

    Sign Up Here!
    for our
    newsletter &
    special offers

    Follow Me

    facebook
    Pinterest
    instagram

    As an Amazon Associate, I earn from qualifying purchases. i.e. as an Amazon Associate, I earn from qualifying purchases.

    Copyright © 2025 Hearth and Vine

    Rate This Recipe

    Your vote:


    A rating is required
    A name is required
    An email is required